qFT8 User Manual
Table of Contents
What is qFT8?
qFT8 is an Android phone app for amateur radio that decodes and transmits FT8 digital data messages using a QRPLabs QMX transceiver.

qFT8 does not currently support other transceivers. However, you may try qFT8 close to the speaker and microphone of a transceiver with VOX enabled, or connected with an audio jack to a transceiver input/output. You may also just try qFT8 without a transceiver: it transmits using the phone speaker and listens to signals using the phone microphone. Several phones running qFT8 can contact each other via audio when they are close enough.
qFT8 is a free app and does not contain ads. It will eventually be published as open source.
Luis Quesada Torres (HB9IPH) developed qFT8 in 2026, owns the copyright, and reserves all rights. Luis Quesada Torres is not affiliated with the creators of the FT8 digital mode nor with QRPLabs, and similarly neither the creators of FT8 nor QRPLabs have been involved in the development of qFT8, and do not endorse it in any way.
Key Features
- Quick setup
- Tracking callsigns rather than messages
- Quick setup
- Tracking callsigns rather than messages
- Manual CALL mode and AUTO operation
- Automatic NTP time synchronization
- Automatic approximate location
- ADIF logs import and export
- QRZ integration: uploads, confirmations
- Retry logic with configurable limits
- SOTA: CQ modifier, reference ADIF exports
- Web server for fully-remote operation
- Battery saving mode: runs with screen off
Quick Setup
Please ensure that you are using the right power supply for the transceiver (e.g. ≤12V for a QMX) or you will damage it.
Please also ensure that the USB-C cable that you're using to connect the phone and the transceiver is rated for data transfer. Most connectivity issues where qFT8 doesn't see the transceiver are due to using an incompatible cable or adapter.
Grant Initial Permissions
When opening qFT8 for the first time, it will request several permissions:
- Allow qFT8 to record audio: This permission is mandatory. qFT8 needs it to gather signals from the transceiver. qFT8 does not store, share, or upload any audio recordings.
- Allow qFT8 to access this device's approximate location: Optional but recommended. qFT8 uses it to obtain your Maidenhead grid locator, which is shared during FT8 exchanges. qFT8 does not access nor share precise location data.
- Allow qFT8 to send you notifications: Optional but recommended. qFT8 uses it to run as a foreground service, while minimized or with the screen off in order to save battery. Notifications are only active when connected to a transceiver.
- Let app always run in background: Optional but recommended. Required for qFT8 to function consistently while the screen is off.
Key Principle: qFT8 does not submit any information to a server dedicated to this app. All data processing happens locally on your device. You may explicitly authorize sharing callsign, date and time, and optionally approximate location if you enter a valid QRZ API Key.
For more details, see the qFT8 Privacy Policy.
Enter Callsign
Inputting a callsign is mandatory for qFT8 to function. If you do not intend to connect to an actual transceiver, any callsign can be input for testing purposes, e.g. XX1XXX.
qFT8 will ask you to input your callsign and acknowledge the following:
- You must hold a valid license to use this software while connected to a transceiver.
- You must not run the software unattended.
- Disclaimer of Liability: By using qFT8, you assume all responsibility for legal compliance, safety, and equipment damage.
Grant USB Connection Permission
When the transceiver is plugged in and qFT8 is open, a system dialog will appear:
"Open qFT8 to handle QMX Transceiver."
- This permission is mandatory for communication with the transceiver.
- If not granted, qFT8 will be able to receive signals but will not be able to transmit.
- You may select "Always open qFT8 when QMX Transceiver is connected" for convenience.
qFT8 automatically configures the QMX transceiver whenever it is connected, so there is no need to configure any of "VOX off", "Rise Threshold", "Fall Threshold", "Cycle Min", "Sample Min", "Discard", "IQ Mode", "Sideband Mode", or "RIT Status", etc. — they are handled automatically. Note that this configuration is temporary: the QMX settings menu will still show the values you persisted, and restarting the QMX will revert all settings to its normal operating condition.
The only thing to keep in mind is to switch the QMX to DIGI mode so the messages can be transmitted properly. qFT8 will remind you constantly if the QMX is not in DIGI mode.
↑ Back to Table of Contents[Optional] Import QSOs
You may now import your existing QSOs; there are two approaches. Both ways require going to settings using the right-most button in the bottom bar of qFT8.

The manual approach: Go to the "ADIF File Import" section in settings, click the "IMPORT QSOs" button, and select the .adi file to import.

The automatic approach: Requires an active QRZ paid subscription. Go to the "QRZ Syncing" section in settings, enter the QRZ API Key for your callsign, press "VALIDATE", and then click the "IMPORT QSOs FROM QRZ" button. This will also set up automated uploads to QRZ and confirmation checks.

Your First QSO With qFT8
At this point, the transceiver should be connected to the right power supply and the antenna, and all permissions should be granted. Make sure that the antenna is tuned to a band with a reasonable SWR (ideally consistently below 2) that will not trigger SWR protections. It is a bad idea to disable SWR protection in the QMX; it could damage the finals or the antenna tuner.
You may now choose the band you want to use in the bottom bar of qFT8 or in the transceiver. Setting it in one of them will sync it to the other.

At this point, the spectrogram will show signals and start decoding messages, and the Stations tab will be updating with the stations you're hearing.

Pressing the TX button (left-most button in the bottom) will enable transmission.
If everything is correct, the TX button will eventually light up with "TX Transmitting" and will show the transmission power and SWR (e.g., "5.0W SWR 1.2").

Given the "AUTO" mode is selected by default, qFT8 will start making QSOs and logging them in the Log tab.

You may tap in the spectrogram to change the Tx frequency offset, you may change sequence by tapping the 0 and 1 buttons in the bottom bar, you may tap the different "CALL" buttons to call specific stations, or you may tweak the bar with the "AUTO" button in the Stations tab to decide on the strategy. More on all of these advanced features in the following sections.
Note that qFT8 will start calling stations or, if none of them are reachable, will start calling CQ. Eventually, if everything is properly set up and the propagation is good, qFT8 will achieve QSOs.
If qFT8 is not receiving proper signals and not decoding messages, that is a clear sign that something is wrong: propagation in that band may be closed, the antenna may not be properly tuned, the antenna may not be properly connected to the transceiver, the transceiver may not be properly connected to the phone, or some of your equipment may not be functioning correctly. See the troubleshooting section below for common issues.
↑ Back to Table of ContentsIntro to the FT8 digital mode
FT8 is a digital protocol designed for multi-hop sporadic-E and other weak-signal conditions. It is characterized by structured messages and precise timing.
Cycles and Sequences
FT8 operates in 15-second cycles. Every communication cycle is strictly timed, starting exactly at 00, 15, 30, and 45 seconds of every minute. For this reason, your device's clock must be accurately synchronized to UTC time.
There are two sequences within the protocol:
- Sequence 0 (Even): Cycles starting at 00 and 30 seconds.
- Sequence 1 (Odd): Cycles starting at 15 and 45 seconds.
Stations generally alternate between transmitting and receiving. A station transmitting in Sequence 0 will listen for a response in Sequence 1, and vice versa. Within each 15-second cycle, the message is transmitted in a window between approximately +0.5s and +13s. This leaves time at the end of the cycle for decoding and at the beginning for preparing the next transmission.
Signal Characteristics
Each FT8 message is transmitted as a sequence of tones with slight frequency variations (sometimes described as "wiggliness"). An FT8 signal is very narrow, occupying only about 50Hz of bandwidth. This efficiency allows dozens of simultaneous conversations to fit within a single 3kHz radio band.
The 6 Stages of a QSO
A standard FT8 contact typically moves through six stages. Here is an example of an exchange between HB9IPH and XX1XXX:
- 1/6 CQ: A station looks for
anyone to talk to.
Example:CQ HB9IPH JN47
Note:JN47is a Maidenhead grid locator, which indicates the station's approximate geographic location. There may also be a CQ modifier, which is a note for other operators (e.g.,CQ SOTA HB9IPHfor the Summits On The Air program, orCQ US HB9IPHwhen trying to contact someone in the US). Both the modifier and location might not fit in the same message; in such cases, the location is omitted. If the callsign is very long, it is possible that neither the location nor the modifier will fit in the CQ! - 2/6 CALL: Another station
responds to the CQ.
Example:HB9IPH XX1XXX JO21
Note: The responder also shares their location (JO21), which may be omitted if the callsigns are too long to fit everything. - 3/6 RPT: The first station
sends a signal report.
Example:XX1XXX HB9IPH -10
Note: The signal report (e.g.,-10) indicates the signal strength relative to the noise floor in dB. - 4/6 RRPT: The second station
acknowledges the report and sends their own.
Example:HB9IPH XX1XXX R-12
Note: The "R" prefix confirms the previous report was received, followed by the signal report for the first station. - 5/6 RR73: The first station
confirms everything and sends a "Roger-Roger 73".
Example:XX1XXX HB9IPH RR73 - 6/6 73: The second station
sends a final "73" to close the contact.
Example:HB9IPH XX1XXX 73
Because of the Two Generals%27 Problem, it is theoretically impossible to know for certain that the other station received your last communication unless they confirm so. However, then you would need to confirm their confirmation, and they would need to confirm that, and so on. The FT8 digital mode mitigates this by having structured stages: a QSO can technically be considered complete after stage 4/6 (when both signal reports have been exchanged). In practice, to ensure both stations agree that the exchange happened, a QSO is logged when a station has received an RR73 and has sent out a 73. Effectively, either transmitting an RR73 or a 73 triggers the logging of a QSO.
Note that stations may also call other stations even if they haven't transmitted a CQ first. For example, stations in rare locations may have a "pile-up" of many stations calling them simultaneously; in such cases, the rare station may simply move from one QSO to the next without needing to invite new callers with a CQ.
Some stations may use RRR instead of RR73 in stage 5. In that case, the contact requires an extra exchange: the second station sends 73, and then the first station sends 73 again to finish.
FT8 also supports free text messages (up to 13 characters), but qFT8 does not currently support sending these custom messages.
Protocol Limitations and Fallbacks
FT8 messages are highly compressed into 77 bits. Sometimes, complex information (like long, non-standard callsigns) does not fit in the standard message format.
- Hashed Callsigns: If a callsign is too long, it may be sent as a hash.
If the receiving station has seen that callsign calling CQ recently, their software can map the hash
back
to the original callsign. Otherwise, it will be displayed as
<...>. It is much harder to achieve QSOs when your callsign is not standard. - Free Text Fallback: Some messages may be forced into the 13-character free text format, which is less robust than the standard structured messages.
- Non-standard Callsigns: If two stations both use very long, non-standard callsigns, they may be fundamentally unable to communicate with each other using the FT8 digital mode.
- Stage Skipping: If callsigns are too long, the protocol may not be able to fit signal reports (stages 3/6 and 4/6). In these cases, the exchange may skip directly from the initial CALL (2/6) to the final confirmations (5/6 and 6/6).
qFT8 User Interface
The qFT8 app is split in three parts:

- The bottom bar: Always visible, to oversee and control transmission and to control qFT8.
- The spectrogram: Always visible, to see decoded messages, see UTC time live and tuned frequency, and control transmission frequency offset.
- The tab area: Shows one out of three tabs (Stations, Log, and Settings). Which one is shown here can be controlled with the buttons at the right-most part of the bottom bar.
The following sections describe all these components in detail.
The Bottom bar
The bottom bar shows important information: the transmission armed/disarmed state, whether qFT8 is transmitting, the transmission power, the Standing Wave Ratio (SWR), the message being transmitted, the current and selected sequence, the band selector, and the buttons to navigate the different tabs.

These are the components of the bottom bar in detail:
- The cycle progress bar: The yellow bar starts at 0s within the cycle (left-most) and ends at 15s within the cycle (right-most).
- The Tx trigger marker: The red dot at the left part of the bar indicates the Tx trigger time. If Tx is ON (see item #4) and the current sequence is the selected sequence (see item #6) transmission starts at this point.
- The decoding time marker: The white dot at the right part of the bar indicates the decoding time, that is, when messages are decoded from signals received and subsequently processed.
- The TX button: Can be disarmed (OFF) or armed (ON). It also shows when transmission is happening, and the transmit power and SWR. It also shows when SWR protection in the transceiver has triggered.
- The message selector: It shows the message selected to be sent or being sent (if that is the case, highlighted in red). In AUTO mode, it is managed automatically. In CALL mode it is also managed automatically by default, but it can be tapped on to select the next message to send manually.
- The sequence selector: The yellow line on top of the buttons show the current sequence (0 or 1). Tapping on 0 or 1 selects that sequence for outgoing transmissions.
- The band selector: When a transceiver is connected, it changes the band in the transceiver.
- The Stations tab button: Opens the tab that lists all the stations you've heard or can communicate with.
- The Log tab button: Opens the tab that lists all the QSO you've made. This button will be marked with a yellow dot if you have QSOs that aren't uploaded to QRZ.
- The Settings tab button: Opens the tab to configure qFT8.
The Spectrogram
The spectrogram shows a peak view, and the waterfall with incoming signals and messages, outgoing signals and messages, markers for the change of sequence annotated with UTC time and time to decode, and the selected offset frequency for transmission.

These are the components of the spectrogram in detail:
- Waterfall view: Displays the recent history of received signals over time.
- Real-time peaks: Show the instantaneous strength of signals across the frequency range.
- Sequence separators: These red horizontal lines act as visual separators of cycles, and are annotated with UTC time and time spent decoding.
- Selected frequency offset: This vertical red overlay on the spectrogram indicates the currently selected frequency offset for transmission.
- Incoming messages, shown color-coded:
- Green: CQ messages.
- Cyan: Messages between other stations.
- Red: Your transmitted messages.
- Orange: Incoming messages directed to you.
- Current UTC time and sequence: Displayed at the top of the waterfall.
- Tuned frequency and band: Frequency and band the transceiver is currently tuned to.
- Frequency axis: Shows the frequency scale in Hz within the selected band.
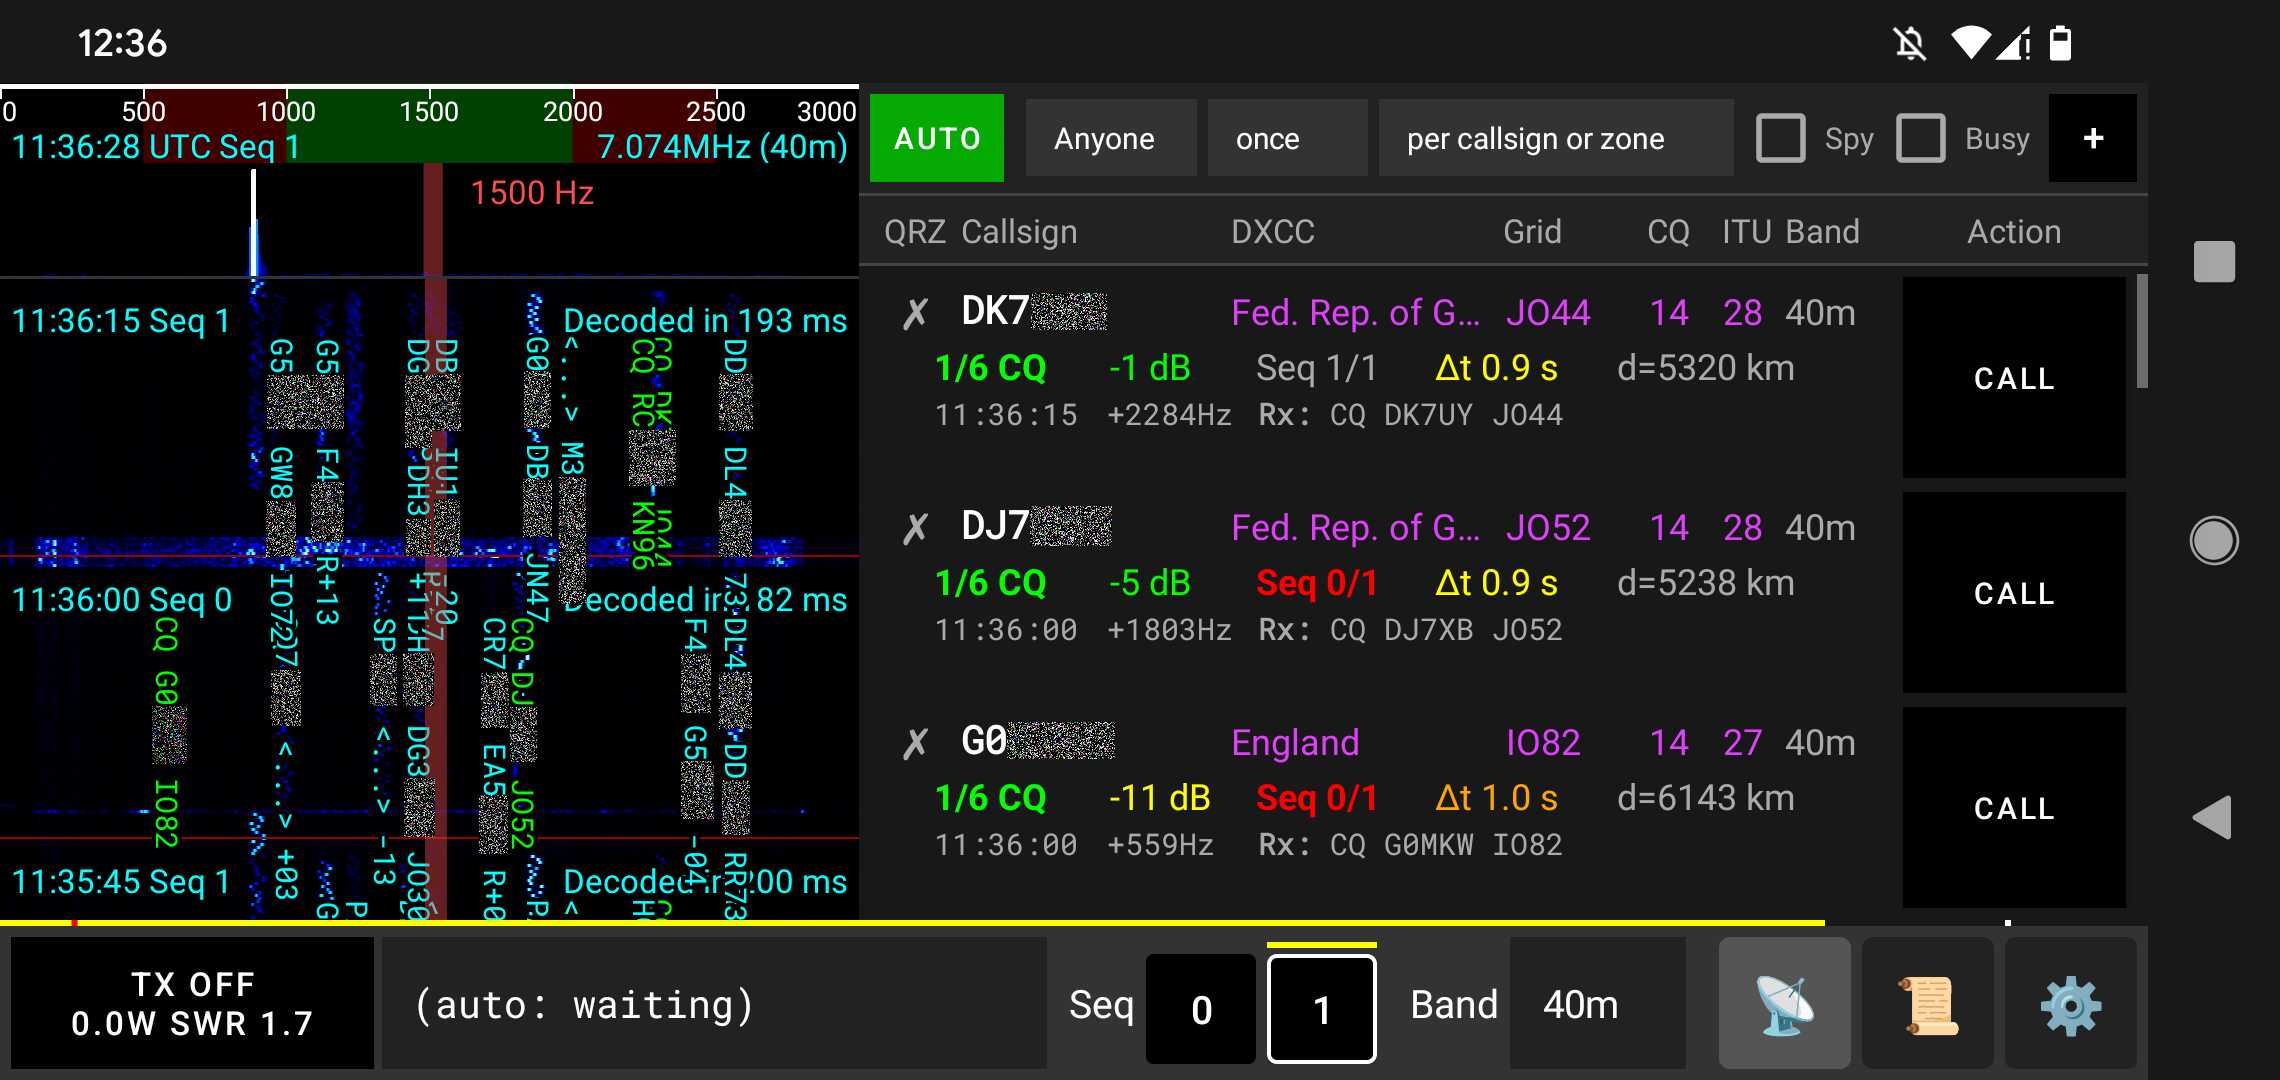
The Stations tab
The Stations tab is the command center for monitoring activity on the band and operating qFT8. It features filtering and automation controls at the top, followed by a list of active stations.

These are the components of the Stations tab in detail:
- AUTO call mode button: Engaging "AUTO" will try to call the best station according to the criteria selected by the user.
- Manual CALL mode button: Engaging "CALL" for a station will insist on calling that station until achieving a QSO, then will fall back to "AUTO".
- Target: Sets the criteria for the AUTO mode:
- Anyone: Any callsign that you don't have a QSO for yet.
- DXCC: Prioritize new countries/entities.
- Grid: Prioritize new Maidenhead grid squares.
- ITU zone: Prioritize new ITU zones.
- CQ zone: Prioritize new CQ zones.
- I/C/D/G: Prioritize first ITU zone, then CQ zone, then DXCC, then Grid.
- Call CQ: Just calls CQ and replies to any station that calls your station.
- Periodicity: How often to contact that target:
- once: In a lifetime.
- daily: Once per UTC date.
- weekly: Once every 7 days rolling window.
- monthly: Once every month rolling window.
- yearly: Once every year rolling window.
- Qualifier: How those constraints apply:
- per callsign or zone
- per band
- in different bands
- until zone confirmed
- per band + until zone confirmed
- Spy mode: When enabled, qFT8 will also try to call stations you haven't heard call CQ yet (marked as DIRECT). This is useful to have more stations at reach and join pile-ups.
- Busy mode: When enabled, qFT8 will also try to call stations engaged in a QSO with someone else (marked as BUSY). This is useful to join a pile-up.
- + button: Manually call any arbitrary station by inputting their callsign.
- Station information: Displays detailed status for each decoded station.
Individual station entries consist of four information-rich rows:
The first row shows station details (left to right):
- QSO Status: Indicates your QSO history with this station (✗ = no QSO, ✓ = logged locally, ★ = confirmed).
- Callsign: The station's callsign.
- DXCC: The country or entity this station's callsign belongs to.
- Grid cell: The Maidenhead grid square this station is reporting.
- CQ zone: The CQ zone this station's callsign belongs to.
- ITU zone: The ITU zone this station's callsign belongs to.
- Band: The band on which the station was last heard.
The second row shows communication status (left to right):
- State: Current phase of communication:
- DIRECT: Heard and seemingly free right now, but never called CQ.
- 1/6 CQ: Heard calling CQ and seemingly free right now.
- 2/6 CALL: Called you.
- 3/6 RPT: Sent you a signal report.
- 4/6 RRPT: Replyed back to your report with their own.
- 5/6 RR73: Confirmed your report with RR73.
- 6/6 DONE: QSO completed (73 exchanged).
- GONE: Not heard in the last couple of cycles.
- TOO LONG: Your callsign and their callsigns are too long together to establish a communication, per FT8 digital mode limits.
- Signal strength: Strength in dB (shows "????" if not heard recently).
- Sequence: The last sequence this station was heard transmitting in (0 or 1).
- Delta time (Δt): Time synchronization offset in seconds between their time and yours.
- Distance: Estimated distance between their and your station Grid cells.
The third and fourth rows show the last transmitted and last received messages, including UTC time, frequency offset, and the message text (prefixed with Rx: or Tx:).
Key visual indicators to watch for:
- Red Callsign: AUTO mode has surpassed the retry limit for this station. It will be temporarily ignored unless you click "CALL" to reset it manually.
- Purple Highlighted Zone: This zone/entity (DXCC, Grid, CQ zone, ITU zone) is a Needed target given your current filters.
- Red Sequence number: The station is on the same sequence you have selected, causing a clash. Pressing "CALL" will automatically switch your sequence.
- Red Band: The station was last heard on a different band.
Stations are automatically sorted by relevance. Changing your target criteria or constraints will immediately re-sort the list.
↑ Back to Table of ContentsThe Log tab
The log tab shows achieved QSOs.

These are the components of the Log tab in detail:
- Callsign text filter: A filter for QSOs based on whether the callsign contains the text inputted.
- Status filter: A filter for QSOs that shows:
- All: Shows all recorded QSOs.
- Confirmed: Shows only QSOs that have been confirmed.
- Not confirmed: Shows QSOs that are not yet confirmed.
- Not uploaded: Shows QSOs that haven't been uploaded to QRZ.
- Duplicated: Shows QSOs that QRZ recognizes as duplicates.
- Rejected: Shows QSOs that were rejected by the other station in QRZ.
- Wrong Callsign: Shows QSOs recorded with a callsign different from the one currently configured.
- Non FT8: Shows QSOs recorded for a mode other than FT8.
- Recent limit filter: A filter that shows only the most recent 100 QSOs with the given criteria.
- The list of QSOs: Displays the log entries with the following columns (from left to
right):
- QRZ: Indicates
your history with this station:
- ✗: No QSO records.
- ✓: Logged locally / Pending upload.
- ✓: Uploaded to QRZ.
- ★: Confirmed on QRZ or manually.
- 🛸: Non-FT8 mode.
- ♻️: Reported as duplicate by QRZ.
- ❕: Station callsign mismatch, already uploaded.
- ⚠️: Station callsign mismatch, not uploaded.
- ⛔: Rejected status.
- Callsign: The station's callsign.
- DXCC: The country or entity this station's callsign belongs to.
- Grid cell: The Maidenhead grid square this station is reporting.
- CQ zone: The CQ zone this station's callsign belongs to.
- ITU zone: The ITU zone this station's callsign belongs to.
- Band: The band on which the station was last heard.
- QRZ: Indicates
your history with this station:
Key visual indicators to watch for:
- Yellow note below callsign: This QSO is for a station different than the one configured.
- Cyan note below callsign: This QSO is in a mode other than FT8.
- Green Highlighted Zone (DXCC, Grid, ITU Zone, CQ Zone): This was the first unconfirmed QSO in your log for this zone.
- Yellow Highlighted Zone (DXCC, Grid, ITU Zone, CQ Zone): This was the first confirmed QSO in your log for this zone.
Editing QSOs: Tapping on any QSO in the list will open a prompt that allows manually marking a QSO as confirmed/unconfirmed locally in qFT8, or deleting a QSO locally in qFT8. Note that these actions are only local and are not synced to QRZ. Deleting a QSO in the app is irreversible, unless you keep an exported copy of the log file or it was uploaded to QRZ.
↑ Back to Table of ContentsThe Settings tab
The settings tab allows configuration of qFT8.

The settings tab is organized into the following sections:
Basic settings
- Callsign: Your amateur radio callsign. This is mandatory and must match the one in your license and you must comply with all regulations and limitations in order to transmit.
- CQ modifier: Optional text that will be appended to your CQ calls, often used for events (e.g., "SOTA").
- Time offset: Used to synchronize your device's clock with other stations. qFT8 automatically synchronizes this on startup if an internet connection is available. You can also manually trigger a synchronization by pressing the SYNC button.
- Location (Maidenhead grid): A coarsened representation of your station's location. This can be automatically updated on startup using your phone's GPS if the "Update on startup" checkbox is enabled. You can also manually update your location at any time by pressing the GPS button.
QRZ Syncing
This section handles integration with QRZ.com. Note that most automated features require a QRZ paid subscription. If you do not have a subscription, you can still use the ADIF File Import and Export sections (see the following two sections below) to manually sync your qFT8 log with QRZ.
To enable syncing with QRZ, obtain your API Key from the QRZ Logbook settings. Input the key and press VALIDATE to unlock the following features:
- Import button: Option to import QSOs from your QRZ logbook.
- Automatic behavior: Configure whether and when your QSOs are automatically uploaded to QRZ and checked for confirmation.
ADIF File Import
Allows you to import existing logs from standard `.adi` files.
ADIF File Export
Allows you to export your log to a .adi file. You can choose to export the full log or a specific time range. Filtering options allow exporting all QSOs, only confirmed ones (useful for award claims), or only those not yet uploaded to QRZ (for manual uploading). You can also add a Summits On The Air (SOTA) reference to the export for submission to SOTAData.
Contact Tracker
This section allows configuring when to automatically clean up stations from the Stations tab.
AUTO Mode
This section enables configuring the behavior of the automation logic, including how many times to retry calls with a single station.
FT8 Settings
This section enables fine-tuning the decoding algorithm (Fast vs. Deep), adjust decoding and Start Tx timing, and set PTT delays to ensure your transceiver transitions correctly between receive and transmit. You can also enable auto-scaling of the system volume for the transceiver.
Band Settings
This section enables configuring how qFT8 handles band information. You can set whether qFT8 and the transceiver should automatically exchange selected band info on connection. This section also allows you to customize which bands appear in the bottom bar selector.
Remote control web server
This section enables configuring the embedded web server for remote control. For more details, see the Remote Control Web Server section below.
PSK Reporter
This section provides a direct link to PSKReporter, pre-filled with your callsign, where you can see which stations have received your transmissions in the last 6 hours. Note: qFT8 only allows viewing your own spots; it does not automatically report spots of other stations to PSK Reporter.
Delete QSOs
This section enables removing QSOs from qFT8. Crucially, this only affects the local qFT8 log and does not impact records that were already uploaded to QRZ.com.
↑ Back to Table of ContentsAutomated operation (AUTO)
AUTO mode is the primary way to use qFT8. In this mode, the application automatically analyzes the decoded messages at the end of every cycle and selects the most relevant station to contact based on your target criteria.
How Target Selection Works
The Stations tab displays a list of active stations, sorted such that the most relevant candidates (based on your criteria) appear at the top. At the end of each decode cycle, qFT8 looks at this sorted list and attempts to call the first eligible station. If no eligible target is found, it will automatically start calling CQ to attract callers. qFT8 always replies to calls in AUTO mode.
Criteria and Filters
You can fine-tune the automation using the three dropdown menus at the top of the Stations tab:
- Target: Defines what "achievement" you are looking for (Anyone, DXCC, CQ Zone, ITU Zone, Grid).
- Interval: How often you are willing to contact the same entity (Once, Always, Daily, Weekly, Monthly).
- Qualifier: Narrow down the uniqueness requirement (Per callsign, Per band, Until zone/entity confirmed).
Manual Override: You can always manually intervene by tapping the CALL button for a specific station. This enters CALL mode for that specific QSO. Once finished, qFT8 seamlessly drops back into AUTO mode.
Retry Mechanism
To prevent qFT8 from calling a non-responsive station indefinitely, qFT8 offers a built-in retry and ban system, enabled by default. You can configure these in the Settings tab under Retry Logic:
- Retry Limit: The maximum number of times qFT8 will repeat a transmission stage for a station that isn't responding.
- Retry Window: The time period during which these attempts are counted.
- Retry Cooldown: If the limit is reached, the station is "Banned" for this duration. AUTO mode will ignore banned stations until the cooldown expires or the station replies.
Example Optimized Setups
Here are some recommended combinations of criteria for common goals:
| Goal | Target | Interval | Condition |
|---|---|---|---|
| Maximize unique stations | Anyone | Once | Per callsign or zone |
| Maximize unique stations per band | Anyone | Once | In different bands |
| Maximize unique DXCC entities | DXCC | Once | Per callsign or zone |
| Maximize unique DXCC per band | DXCC | Once | In different bands |
| Maximize confirmed DXCC entities | DXCC | Once | Until zone confirmed |
| Maximize confirmed DXCC per band | DXCC | Once | Per band + Until zone |
| Collect unique Grids per band | Grid | Once | Per band + Until zone |
| Work all Zones (CQ/ITU) | I/C/D/G | Once | Until zone confirmed |
| Contest: Unique stations on different bands | Anyone | Once | In different bands |
| Contest: Points for same station on different days | Anyone | Daily | In different bands |
Note that in all these cases, you may enable Spy and Busy to reach out to more stations and enter their pile-ups.
Note: If your callsign is not standard (e.g. with "/"-separated suffixes or prefixes, long callsigns, or other callsigns with numbers in rare positions), you probably want to set Target to Call CQ as your callsign will likely be sent out hashed and only stations who have seen you call CQ will be able to map the hash to your callsign. You may still call stations but they will only map the message to your callsign if they recently heard you call CQ.
↑ Back to Table of ContentsManual operation (CALL)
While qFT8 is highly automated, you can take control at any time. Tapping the CALL button next to any station in the Stations tab will immediately enter CALL mode and attempt to establish a QSO with that specific station.
Once the QSO for the manual target is completed (successfully or not), qFT8 will automatically fallback to AUTO mode and resume your previous automated strategy (e.g., calling CQ).
Timing for Manual Operators
If you find that you'd like more time at the end of the cycle to make manual decisions, you can get yourself more margin by adjusting the FT8 Settings in the Settings tab:
- Decrease "Start decoding time": Starts processing the audio earlier.
- Increase "Start transmission time": Delays the onset of your reply.
Warning: Adjusting these values aggressively into the margins may make your messages much more difficult for other stations to decode, as you are reducing the effective time available for the actual FT8 signal within the sync window.
ADIF Import/Export
qFT8 supports the standard ADIF (Amateur Data Interchange Format) for interoperability with other logging software, cloud services, and for manual backups.
Importing QSOs
The import feature allows you to bring records from other sources (like WSJT-X or backups from other devices) into your local qFT8 log.
- Filtering Options: You can choose whether to import only FT8 records or all modes, and whether to restrict the import to your current callsign or include all operators.
- Automatic Deduplication: qFT8 intelligently merges records. It prevents duplicates by matching QRZ Log IDs and QSO timestamps. If an imported record has a confirmed status or a valid Log ID that your local record is missing, qFT8 will "heal" your local entry by updating it with the better data.
- QRZ Full Import: Beyond importing local files, qFT8 can fetch your entire logbook directly from QRZ.com (requires a validated API key). This is the easiest way to sync your log across multiple devices.
Exporting QSOs
Tapping EXPORT QSOs generates an ADIF 3.1.6 file and opens the system Share sheet, allowing you to save the log to your device or send it via email/messaging.
- Time Range: You can export your entire history or use the UTC date/time pickers to isolate a specific activation or contest period.
- Status Filters: Useful for claiming awards (export "Confirmed Only") or for manual uploads to other services (export "Not Uploaded to QRZ" to avoid duplicates).
- SOTA reference: As detailed
in the SOTA section,
qFT8 can
automatically inject the summit reference into the
<MY_SOTA_REF>field of every exported record.
Note: For very large logs (over 100KB), qFT8 will display a warning as the deduplication and sorting process may take a few moments to complete on your mobile device.
QRZ Integration
qFT8 offers deep integration with QRZ.com to keep your logbook automatically synchronized. This feature requires a QRZ paid subscription (XML Logbook Data or higher).
How it Works
Once you have entered and VALIDATED your QRZ API Key in the Settings tab, you can enable "Upload QSOs to QRZ". From that point forward, qFT8 will manage your logbook in the background.
- Automatic Uploads: Every time a QSO is completed (successfully reaching the 6/6 DONE state), qFT8 immediately attempts to upload it to your QRZ logbook.
- Background Reliability: If an upload fails (e.g., due to no internet connection or server timeouts), qFT8 doesn't give up. A background worker will automatically retry failed uploads every 5 minutes. This process is silent and ensures your log eventually reaches the cloud once connectivity is restored.
- Smart Skipping: qFT8 protects your logbook integrity by only uploading QSOs that match your current configured callsign and the FT8 mode. Non-FT8 entries or QSOs for different callsigns (e.g., from an imported log) are skipped automatically.
Syncing Confirmations
The integration goes beyond just uploading. qFT8 also polls QRZ to see if your QSOs have been confirmed.
- Immediate check: 30 seconds after a QSO is completed and uploaded, qFT8 will check back with QRZ to see if the other station has also uploaded the QSO; if they have, the QSO will be synchronized as confirmed immediately.
- Automatic Sync: By default, qFT8 queries QRZ every 6 hours (configurable) in batches of 250 QSOs at a time, rotating through your entire unconfirmed log to ensure that even older QSOs are eventually checked for new confirmations.
- Confirmation Star (★): When QRZ reports a confirmation, the status icon in your Log tab will automatically change to a gold star.
- Manual Sync: Updates to the 250 least recently synchronized QSOs can also be triggered manually in the settings.
Pro Tip: You can see the sync progress in settings under "Oldest QSO synced for confirmation". There's no urgency in keeping this up to date, as qFT8 will take care of it over time.
Summits On The Air (SOTA)
qFT8 is designed to be a powerful tool for SOTA (Summits On The Air) activators. Here are the steps to configure qFT8 for a successful activation:
1. Set your CQ Modifier
Go to the Settings tab and find
the CQ modifier option. Set this
to
SOTA. From now on, every time you
call CQ,
qFT8 will transmit
CQ SOTA [Callsign], alerting chasers
that you are activating a summit.
2. Configure AUTO Mode
In the Stations tab, find the first dropdown menu (the target selector) and set it to Call CQ. Then, engage AUTO mode.
3. Start Activating
Press the TX button in the bottom bar to enable transmission.
Once enabled, qFT8 will automatically call CQ and reply to any stations that call you. Since the goal of an activation is to gather QSOs, qFT8 will always reply to callers, even if you have had QSOs with them in previously logged sessions.
Manual Overrides: Several stations may reach you at once. If you want to prioritize a specifically interesting station while CQing, you can manually tap the CALL button for that station. Once the QSO is completed, qFT8 will automatically fallback to calling CQ.
4. Exporting your SOTA Log
When you wrap up your activation, you can export a valid ADIF log specifically for SOTAData:
- Go to Settings and tap ADIF File Export.
- Choose Selected time range and specify the UTC start and end times of your activation.
- Set the filter to All QSOs.
- In the Event selection, select SOTA.
- Input your summit reference (e.g.,
XX/GG-111). - Press EXPORT QSOs. This generates an ADIF file with the necessary SOTA fields pre-filled and ready for upload.
Remote Control Web Server
qFT8 includes an embedded HTTP server that allows you to monitor and control the application from any web browser on your network. This is particularly useful for remote operation or as a secondary display.
This is how the Spectrogram/Stations view looks like in the remote control web server:

It allows operating with the AUTO button, criteria dropdown, + button to directly add callsigns, and the list of stations with CALL buttons to manually call them.
And this is how the Spectrogram/Log view looks like:

This view shows the most recent log entries.
Network & Connectivity
The server opens a specific TCP port (default 13497) on your phone. To access it, your devices must be able to "see" each other on the network:
- Local Network: Both the qFT8 phone and your control device (computer, tablet, or another phone) must be on the same Wi-Fi network.
- Router Settings: Some routers have a feature called AP Isolation (or Client Isolation) enabled by default. This must be disabled for devices to communicate with each other.
- Mobile Hotspot Scenario: If you are in the field, you can open a Wi-Fi hotspot on one phone (with internet) and connect the qFT8 phone to that Wi-Fi network. After connecting, close and reopen the web server in qFT8 settings; the IP address shown will then be accessible from the hotspot-providing phone.
- Internet Access: Accessing the server from outside your home (over the internet) requires Port Forwarding in your router settings (mapping the internal IP and port to an external one). Note that this generally will not work over 5G/LTE connections due to carrier NAT restrictions.
Access Levels
You can configure the remote security level in the settings pane:
- Read only: Allows viewing the live spectrogram, active stations, and the QSO log. No actions can be performed.
- Read + Stop TX: Primarily a safety mode. Allows viewing all data and permits disarming the transmitter (stopping TX) in case of an emergency, but does not allow starting TX or changing settings.
- Full control: Grants complete authority over the application, enabling all interactive features.
Security Note: Anyone with access to your network, IP address, and port will have the level of control you have configured. If set to Full control, they could potentially start transmitting using your station.
Capabilities
In Full control mode, the web interface offers nearly everything the app UI does:
- Operation Modes: Toggle between AUTO and manual CALL modes.
- Strategy: Change the AUTO criteria (Anyone, DXCC, Grid, etc.) and search constraints.
- Transmission: Manually start/stop TX, choose specific TX messages, and change the FT8 sequence (0/1).
- Frequency & Band: Tap the web spectrogram to move your frequency offset or change the active radio band.
Note: The web UI is designed to remain responsive even if the physical phone's screen becomes sluggish due to RF interference, providing a reliable fallback for control.
Note: The web server will function when the screen is off if the settings to run in background are enabled (the default is to keep running in the background when qFT8 is connected to a transceiver).
Troubleshooting
Instead of receiving signal from the transceiver, qFT8 is getting audio from the microphone
This indicates that the phone is using its internal microphone because it doesn't recognize the transceiver as an external audio source. The most common causes are:
- The USB cable is not rated for data (charge-only cable).
- The USB adapter (OTG) is faulty or incompatible.
- The cable is plugged in the wrong direction (some cables are directional).
Try: Using a different USB cable, a different adapter, or flipping the cable connections.
Not receiving any signal at all; the waterfall is pitch black
If the waterfall remains entirely black both when the transceiver is connected or disconnected, qFT8 likely lacks the necessary permissions to access audio.
Try: Go to your phone's Settings > Apps > qFT8 > Permissions and ensure that Microphone (or Audio recording) is allowed while using qFT8. Alternatively, fully uninstall and reinstall qFT8 and accept all permission prompts on the first launch.
Signals are visible, but no messages are decoded
If you see vertical "wiggly lines" in the waterfall (FT8 signals) but no text appears in the Stations tab, perhaps your clock is not synchronized.
Try: Check your device clock. If the signals don't fit perfectly between the red horizontal sequence separators, your device clock is likely off. Ensure you have internet access and reopen the app to trigger an NTP sync.
If no wiggly stripes appear at all in the waterfall, perhaps the band is closed or your antenna is disconnected/untuned.
Try: Ensure your radio is actually receiving signals from the air.
Messages are decoded too late
The phone processor may be too slow to decode messages on time.
Try: Make sure you switch to Fast decode in the settings, and feel free to move decoding time earlier (e.g. to 13000ms) to create more margin for decoding, at the expense of potentially missing some late messages every cycle.
Frequent "QMX disconnected" and "QMX connected" messages
This is almost always a hardware connectivity issue. USB connections are sensitive to vibration, cable quality, and fluff phone raccoons dwelling in the USB port.
Try: Using a high-quality, short USB cable, and ensure the port on your phone is clean and the connection is tight.
Getting "SWR Protection" errors and QMX shows "S" (SWR Protection) after frequency
This means your antenna is not properly tuned for the current band, and the QMX has stopped transmitting to protect its circuitry.
- Legacy Firmware: On QMX firmware older than 1.03.000, you must manually reset the transceiver (off/on) or enter and leave the TUNE menu on the QMX to clear the error.
- Firmware 1.03.000+: You can set "SWR Protection reset options" to Timer or TX->RX in the QMX menu. This allows qFT8 to continue operating without you having to touch the transceiver physically.
SWR protection kicks in but QMX doesn't show "S" (SWR Protection) after frequency
qFT8 determines that SWR protection engaged by checking that the output power is 0W during a transmission. When this happens, you will see (SWR Protection) after the frequency in the bottom bar.
If the QMX itself doesn't show the "S" (SWR Protection) icon, it is likely that the transceiver is simply not receiving any audio signal from the phone to start transmitting.
Try: Check the signal indicator on your QMX. A single dot means no audio, two dots mean there's audio but it's not loud enough. Ensure your phone volume is set to ~90%. qFT8 tries to automate this, but some Android versions may block external volume control.
What is the qFT8 Android notification?
This notification allows qFT8 to continue processing audio and managing QSOs when you minimize the app or turn off the screen.
- By default, it triggers automatically when a transceiver is plugged in.
- You can disable this in qFT8 settings, but qFT8 will stop working in the background.
- You can press STOP in the notification to fully close qFT8.
qFT8 stops working when the screen is off
Some Android manufacturers implement very aggressive battery optimizations that may kill background apps even if you granted the initial permissions.
Double check that you granted the permissions: Go to your phone's Settings > Apps > qFT8 > Battery and select "Unrestricted" (or "Don't optimize").
Buttons act weird or the screen is unresponsive during TX
This is caused by RF Interference (RFI). If your antenna is close to the phone or the cable is poorly shielded, the radio energy can interfere with the touch digitizer.
- Tip: Use a shielded USB cable or clip a ferrite bead onto the cable.
- Note: qFT8 intentionally locks the AUTO and CALL buttons during transmission to prevent accidental changes, but RFI can affect other parts of the screen. The Web Server remains fully functional during TX as a reliable fallback.
The app looks different than the screenshots in this manual
If the color looks different or some parts of the UI with a specific color are missing (e.g. the yellow progress bar, the sequence selectors, etc.) this may be caused by your phone dark mode, that is actually altering the app palete.
Try: This seems a bad implementation of dark mode - you may try reverting it, it is likely to fix this issue.
qFT8 says "NO QMX" even though QMX transceiver is connected
The issue is likely that you didn't grant the permissions to connect qFT8 to the QMX transceiver. Sometimes this happens because you tap somewhere out of the permission dialog and the dialog closes.
Try: Disconnect and reconnect the QMX transceiver, this should trigger the prompt again. For comfort, mark the option "Always open qFT8 when QMX Transceiver is connected" so you never hit this issue again.
qFT8 shows distance in miles and I want it in kilometers (or vice versa)
This comes from the operating system locale (i.e. language selection).
Try: Switching that configuration to the right country (e.g. English (United States) for miles, English (United Kingdom) for kilometers) will fix it.
qFT8 hangs or behaves strangely
If this happens only during transmission, it is likely extreme RFI as mentioned above. If it happens at other times, please scroll to the bottom of the Settings tab and use the "Email me to report issues and bugs" link.
↑ Back to Table of Contents