qFT8 ユーザーマニュアル
目次
- What is qFT8? / qFT8とは?
- Quick Setup / クイックセットアップ
- Your First QSO With qFT8 / qFT8での最初のQSO(交信)
- Intro to digital modes / デジタルモードの概要
- qFT8 User Interface / qFT8 ユーザーインターフェース
- 自動運用(AUTOモード)
- 手動運用(CALLモード)
- ADIFログのインポート・エクスポート
- QRZ連携
- LoTW Integration
- Summits On The Air (SOTA) / Summits On The Air(SOTA)
- Parks On The Air (POTA) / Parks On The Air(POTA)
- JS8Chat / JS8チャット
- WSPR モード
- Remote Control Web Server / リモートコントロール Webサーバー
- Troubleshooting / トラブルシューティング
What is qFT8? / qFT8とは?
qFT8 is an Android phone app for amateur radio that decodes and transmits FT8, FT4, FT2, LQ8, JS8, or WSPR digital data messages using a transceiver.

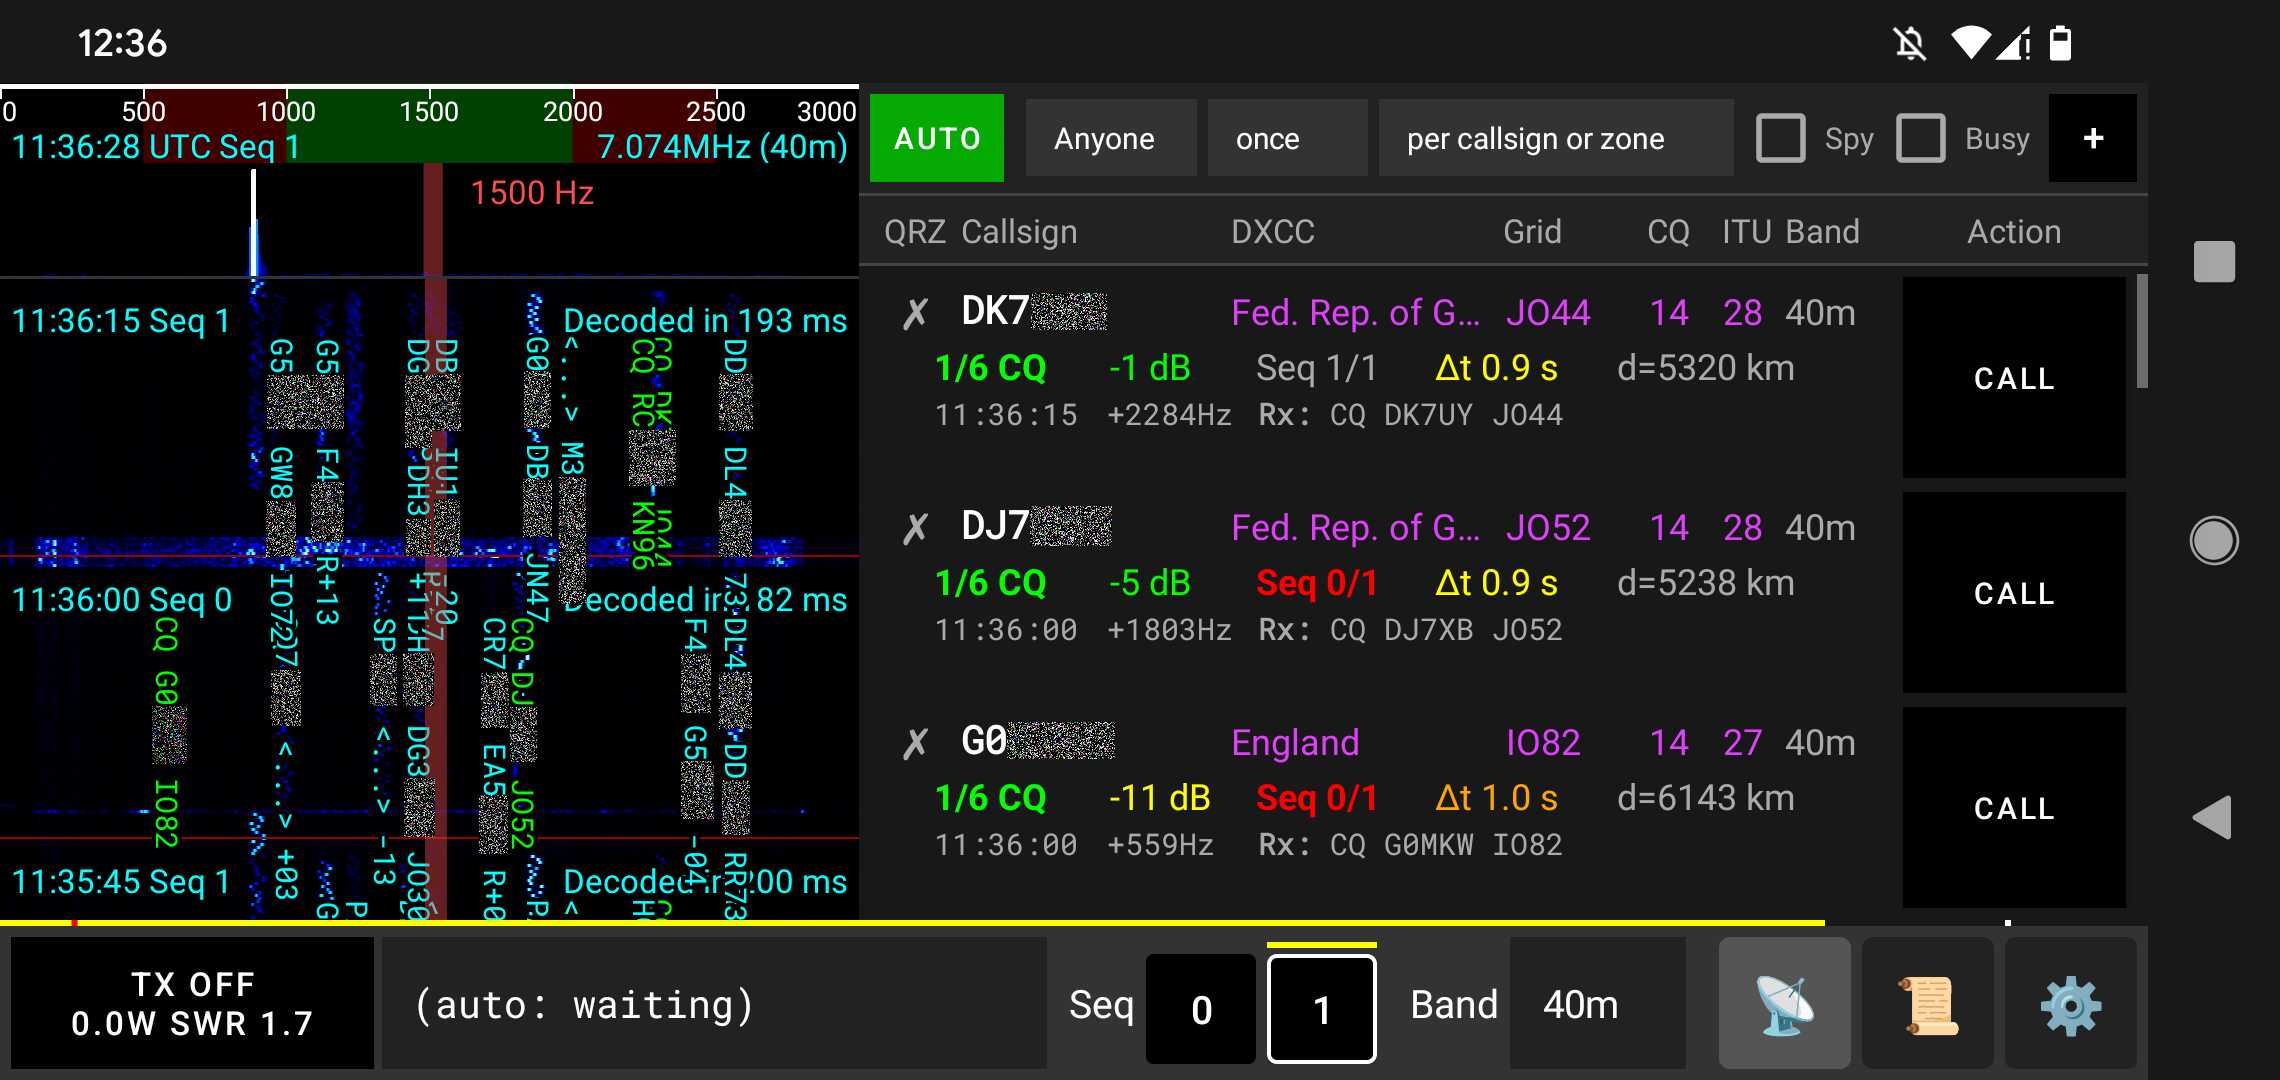
Although qFT8 features out-of-the-box (plug-and-play) support for the QMX and ICOM 7300, you may also use it with any transceiver by placing the phone close to the speaker and microphone with VOX enabled, or using an audio link cable. You may also just try qFT8 without a transceiver: it transmits using the phone speaker and listens to signals using the phone microphone. Several phones running qFT8 can contact each other via audio when they are close enough.
qFT8 is a free app and does not contain ads. The license for its source code will be decided when the source code is released (LICENSE).
Luis Quesada Torres (HB9IPH) developed qFT8 in 2026, owns the copyright, and reserves all rights.
qFT8 includes parts from usb-serial-for-android (Copyright © 2011-2020 Google Inc., Mike Wakerly, Andreas Butti, Kai Morich, BSD-3-Clause), Roboto (Copyright © 2015 Google / The Roboto Project Authors, Apache-2.0), Roboto Mono (Copyright © 2015 Google / The Roboto Mono Project Authors, OFL-1.1), Natural Earth (Public Domain), hamradio-zones-geojson (Copyright © 2024 HB9HIL, HA8TKS, MIT license), and Big CTY (Copyright © Jim Reisert AD1C). これらのサードパーティ著者およびプロジェクトは、qFT8を推奨または提携するものではありません。
Key Features / 主な機能
- Quick setup
- Supports 50+ radios
- Manual CALL mode and AUTO operation
- Automatic NTP / GPS time synchronization
- Automatic approximate location
- ADIF logs import and export
- QRZ / LoTW integration: uploads, confirmations
- Retry logic with configurable limits
- SOTA / POTA: CQ modifier, reference ADIF exports
- Web server for fully-remote operation
- Battery saving mode: runs with screen off
Supported Devices / 対応デバイス・無線機
qFT8 supports three main ways of connecting your transceiver:
Direct CAT/Audio Transceivers (USB Cable Control)
These transceivers are directly supported via a USB cable, which handles both CAT control (for frequency tuning and PTT keying) and high-quality USB audio transmission:
- QRPLabs QMX or QMX+
- QRPLabs QDX or QDX-M (this device does not have W or SWR meter, though)
- ICOM IC-7300 and ICOM IC-7300 MK2
- ICOM IC-705
- ICOM IC-7610
- ICOM IC-7851
- ICOM IC-7100
- ICOM IC-7200
- ICOM IC-9700
- ICOM IC-7600
- ICOM IC-7410
- ICOM IC-9100
- ICOM IC-7000
- ICOM IC-706MKIIG
- ICOM IC-746 / IC-746PRO
- ICOM IC-756PRO / PRO2 / PRO3
- ICOM IC-7700
- ICOM IC-7800 / IC-7850
- Yaesu FT-891
- Yaesu FT-710
- Yaesu FTX-1
- Yaesu FT-991 / FT-991A
- Yaesu FT-DX10
- Yaesu FTDX101
- Elecraft K4 / K4D / K4HD
- Elecraft K3 / K3S
- Elecraft KX3
- Elecraft KX2
- Elecraft KH1
- Elecraft K2 (requires KIO2 module)
- Xiegu X6100
- Xiegu X6200
- Kenwood TS-480 / TS-590 / TS-2000 series
- FX-4CR
- QuantumSDR
- (tr)uSDX / uSDX+ / usdr
Note on External Interfaces (Digirig, generic USB-serial cables): Auto-detection (AUTO) is designed for transceivers with native USB controllers or model-branded cables. When using a generic external interface (like Digirig), auto-detection only sees the generic interface chip and defaults to VOX mode. To use CAT control with radios connected via external interfaces (e.g., Lab599 TX-500), please manually select your transceiver model in the Transceiver Settings menu.
More devices are supported via VOX, which is a partial audio-only integration.
Note: For safety reasons, qFT8 does not allow changing the Tx power of the transceiver. Adjust power manually in your transceiver.
Other transceivers
- Supported via speakers/mic but not ideal
- Supported via generic audio connection
Quick Setup / クイックセットアップ
Please ensure that you are using the right power supply for the transceiver (e.g. ≤12V for a QMX) or you will damage it.
Please also ensure that the USB cable and adapter you are using to connect the phone and the transceiver is rated for data transfer. Note that for devices that use connectors other than USB-C, a specific OTG (on-the-go) cable is often required. Most connectivity issues where qFT8 doesn't see the transceiver are due to using an incompatible cable or adapter.
Some Android devices have USB OTG disabled by default. This must be enabled in your device settings (the option may be hidden in advanced, system, or additional settings). If you are having connection issues—in particular if you are able to receive signal from qFT8 but not transmit and CAT commands don't work even when the device is fully supported (shown in the device dropdown, autorecognized in AUTO mode, etc.)—this is very likely the cause.
一部のAndroid端末では、USB OTGが無効(オフ)に設定されている場合があります。端末の設定からこの機能を有効にする必要があります(詳細設定、システム設定、またはその他の追加設定に配置されていることがあります)。接続トラブルが発生している場合、特に「qFT8で信号は受信できるが送信ができない」「無線機が完全に対応機種(ドロップダウンに表示される、AUTOモードで自動認識されるなど)であるにもかかわらずCATコマンドが機能しない」という場合は、このOTG設定が無効になっている可能性が極めて高いです。
Grant Initial Permissions / 初期権限の許可
When opening qFT8 for the first time, it will request several permissions:
- Allow qFT8 to record audio: This permission is mandatory. qFT8 needs it to gather signals from the transceiver. qFT8 does not store, share, or upload any audio recordings.
- Allow qFT8 to access this device's approximate location: Optional but recommended. qFT8 uses it to obtain your Maidenhead grid locator, which is shared during FT8 exchanges. qFT8 does not access nor share precise location data.
- Allow qFT8 to send you notifications: Optional but recommended. qFT8 uses it to run as a foreground service, while minimized or with the screen off in order to save battery. Notifications are only active when connected to a transceiver.
- Let app always run in background: Optional but recommended. Required for qFT8 to function consistently while the screen is off.
Key Principle: qFT8 does not submit any information to a server dedicated to this app. All data processing happens locally on your device. You may explicitly authorize sharing callsign, date and time, and optionally approximate location if you enter a valid QRZ API Key.
For more details, see the qFT8 Privacy Policy - License.
Enter Callsign / コールサインの入力
Inputting a callsign is mandatory for qFT8 to function. If you do not intend to connect to an actual transceiver, any callsign can be input for testing purposes, e.g. XX1XXX.
qFT8 will ask you to input your callsign and acknowledge the following:
- You must hold a valid license to use this software while connected to a transceiver.
- You must not run the software unattended.
- Disclaimer of Liability: By using qFT8, you assume all responsibility for legal compliance, safety, and equipment damage.
Grant USB Connection Permission / USB接続権限の許可
When the transceiver is plugged in and qFT8 is open, a system dialog will appear:
"Open qFT8 to handle Transceiver."
- This permission is mandatory for communication with the transceiver.
- If not granted, qFT8 will be able to receive signals but will not be able to transmit.
- You may select "Always open qFT8 when Transceiver is connected" for convenience.
If you have issues connecting the Android device, check the Android device doesn't recognize the transceiver or it gets disconnected / Android端末がトランシーバーを認識しない、または切断される troubleshooting section.
qFT8 automatically configures the transceiver whenever it is connected.
↑ 目次へ戻る[QMX Only] Audio Check / [QMX専用] オーディオ確認
Before you start operating, it is important to verify that the audio signal between your phone and the QMX is working correctly. Press the TX button and wait for the QMX to start transmitting in one of the next sequences.
Everything is working
If the TX button shows power output (e.g. 5W), everything is working correctly. On the QMX LCD, you should see a bar under the "A" VFO marker at the top-left of the screen — this means the QMX is receiving a good audio signal from the phone. You should also confirm that there is no "S" shown after the frequency on the LCD, which would indicate SWR protection.
"S" shown after the frequency
If the QMX LCD shows an "S" after the frequency, it means SWR protection has engaged. Your antenna is not properly tuned for the current band. You can use the SWR check option in the QMX menu to measure the SWR and will need to tune your antenna.
- Firmware 1_04_004+: qFT8 automatically resets SWR protection at the end of the cycle.
- Firmware 1_03_000+: You can set "SWR Protection reset options" to TX->RX in the QMX Protection menu, so it resets automatically.
- Legacy firmware (older than 1_03_000): You must enter and leave the TUNE menu on the QMX or power cycle it to reset SWR protection.
Two dots instead of a bar
If the QMX shows two dots instead of a bar under the "A" VFO marker at the top-left of the screen, the audio volume is either too low or too high.
Try: Go to qFT8 Settings, find the "Set system volume to [X] when transmitting" option, and try different values (e.g. 70%, 80%, 60%, 100%). One of these should turn the two dots into a bar.
On some phones, this option may not work. In that case, uncheck it and manually adjust your phone volume to different values (100%, 90%, 80%, etc.) until the bar appears.
Also, common-mode current may be impacting the QMX behavior, and adding a common-mode choke to the antenna may help with audio issues as well.
Nothing under the "A"
If there is no bar and no dots under the "A" VFO marker at the top-left of the QMX LCD screen, the phone may not be properly controlling the transceiver. This usually means USB permissions were not granted or were accidentally dismissed. Receiving will work, but transmitting will not.
Try: Unplug the QMX from the phone and plug it back in — the permission dialog should appear again. It may also be that the cable is not suitable for the QMX; try a different USB-C cable.
Once you see a bar under the "A" VFO marker at the top-left of the QMX LCD screen and power output in the TX button, your QMX is properly set up and ready to operate!
↑ 目次へ戻る[Optional] Import QSOs / [オプション] QSOログのインポート
You may now import your existing QSOs; there are two approaches. Both ways require going to settings using the right-most button in the bottom bar of qFT8.
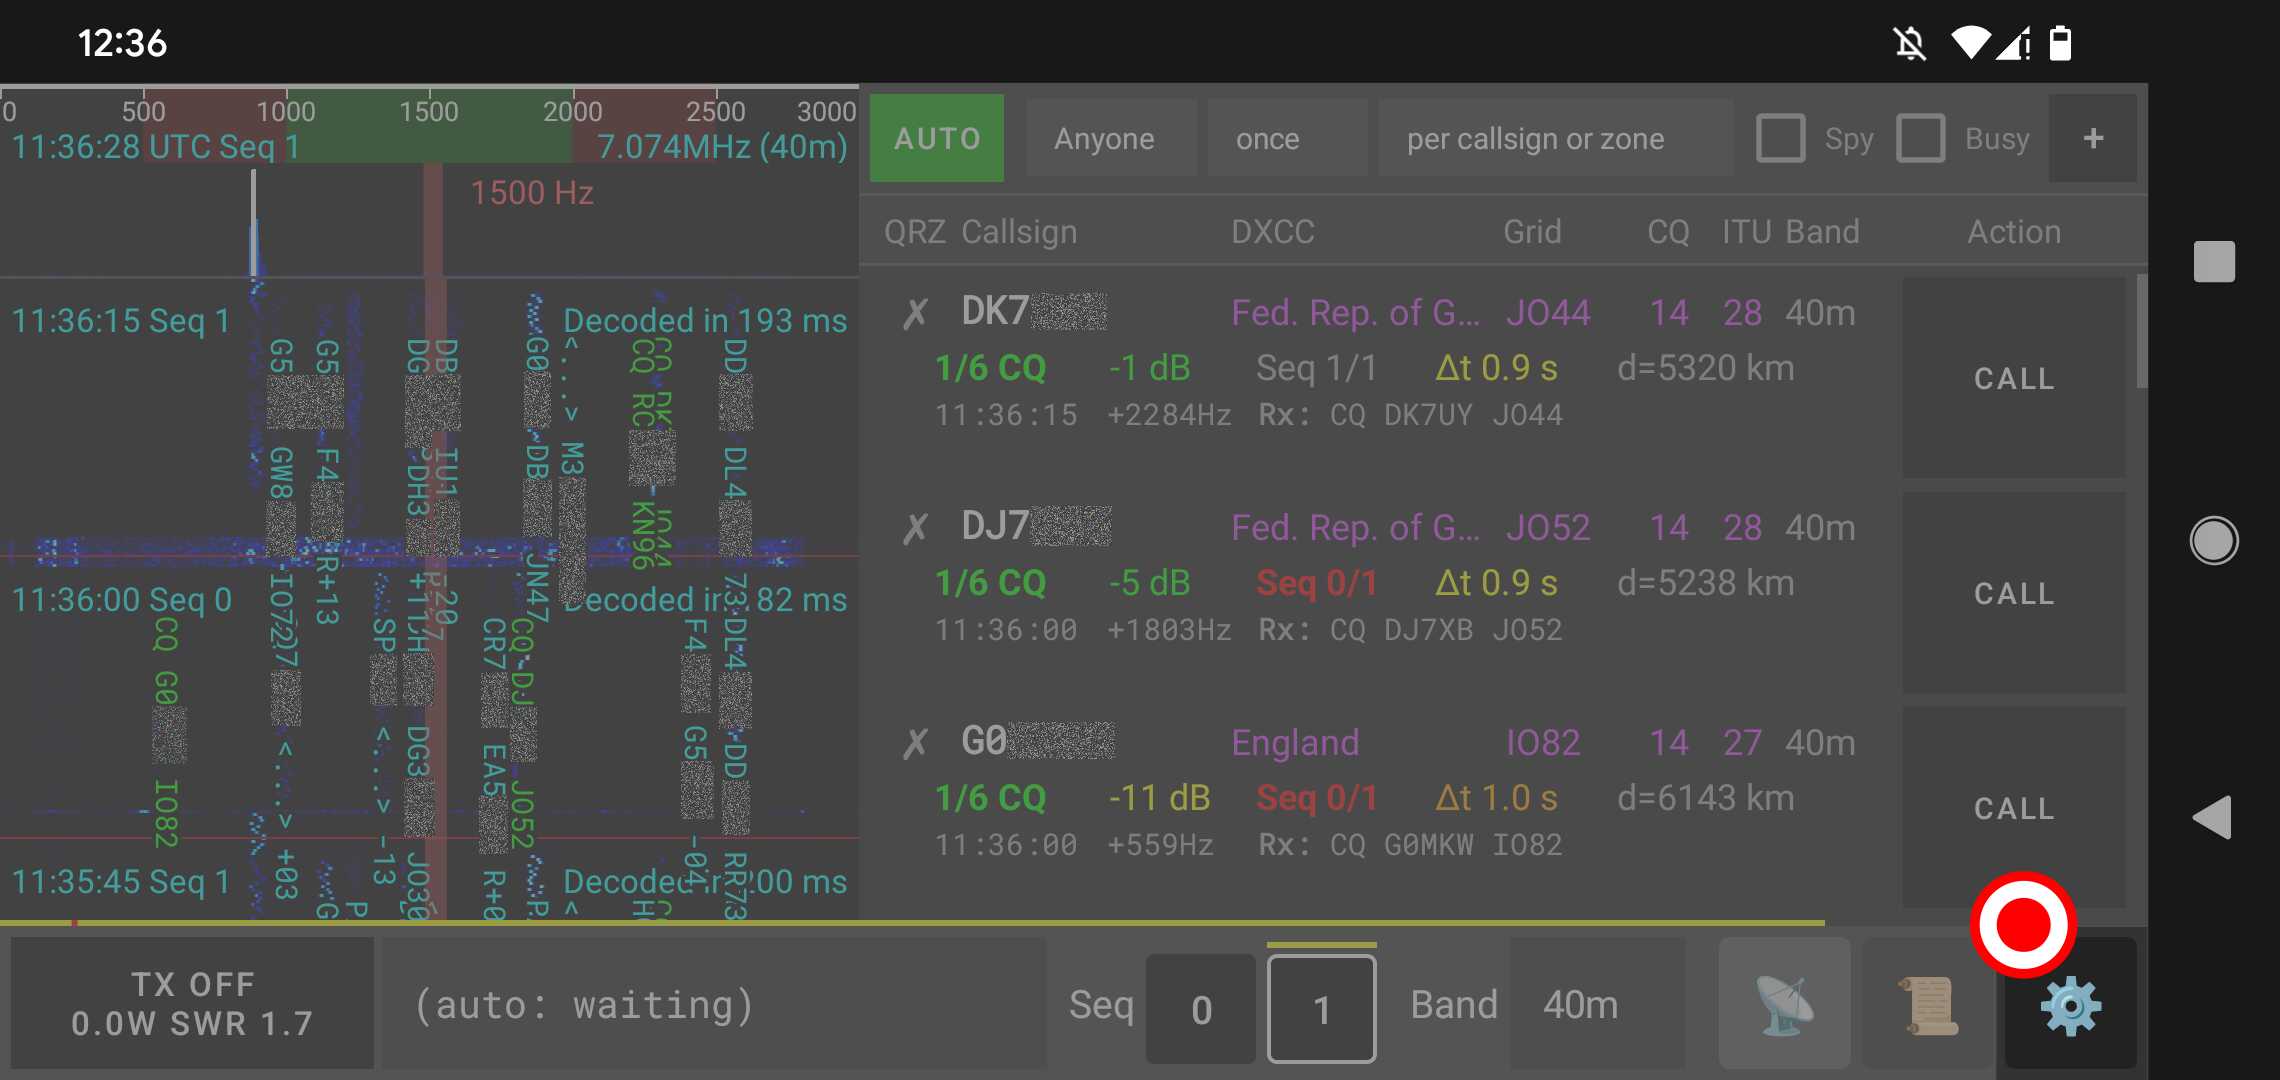
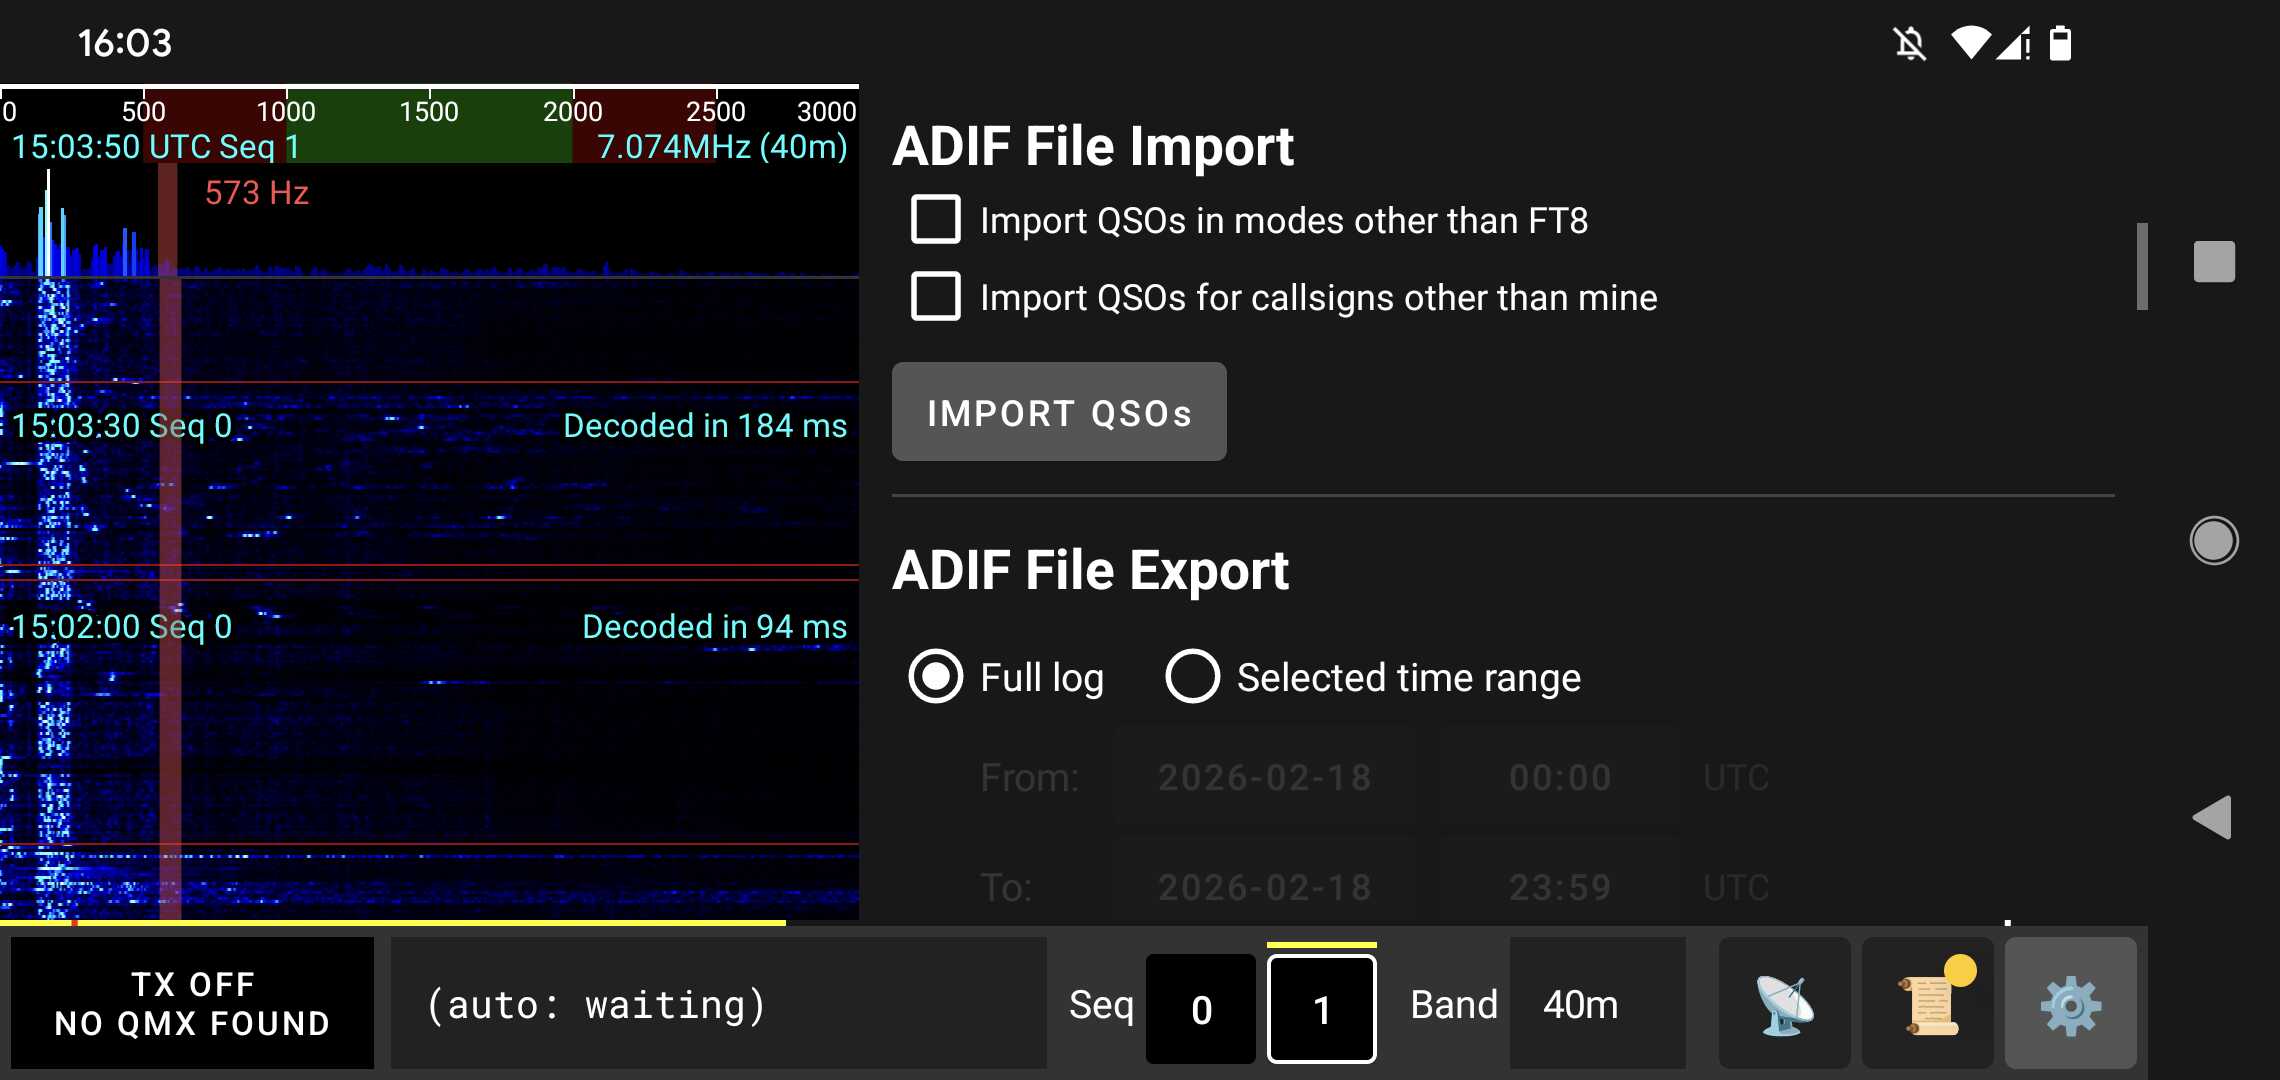
The manual approach: Go to the "ADIF File Import" section in settings, click the "IMPORT QSOs" button, and select the .adi file to import.
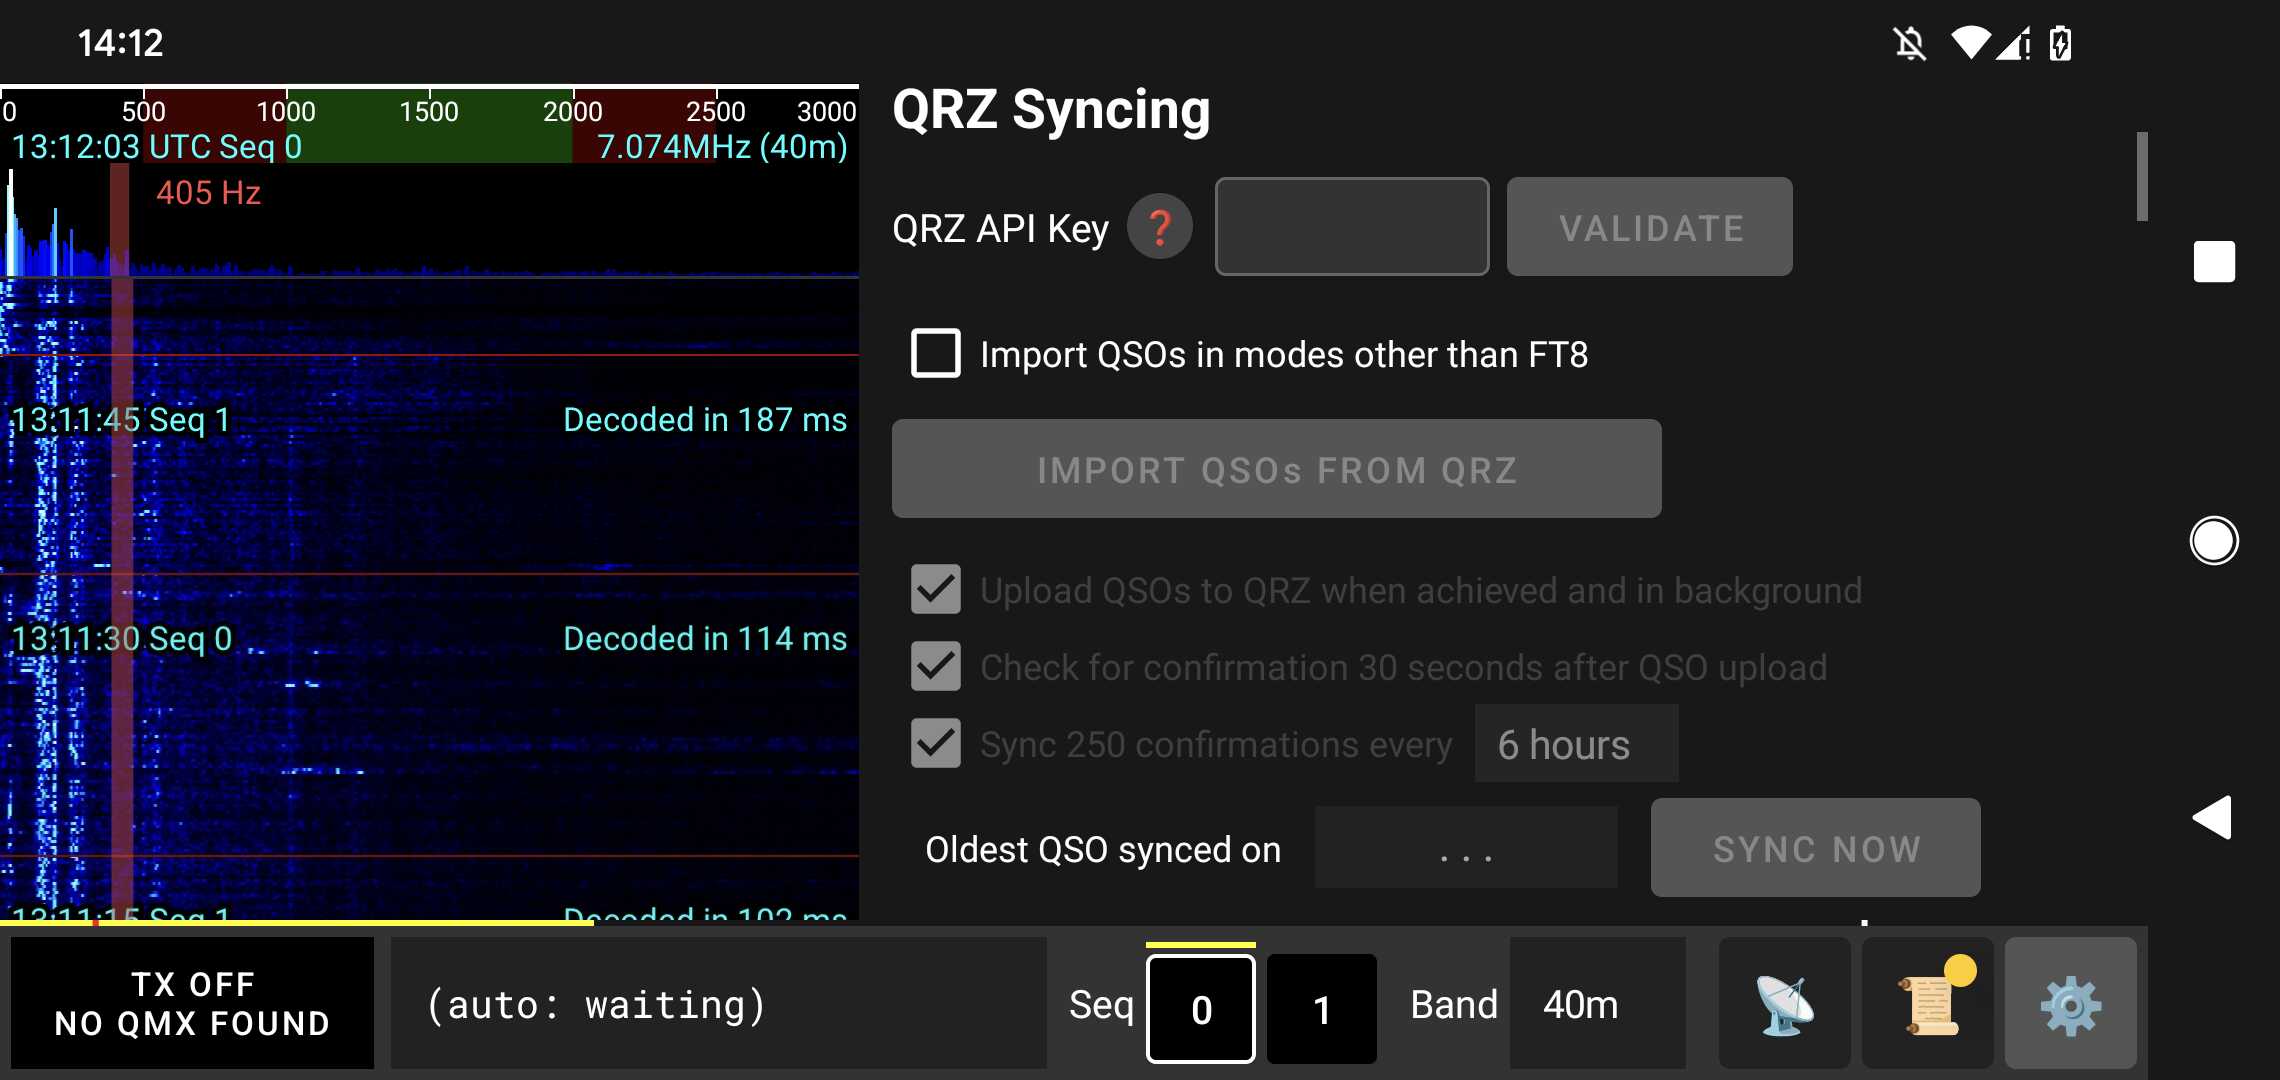
The QRZ automatic approach: Requires an active QRZ paid subscription. Go to the "QRZ Syncing" section in settings, enter the QRZ API Key for your callsign, press "VALIDATE", and then click the "IMPORT QSOs FROM QRZ" button. This will also set up automated uploads to QRZ and confirmation checks.
The LoTW automatic approach: Free of charge. Go to the "LoTW Syncing" section in settings, enter your Callsign and LoTW password, and enable background synchronization if desired. This will also allow you to perform the initial "IMPORT QSOs FROM LoTW".
↑ 目次へ戻るYour First QSO With qFT8 / qFT8での最初のQSO(交信)
Note: Accurate time is critical for FT8. qFT8 automatically synchronizes time upon app initialization via NTP (internet) or GPS (satellites). If you are operating in the field without internet access, you can use the GPS SYNC button in the Settings tab to synchronize your clock directly from GPS satellites. This requires precise location permission and a clear view of the sky.
At this point, the transceiver should be connected to the right power supply and the antenna, and all permissions should be granted. Make sure that the antenna is tuned to a band with a reasonable SWR (ideally consistently below 2) that will not trigger SWR protections. It is a bad idea to disable SWR protection in the QMX; it could damage the finals or the antenna tuner.
You may now choose the band you want to use in the bottom bar of qFT8 or in the transceiver. Setting it in one of them will sync it to the other.
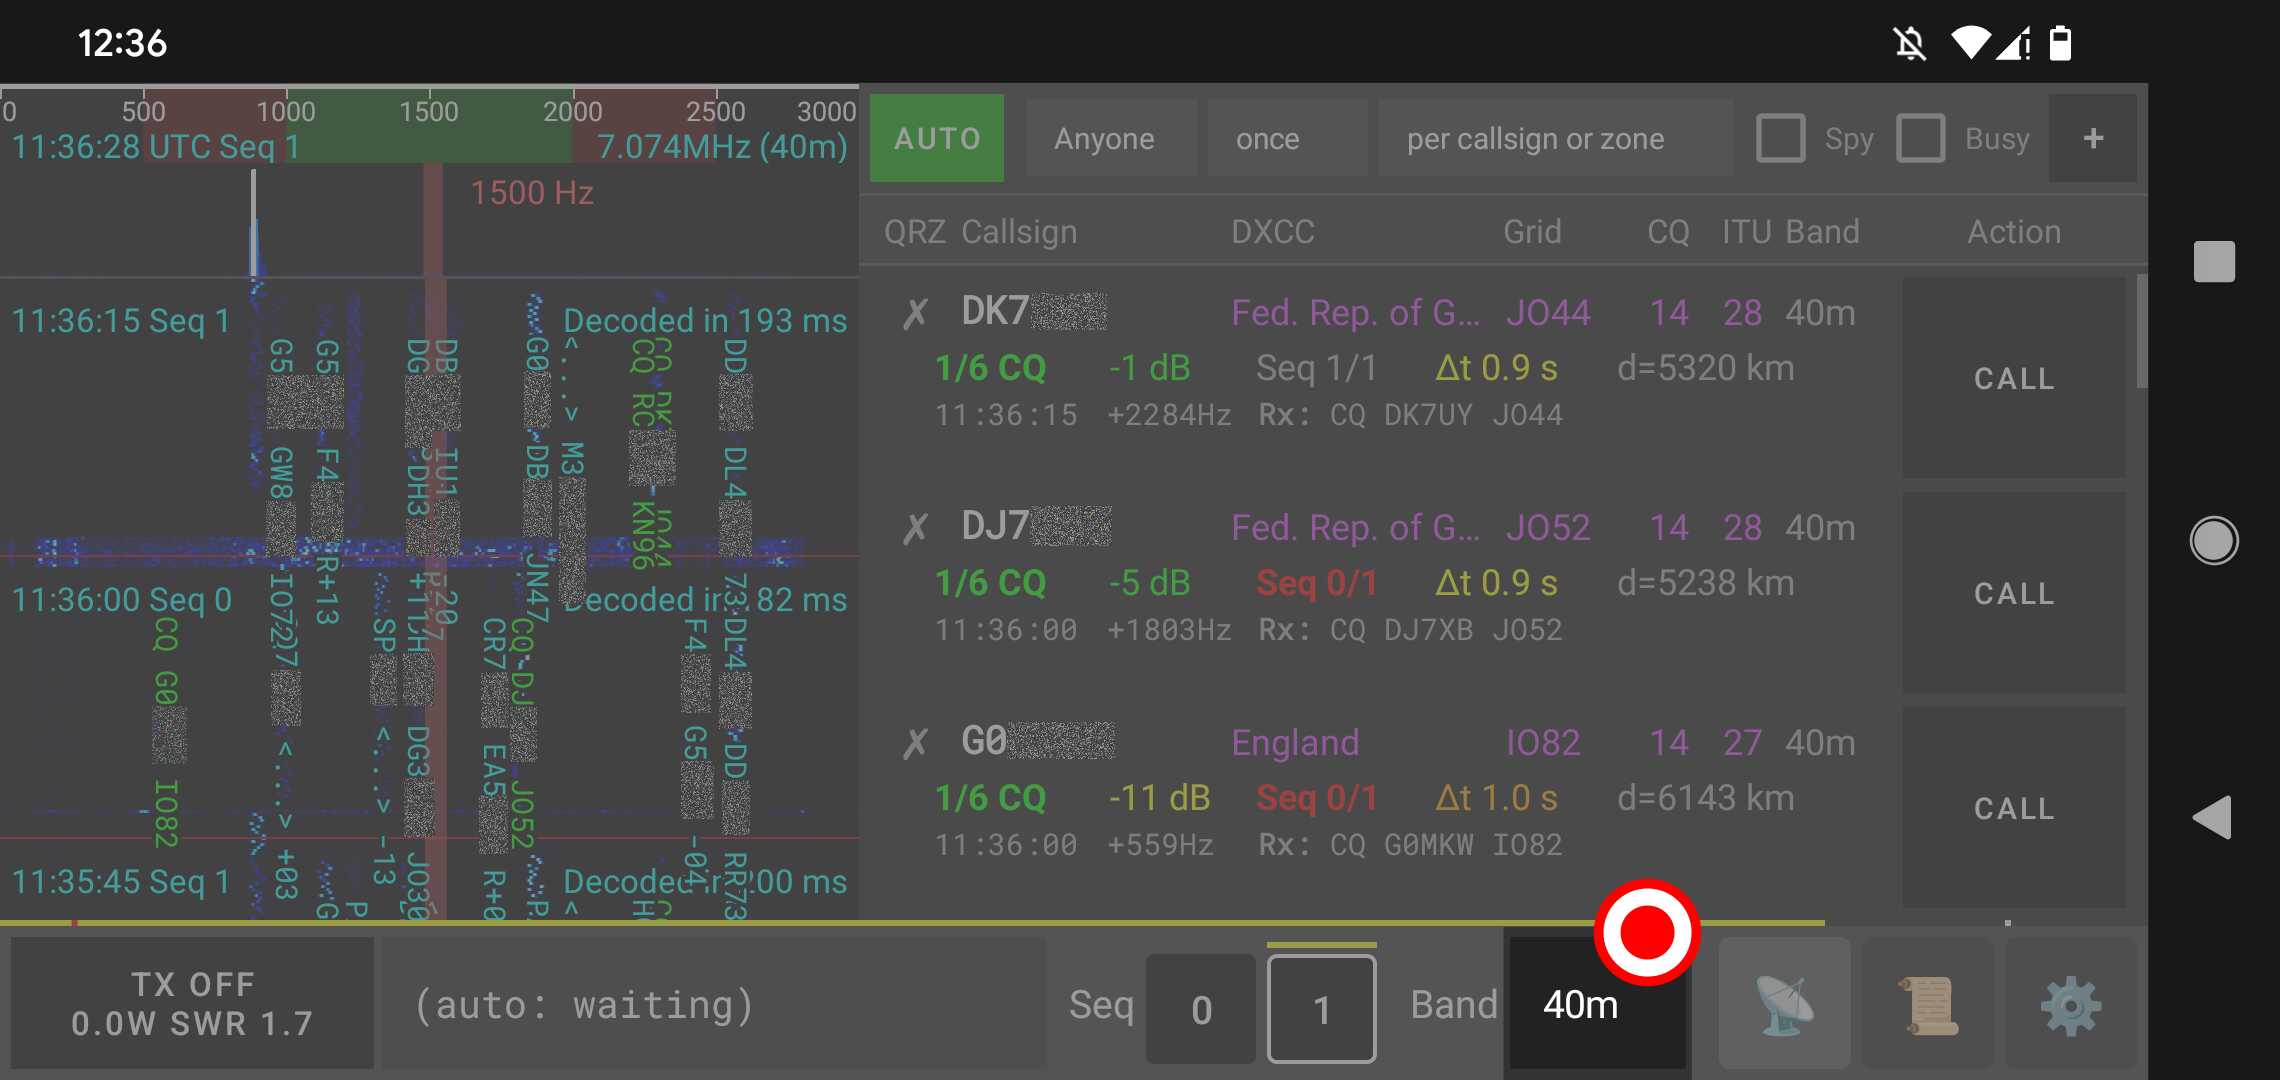
At this point, the spectrogram will show signals and start decoding messages, and the Stations tab will be updating with the stations you're hearing.
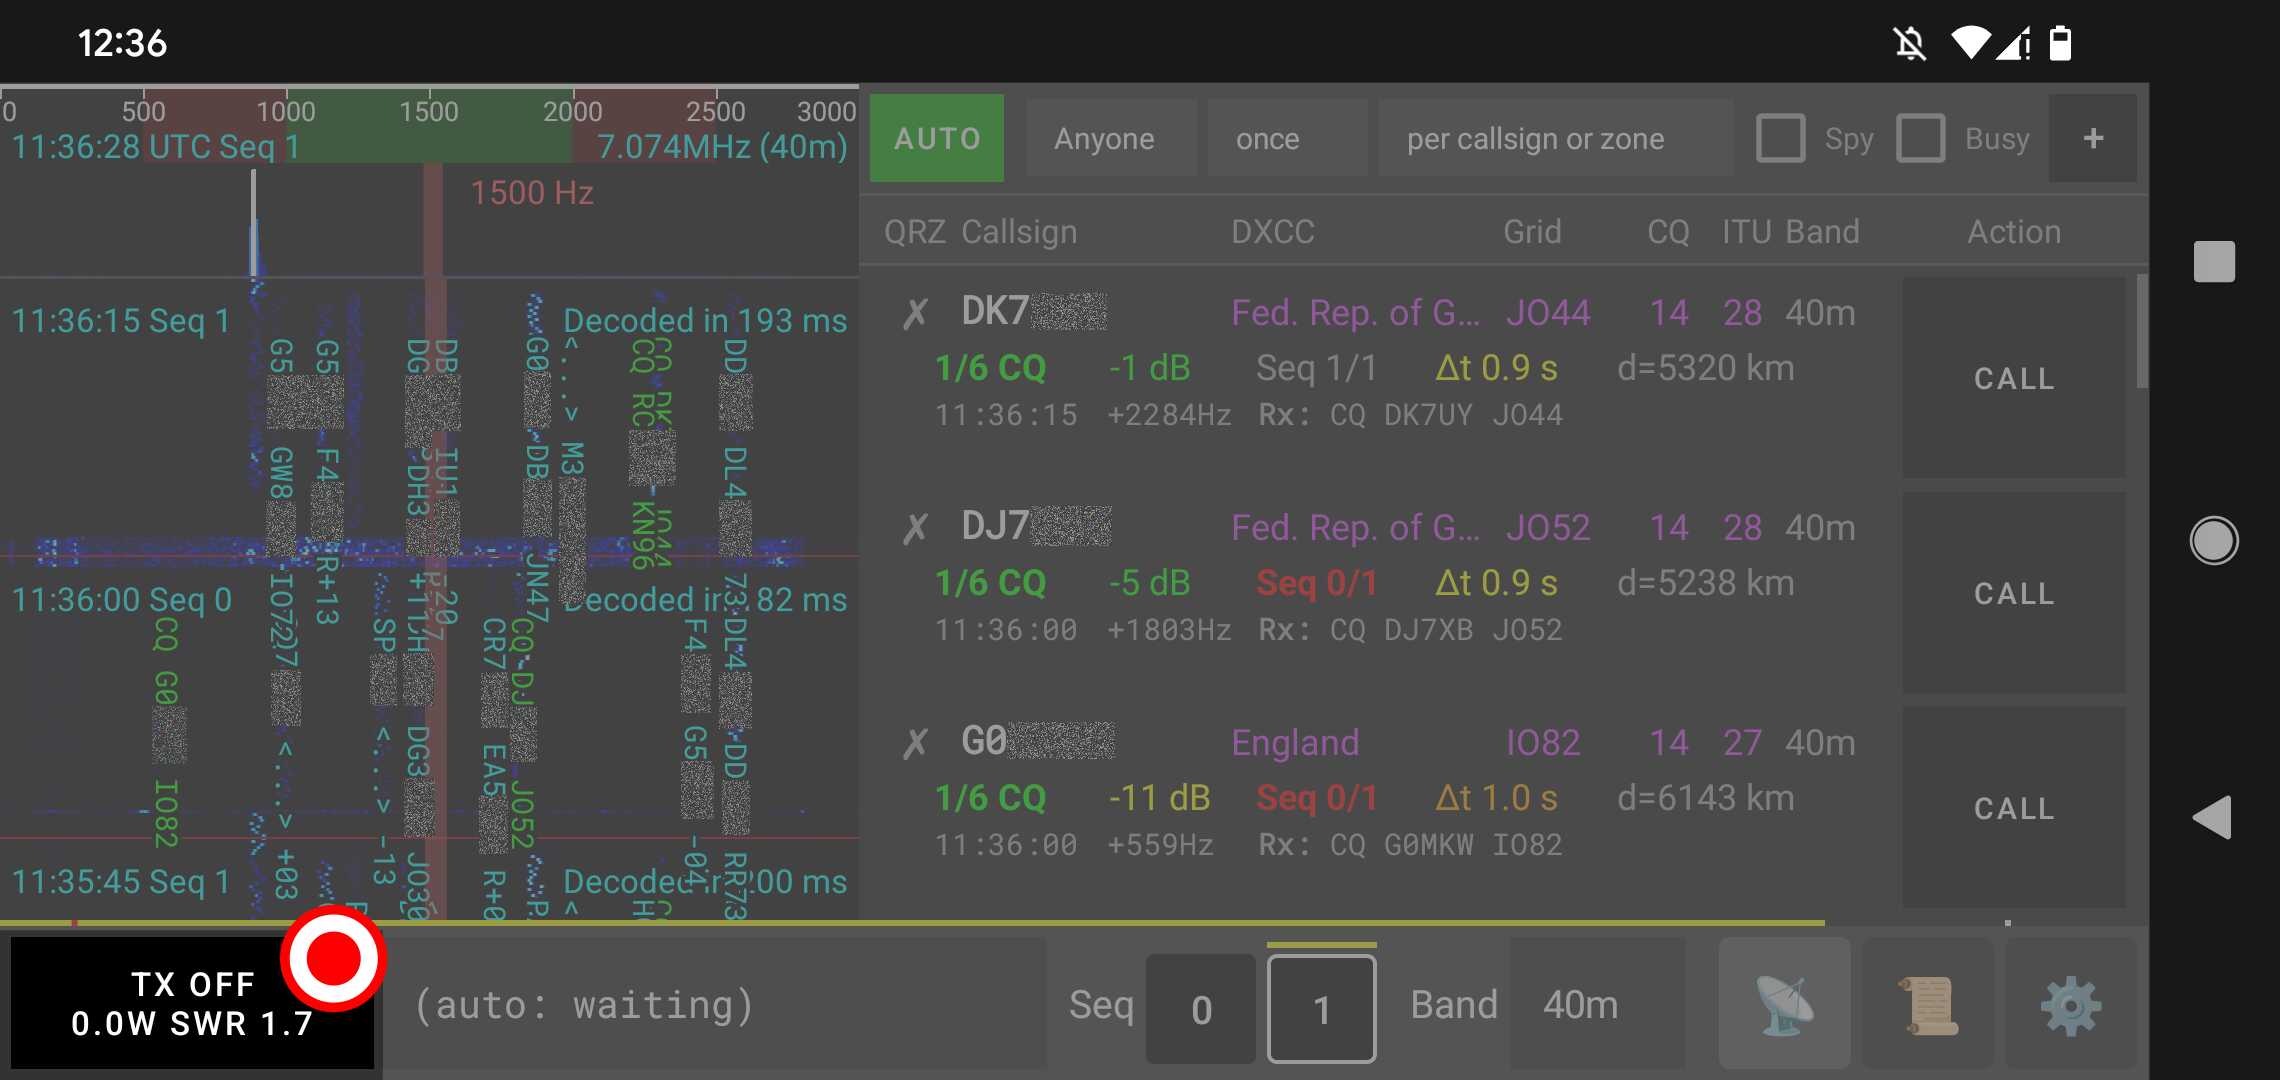
Pressing the TX button (left-most button in the bottom) will enable transmission.
If everything is correct, the TX button will eventually light up with "TX Transmitting" and will show the transmission power and SWR (e.g., "5.0W SWR 1.2").
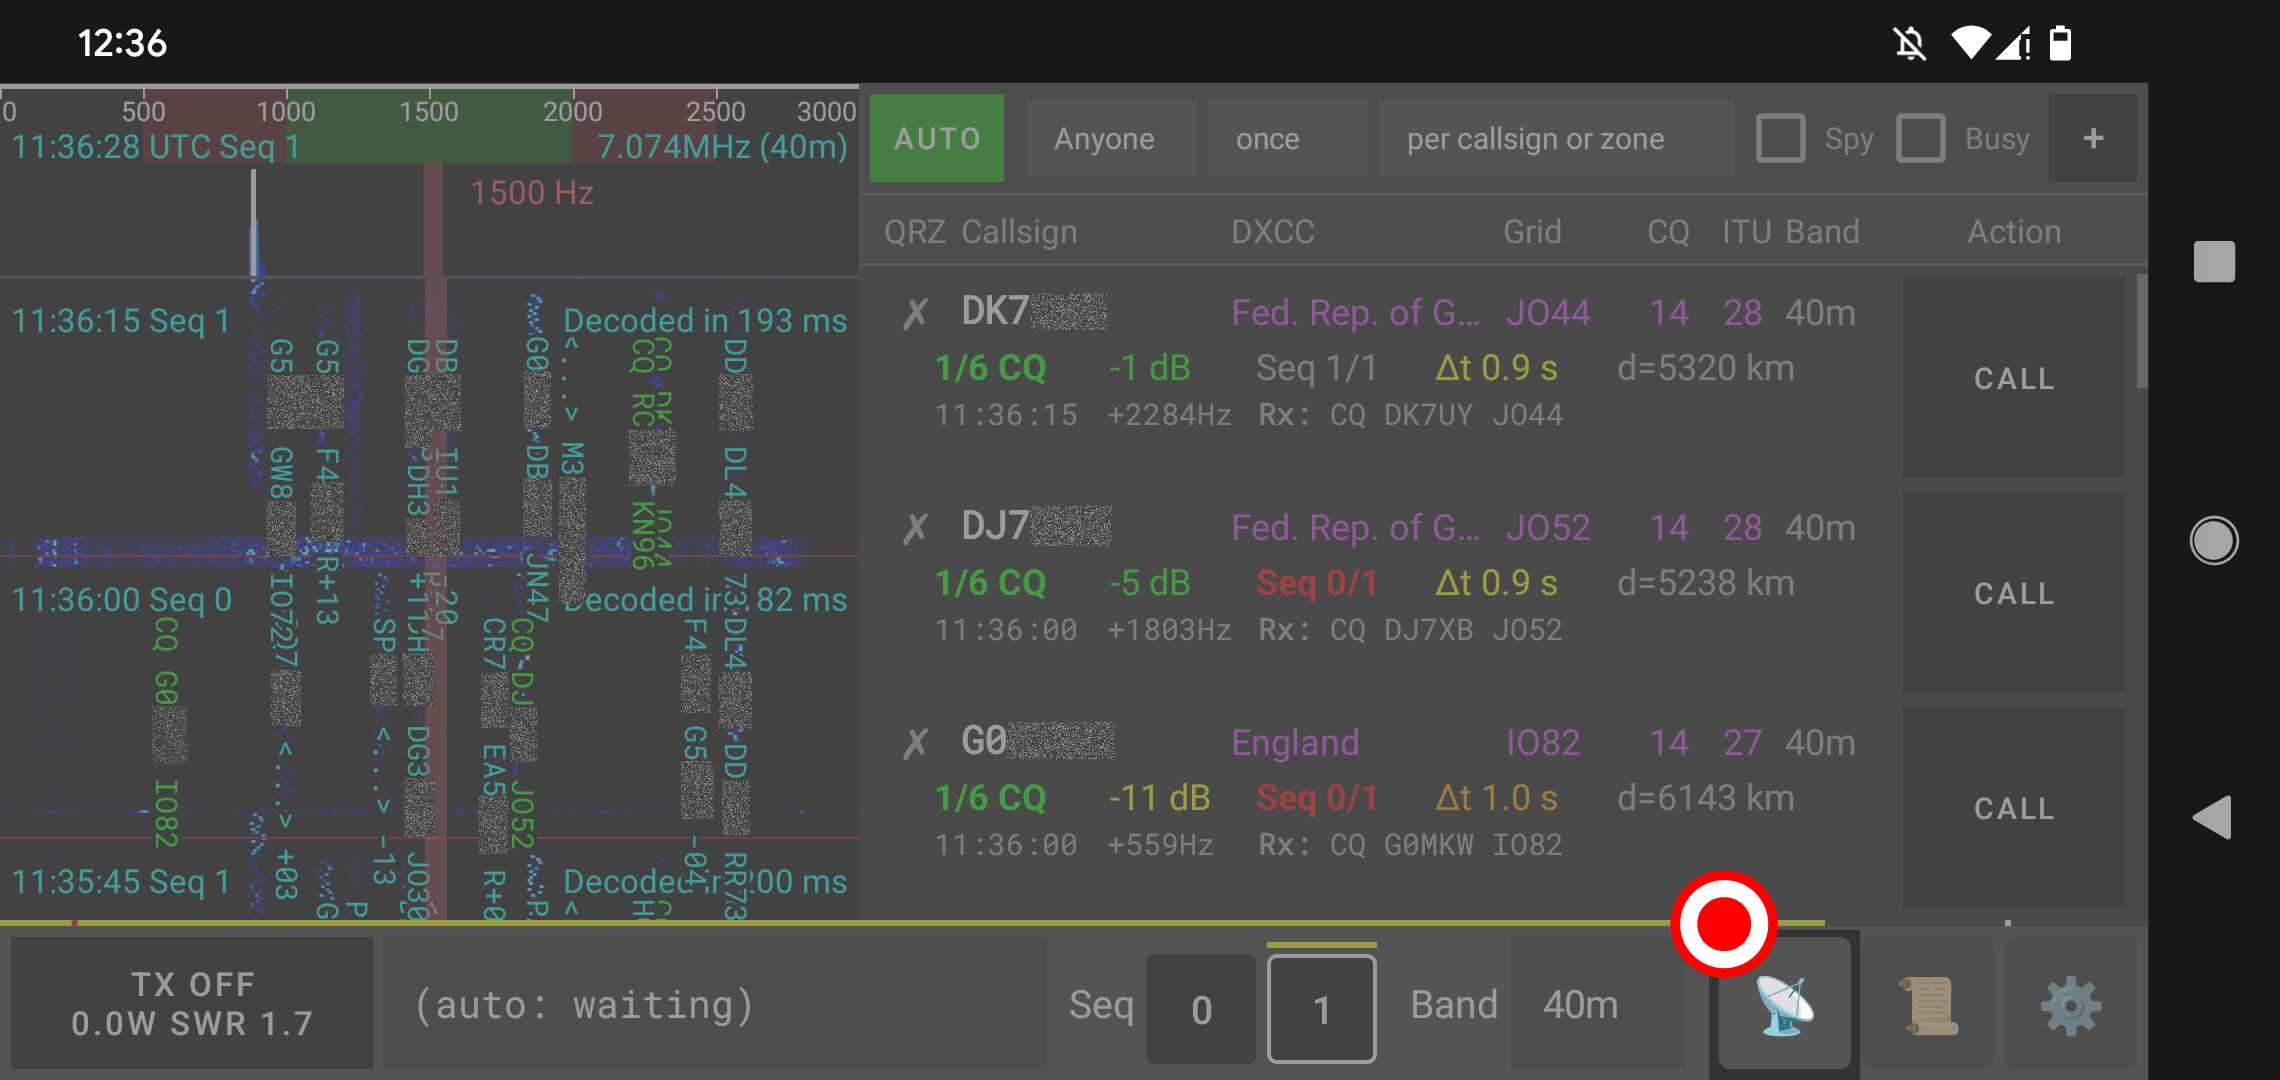
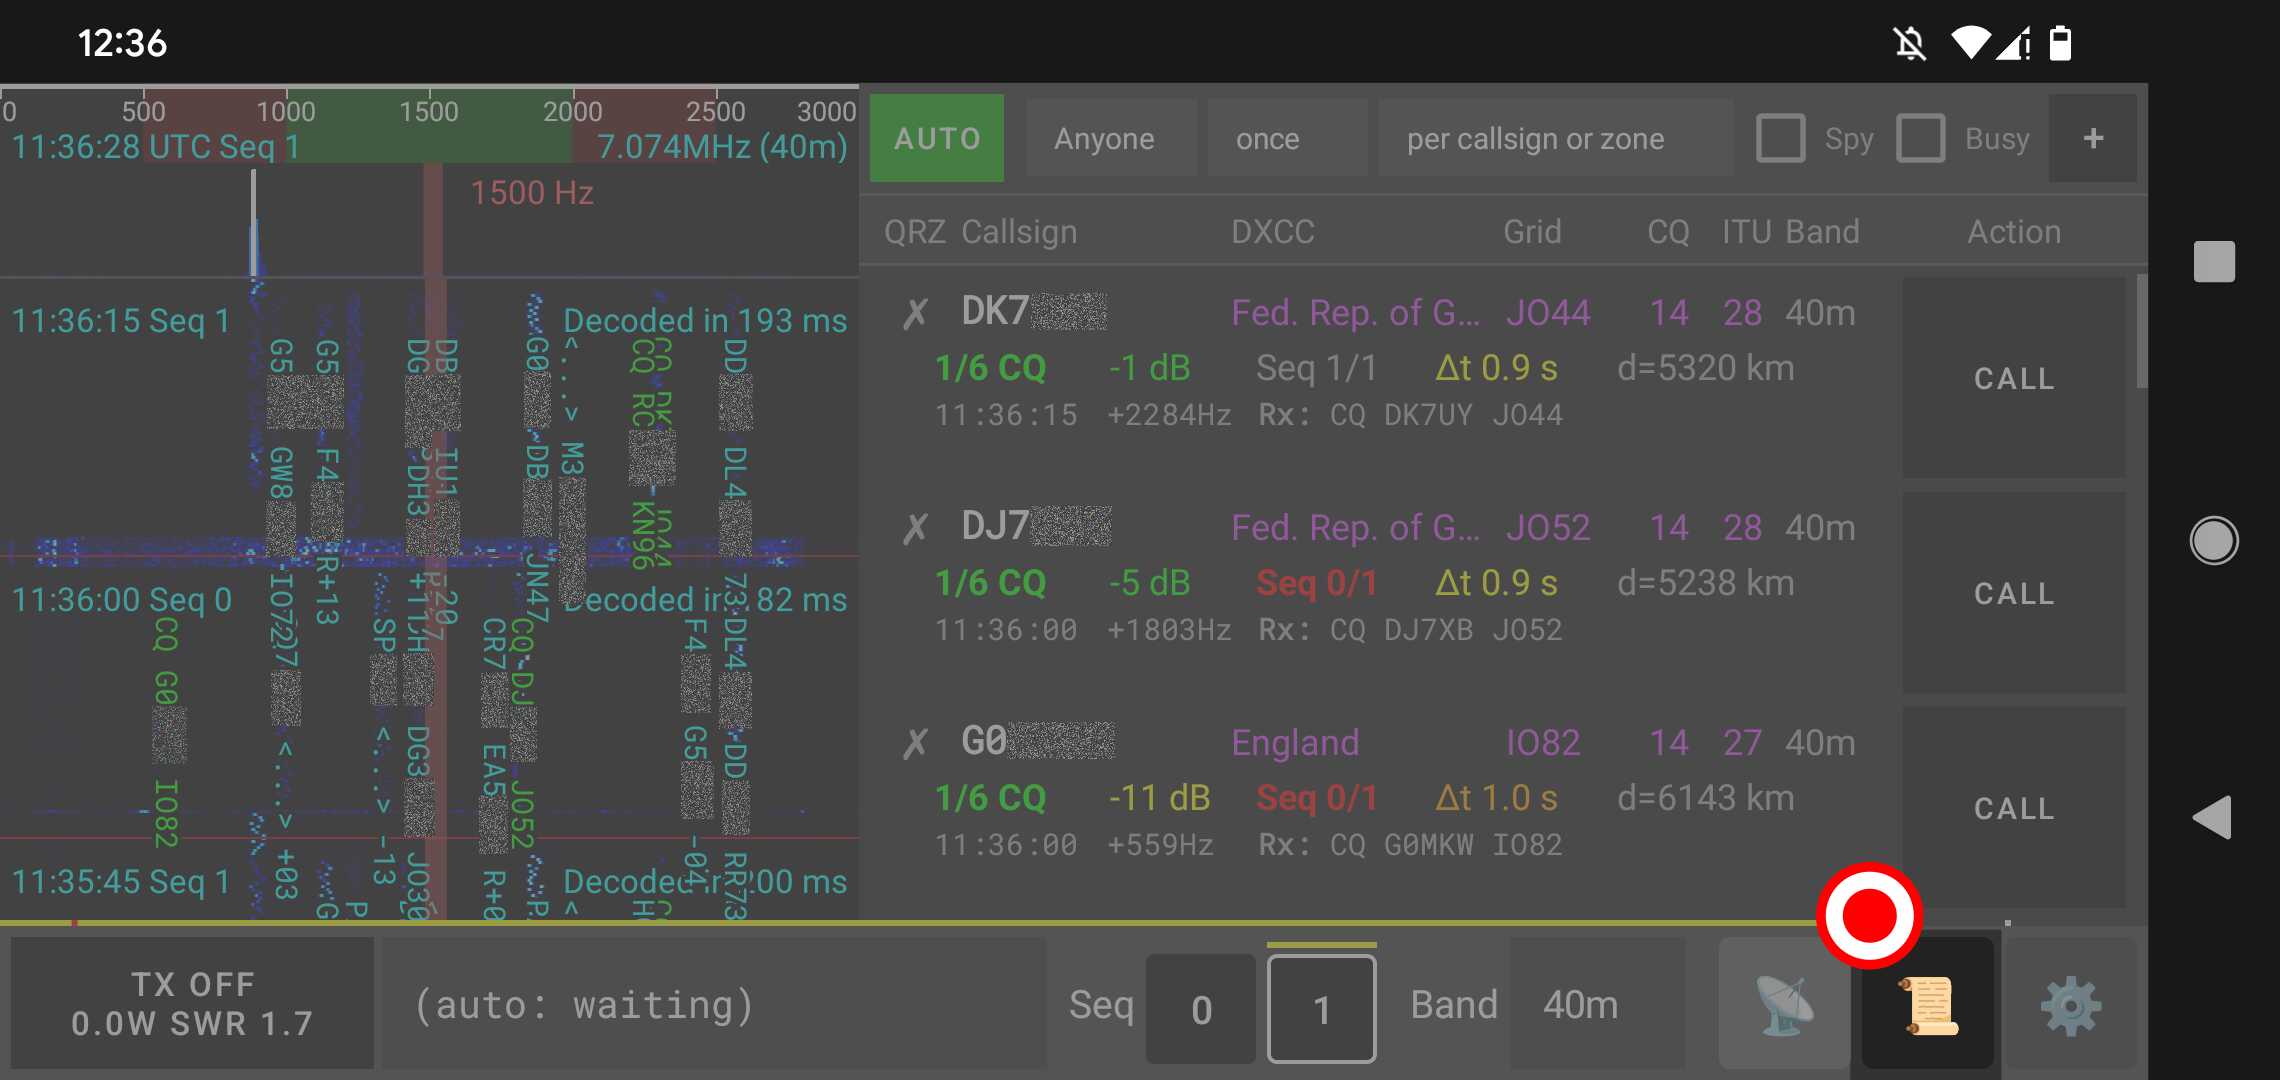
Given the "AUTO" mode is selected by default, qFT8 will start making QSOs and logging them in the Log tab.
You may tap in the spectrogram to change the Tx frequency offset (additionally, tapping on the top part of the spectrogram, where the peak indicators are, allows you to input a frequency manually), you may change sequence by tapping the 0 and 1 buttons in the bottom bar, you may tap the different "CALL" buttons to call specific stations, or you may tweak the bar with the "AUTO" button in the Stations tab to decide on the strategy. More on all of these advanced features in the following sections.
Note that qFT8 will start calling stations or, if none of them are reachable, will start calling CQ. Eventually, if everything is properly set up and the propagation is good, qFT8 will achieve QSOs.
If qFT8 is not receiving proper signals and not decoding messages, that is a clear sign that something is wrong: propagation in that band may be closed, the antenna may not be properly tuned, the antenna may not be properly connected to the transceiver, the transceiver may not be properly connected to the phone, or some of your equipment may not be functioning correctly. See the troubleshooting section below for common issues.
↑ 目次へ戻るIntro to digital modes / デジタルモードの概要
アマチュア無線のデジタルモードは、構造化されたテキストやデータを音声の周波数偏移変調(FSK)信号に変換し、単側波帯(SSB)で送受信します。極めて狭い帯域幅、高度な前方誤り訂正(FEC)、正確な時刻同期を組み合わせることで、人の耳には聞こえないノイズの底に埋もれた微弱な信号であっても全世界との確実な交信を可能にします。qFT8は主要な現代デジタルモードであるFT8、FT4、FT2、JS8、WSPR、LQ8をサポートしており、超微弱信号の伝搬調査から高速コンテスト、キーボードによる自由なチャットまで多彩な用途に対応します。
FT8
FT8(Steve Franke氏とJoe Taylor氏設計、8-GFSK)は、スポラディックE層のマルチホップや混雑したバンドなどの厳しい微弱信号環境向けに開発された世界で最も普及しているデジタルプロトコルです。15秒ごとの精密な同期、構造化メッセージ、堅牢な誤り訂正が特徴です。
Cycles and Sequences / サイクルとシーケンス
FT8 operates in 15-second cycles. Every communication cycle is strictly timed, starting exactly at 00, 15, 30, and 45 seconds of every minute. For this reason, your device's clock must be accurately synchronized to UTC time.
There are two sequences within the protocol:
- Sequence 0 (Even): Cycles starting at 00 and 30 seconds.
- Sequence 1 (Odd): Cycles starting at 15 and 45 seconds.
Stations generally alternate between transmitting and receiving. A station transmitting in Sequence 0 will listen for a response in Sequence 1, and vice versa. Within each 15-second cycle, the message is transmitted in a window between approximately +0.5s and +13s. This leaves time at the end of the cycle for decoding and at the beginning for preparing the next transmission.
Signal Characteristics / 信号特性
Each FT8 message is transmitted as a sequence of tones with slight frequency variations (sometimes described as "wiggliness"). An FT8 signal is very narrow, occupying only about 50Hz of bandwidth. This efficiency allows dozens of simultaneous conversations to fit within a single 3kHz radio band.
The 6 Stages of a QSO / QSOの6つのステージ
A standard FT8 contact typically moves through six stages. Here is an example of an exchange between HB9IPH and XX1XXX:
- 1/6 CQ: A station looks for
anyone to talk to.
Example:CQ HB9IPH JN47
Note:JN47is a Maidenhead grid locator, which indicates the station's approximate geographic location. There may also be a CQ modifier, which is a note for other operators (e.g.,CQ SOTA HB9IPHfor the Summits On The Air program, orCQ US HB9IPHwhen trying to contact someone in the US). Both the modifier and location might not fit in the same message; in such cases, the location is omitted. If the callsign is very long, it is possible that neither the location nor the modifier will fit in the CQ! - 2/6 CALL: Another station
responds to the CQ.
Example:HB9IPH XX1XXX JO21
Note: The responder also shares their location (JO21), which may be omitted if the callsigns are too long to fit everything. - 3/6 RPT: The first station
sends a signal report.
Example:XX1XXX HB9IPH -10
Note: The signal report (e.g.,-10) indicates the signal strength relative to the noise floor in dB. - 4/6 RRPT: The second station
acknowledges the report and sends their own.
Example:HB9IPH XX1XXX R-12
Note: The "R" prefix confirms the previous report was received, followed by the signal report for the first station. - 5/6 RR73: The first station
confirms everything and sends a "Roger-Roger 73".
Example:XX1XXX HB9IPH RR73 - 6/6 73: The second station
sends a final "73" to close the contact.
Example:HB9IPH XX1XXX 73
Because of the Two Generals' Problem, it is theoretically impossible to know for certain that the other station received your last communication unless they confirm so. However, then you would need to confirm their confirmation, and they would need to confirm that, and so on. The FT8 digital mode mitigates this by having structured stages: a QSO can technically be considered complete after stage 4/6 (when both signal reports have been exchanged). In practice, to ensure both stations agree that the exchange happened, a QSO is logged when a station has received an RR73 and has sent out a 73. Effectively, either transmitting an RR73 or a 73 triggers the logging of a QSO.
Note that stations may also call other stations even if they haven't transmitted a CQ first. For example, stations in rare locations may have a "pile-up" of many stations calling them simultaneously; in such cases, the rare station may simply move from one QSO to the next without needing to invite new callers with a CQ.
Some stations may use RRR instead of RR73 in stage 5. In that case, the contact requires an extra exchange: the second station sends 73, and then the first station sends 73 again to finish.
FT8 also supports free text messages (up to 13 characters), but qFT8 does not currently support sending these custom messages.
Protocol Limitations and Fallbacks / プロトコルの制限とフォールバック
FT8 messages are highly compressed into 77 bits. Sometimes, complex information (like long, non-standard callsigns) does not fit in the standard message format.
- Hashed Callsigns: If a callsign is too long, it may be sent as a hash.
If the receiving station has seen that callsign calling CQ recently, their software can map the hash
back
to the original callsign. Otherwise, it will be displayed as
<...>. It is much harder to achieve QSOs when your callsign is not standard. - Free Text Fallback: Some messages may be forced into the 13-character free text format, which is less robust than the standard structured messages.
- Non-standard Callsigns: If two stations both use very long, non-standard callsigns, they may be fundamentally unable to communicate with each other using the FT8 digital mode.
- Stage Skipping: If callsigns are too long, the protocol may not be able to fit signal reports (stages 3/6 and 4/6). In these cases, the exchange may skip directly from the initial CALL (2/6) to the final confirmations (5/6 and 6/6).
FT4
FT4は、交信レートの高さが決定打となるアマチュア無線のコンテスト(コンテスト運用)専用に設計された高速デジタルモードです:
- 速度が2倍:7.5秒周期(FT8の2倍の速さ)で動作し、約4.48秒送信します(1分間に4回の送信スロット)。
- 帯域幅が2倍:約 90 Hz の帯域幅を占有します(FT8の約50 Hzの2倍)。
- 受信感度の低下:交信速度を2倍にしたトレードオフとして、復調閾値は約 -16.4 dB 〜 -17.5 dB SNR となり、FT8に比べて約3.5〜4 dB感度が低下します。
- 運用の特徴:4-GFSK変調およびFT8と同じ77ビット構造化フォーマットを採用し、電波伝搬が十分な状況でコンテスト交信を半分の所要時間で完了できます。
FT2
FT2は、強い信号強度での超高速交信、VHF/UHFの流星散乱(MS)、ハイスピードコンテスト向けに設計されています:
- FT4の2倍の速度(FT8の4倍):3.75秒周期(送信時間は約2.24秒)で動作し、1分間に最大16回の交信サイクルが可能です。
- FT4の2倍の帯域幅(FT8の4倍):約 180 Hz の帯域幅を占有します(FT4の2倍、FT8の約4倍)。
- さらなる感度低下:復調閾値は約 -13 dB 〜 -14 dB SNR となり、FT4からさらに約3 dB低下(FT8比で約6〜7 dB低下)します。
- 運用の特徴:交信チャンスが一瞬に限られる突発的な伝搬モードや、信号がノイズフロアより十分に強い状況で威力を発揮します。
JS8
JS8(Jordan Sherer氏設計、8-GFSK)は、定型のコンテスト交信ではなく、キーボードによる自由会話(ラグチュー)、メッセージング、アドホックネットワークを目的に設計されています:
- メッセージの分割送信と再構築:FT8の8-GFSK変調と77ビットフレーム構造を踏襲しつつ、上位トランスポート層でメッセージのスライスと再構成を行います。これにより任意の長さの自由文を複数サイクルにわたって送信可能です。
- 複数の速度サブモード:コンディションに合わせて4種類の速度を選択できます:
- Slow:30秒周期、帯域幅約25 Hz、復調感度 -25 dB SNR。
- Normal:15秒周期、帯域幅約50 Hz、復調感度 -21 dB SNR。
- Fast:10秒周期、帯域幅約80 Hz、復調感度 -18 dB SNR。
- Turbo:6秒周期、帯域幅約160 Hz、復調感度 -15 dB SNR。
- ネットワーク機能:宛先指定チャット、他局による自動中継(relay)、ハートビートビーコン、ストア&フォワード型の私書箱機能を備えています。
WSPR
WSPR(Weak Signal Propagation Reporter)は、双方向交信ではなく電波伝搬経路の調査と自動ビーコン送信に特化したモードです:
- 2分間の長周期:正確に同期した 2分間(120秒)周期 で動作し、110.6秒間にわたり162シンボルの4-FSK信号を送信します。
- 極めて狭い帯域幅:わずか約 6 Hz の帯域幅しか占有せず、送信電力を狭いスペクトラムに集中させます。
- 驚異的な微弱信号感度:標準2.5 kHz帯域で -28 dB 〜 -31 dB SNR という微弱な信号まで復調可能で、ミリワット級(QRPp)の超低出力でも大陸を越える交信が実証されます。
- 伝搬レポートの自動収集:コールサイン、グリッドロケーター(4桁または6桁)、送信電力(dBm)を送信し、世界中の受信局からWSPRnetデータベースへ自動報告されます。
LQ8
LQ8は、qFT8の作者・開発者である Luis Quesada(HB9IPH) 氏によって開発された次世代微弱信号デジタルモードです:
- 感度低下なしでFT8より高速にQSO完了:LQ8は、受信感度のペナルティを一切伴わずに FT8よりも大幅に早く交信を成立させます。FT8と同等以上の微弱信号復調閾値(-21 dB SNR)を完全に維持しながら、最適化されたプロトコルにより少ないサイクル数で交信を完了します。
- 複合メッセージ:レポート送信と確認を1サイクルに統合する(
REPORT+RR73)や、複数局への並列応答(MULTI_CALL)などの複合メッセージをネイティブサポートし、通常4〜6サイクルかかるQSOをわずか2〜3サイクルに短縮します。 - 先進のアーキテクチャ:15秒周期、79シンボルの8-GFSK変調(帯域幅約65 Hz)、ハフマン圧縮による77ビットペイロード、CRC-14誤り検出、および構造化された非常通信フラグを備えています。
仕様、技術文書、ツールの詳細については、LQモードのポータルサイト https://lq8.org をご覧ください。
↑ 目次へ戻るqFT8 User Interface / qFT8 ユーザーインターフェース
The qFT8 app is split in three parts:
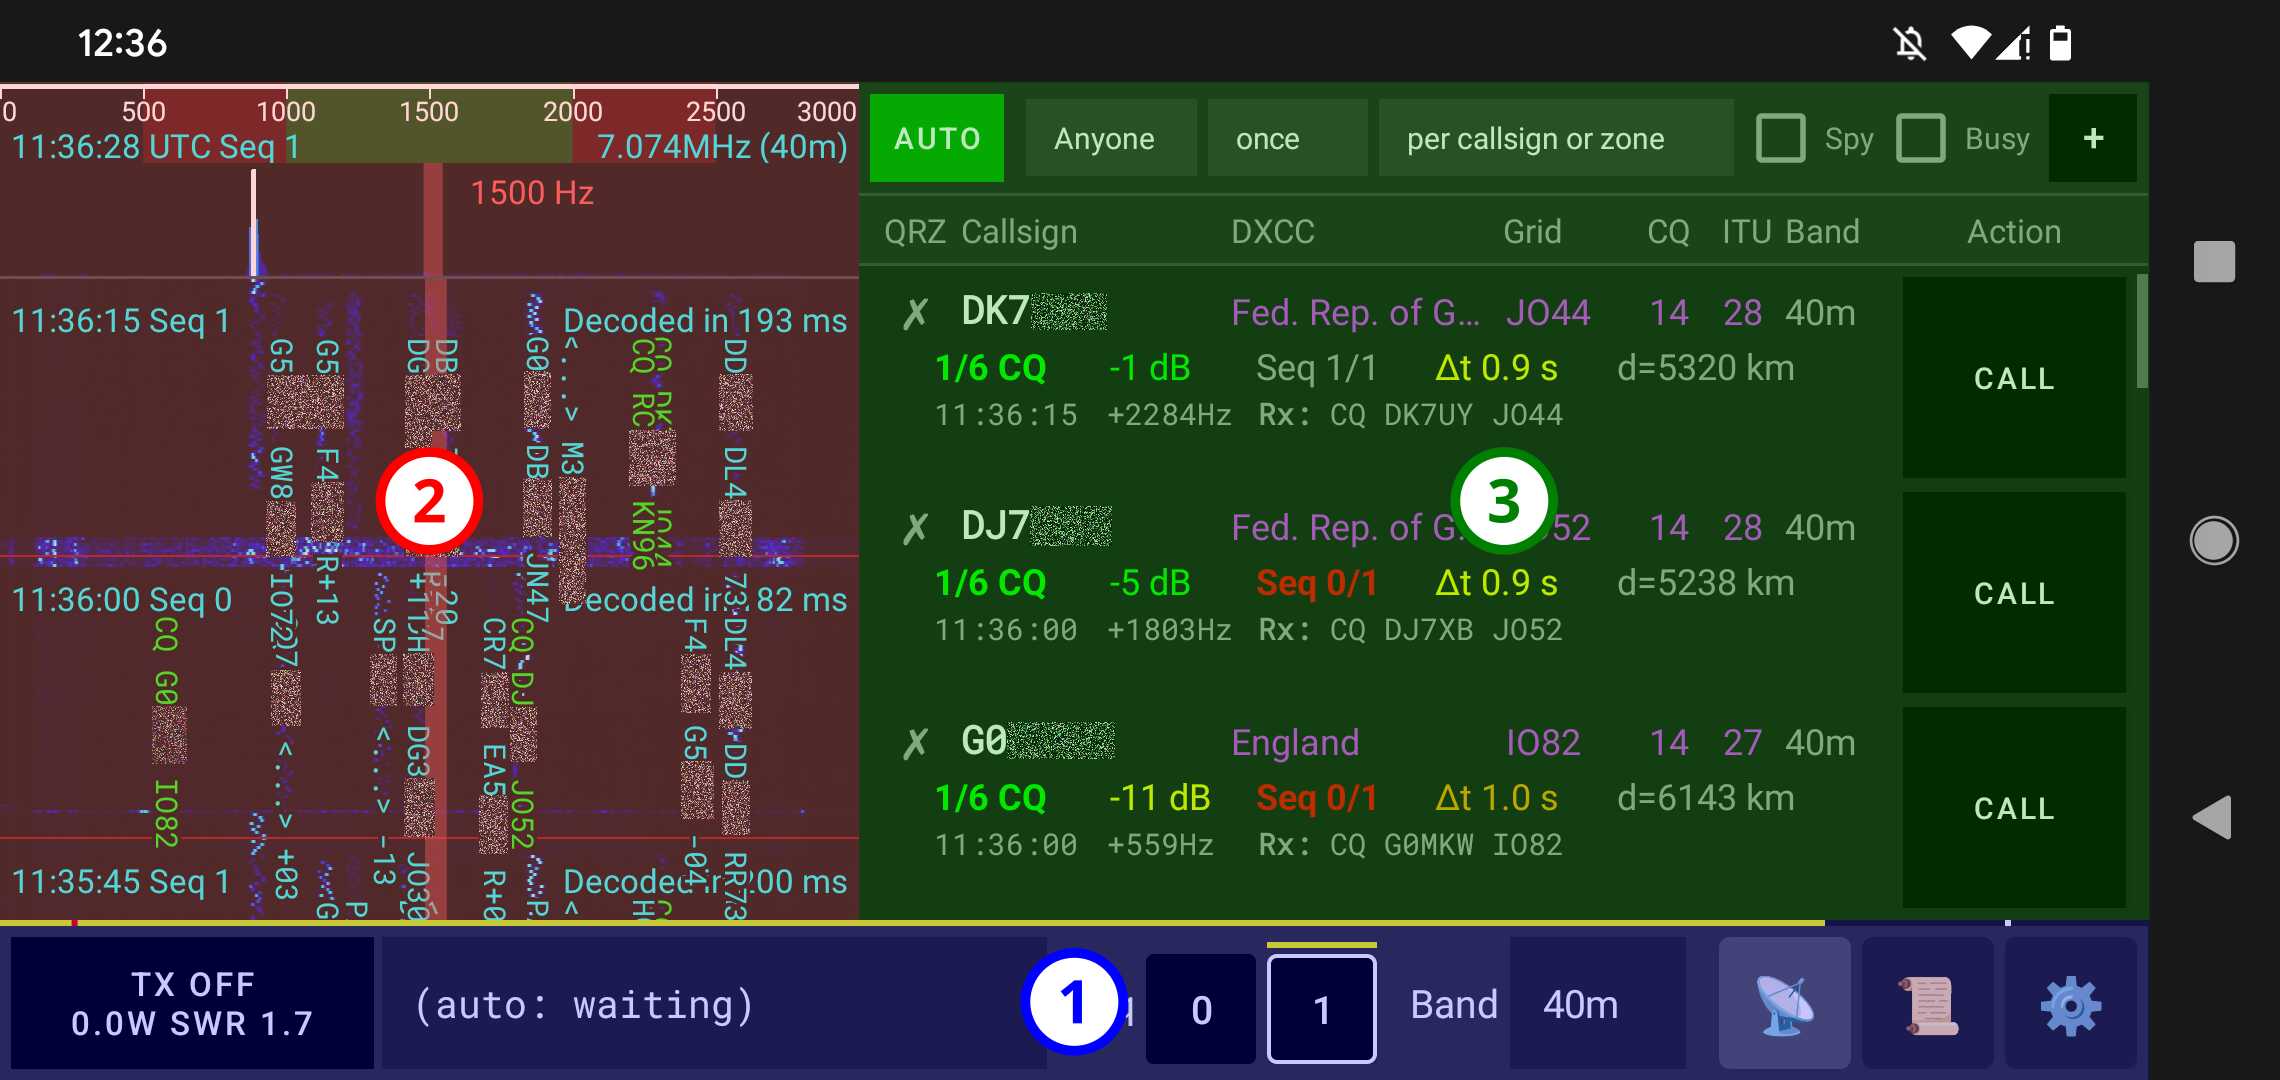
- The bottom bar: Always visible, to oversee and control transmission and to control qFT8.
- The spectrogram: Always visible, to see decoded messages, see UTC time live and tuned frequency, and control transmission frequency offset.
- The tab area: Shows one out of four tabs (Stations, Log, World Map, and Settings) / 4つのタブ(Stations、Log、World Map、Settings)のいずれかを表示します. Which one is shown here can be controlled with the buttons at the right-most part of the bottom bar.
The following sections describe all these components in detail.
The Bottom bar / ボトムバー(下部操作バー)
The bottom bar shows important information: the transmission armed/disarmed state, whether qFT8 is transmitting, the transmission power, the Standing Wave Ratio (SWR), the message being transmitted, the current and selected sequence, the band selector, and the buttons to navigate the different tabs.
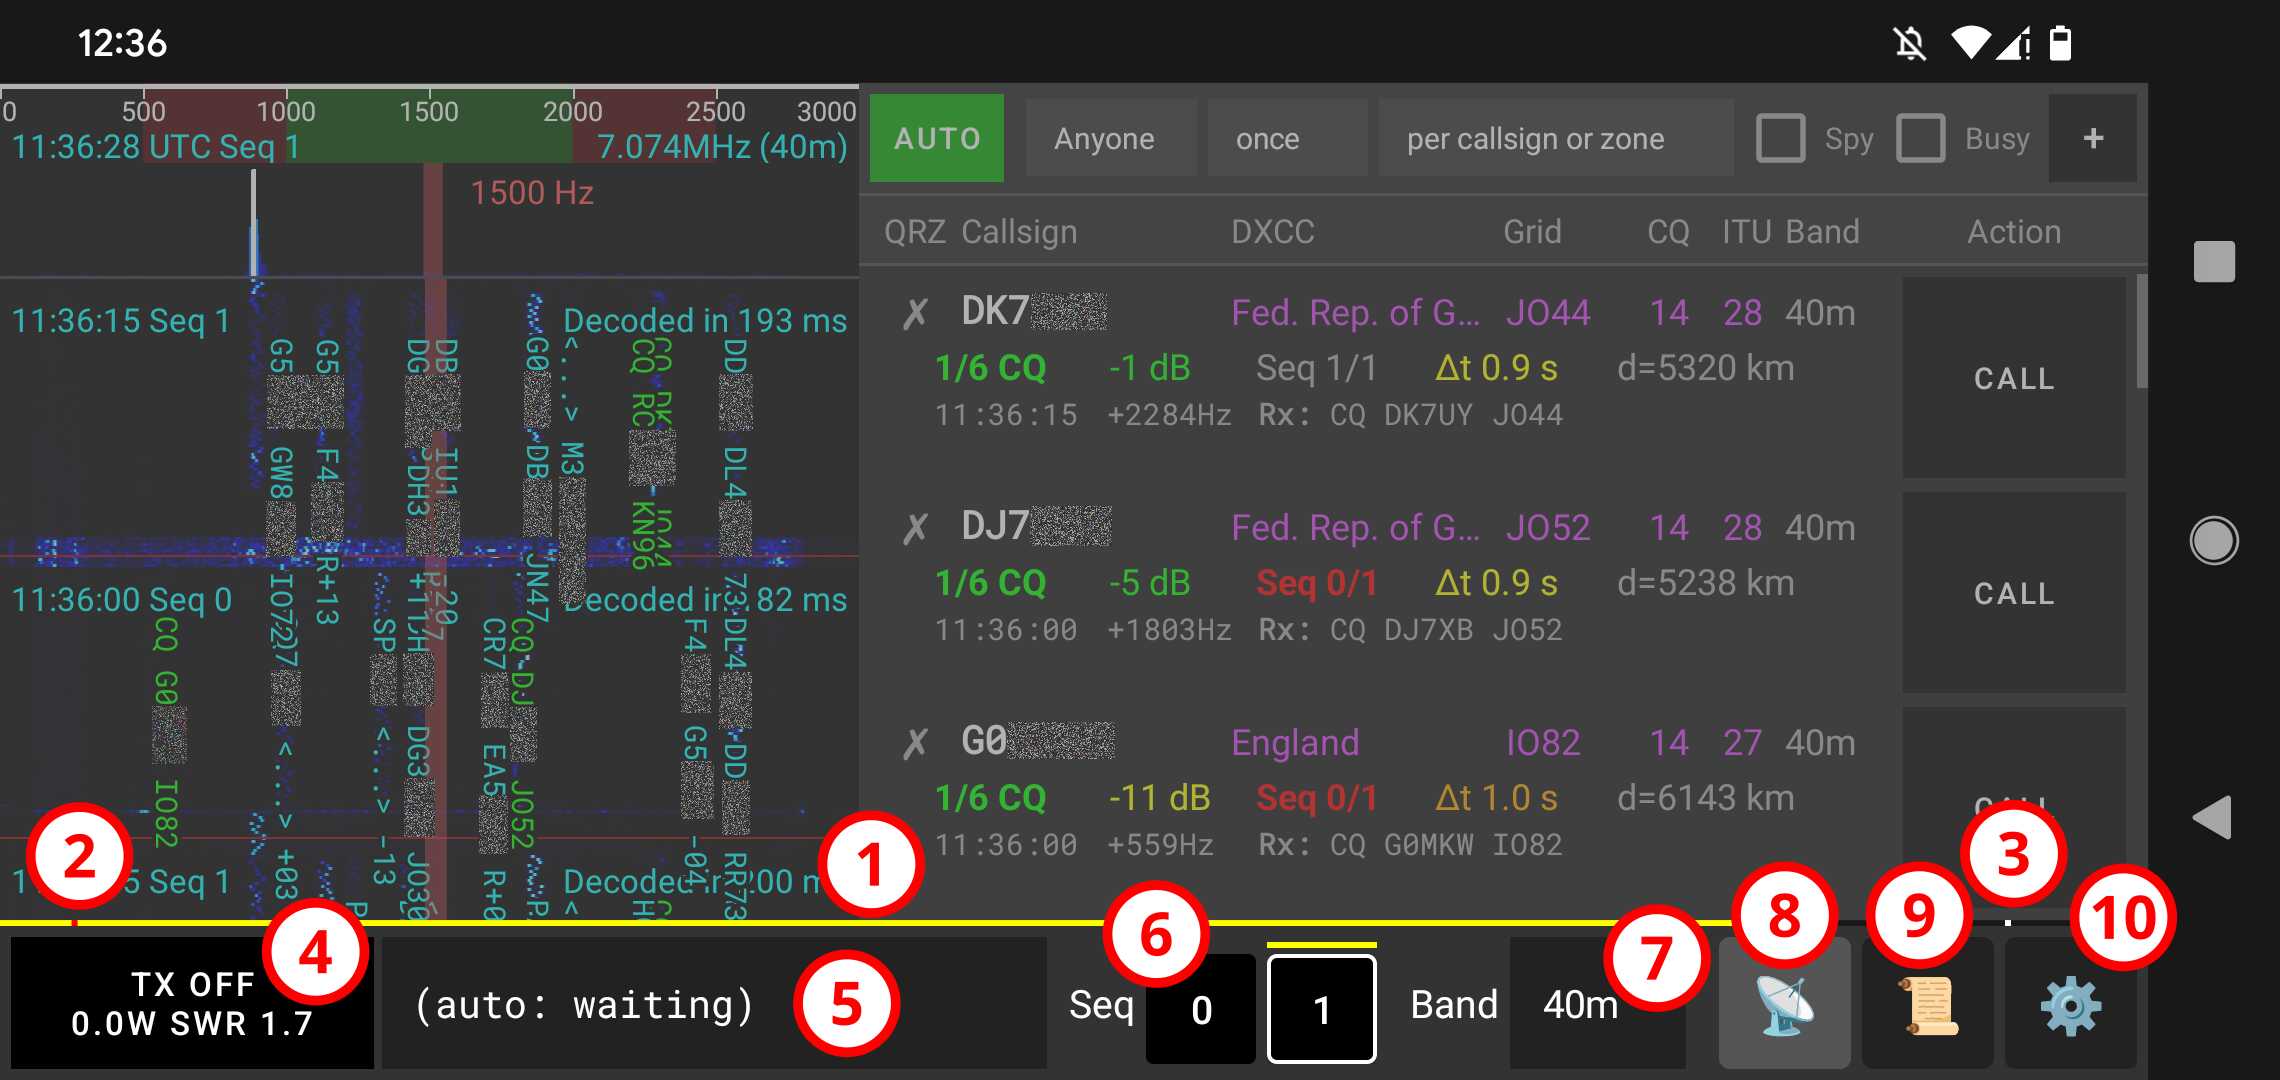
These are the components of the bottom bar in detail:
- The cycle progress bar: The yellow bar starts at 0s within the cycle (left-most) and ends at 15s within the cycle (right-most).
- The Tx trigger marker: The red dot at the left part of the bar indicates the Tx trigger time. If Tx is ON (see item #4) and the current sequence is the selected sequence (see item #6) transmission starts at this point.
- The decoding time marker: The white dot at the right part of the bar indicates the decoding time, that is, when messages are decoded from signals received and subsequently processed.
- The TX button: Can be disarmed (OFF) or armed (ON). It also shows when transmission is happening, and the transmit power and SWR. In QMX firmwares above 1_04, this button will show "HOLD: TUNE". Holding the button will enable tuning mode and report on SWR live.
- The message selector: It shows the message selected to be sent or being sent (if that is the case, highlighted in yellow). In AUTO mode, it is managed automatically. In CALL mode it is also managed automatically by default, but it can be tapped on to select the next message to send manually.
- The sequence selector: The yellow line on top of the buttons show the current sequence (0 or 1). Tapping on 0 or 1 selects that sequence for outgoing transmissions.
- The mode selector: It changes the transmission mode used (e.g. FT8, FT4, FT2, LQ8, JS8, or WSPR).
- The band selector: When a transceiver is connected, it changes the band in the transceiver.
- The Stations tab button: Opens the tab that lists all the stations you've heard or can communicate with.
- The Log tab button: Opens the tab that lists all the QSO you've made. This button will be marked with a yellow dot if you have QSOs that aren't uploaded to QRZ.
- The World Map tab button: Opens the tab that displays the interactive global world map.
- The Settings tab button: Opens the tab to configure qFT8.
The Spectrogram / スペクトログラム(ウォーターフォール)
The spectrogram shows a peak view, and the waterfall with incoming signals and messages, outgoing signals and messages, markers for the change of sequence annotated with UTC time and time to decode, and the selected offset frequency for transmission.
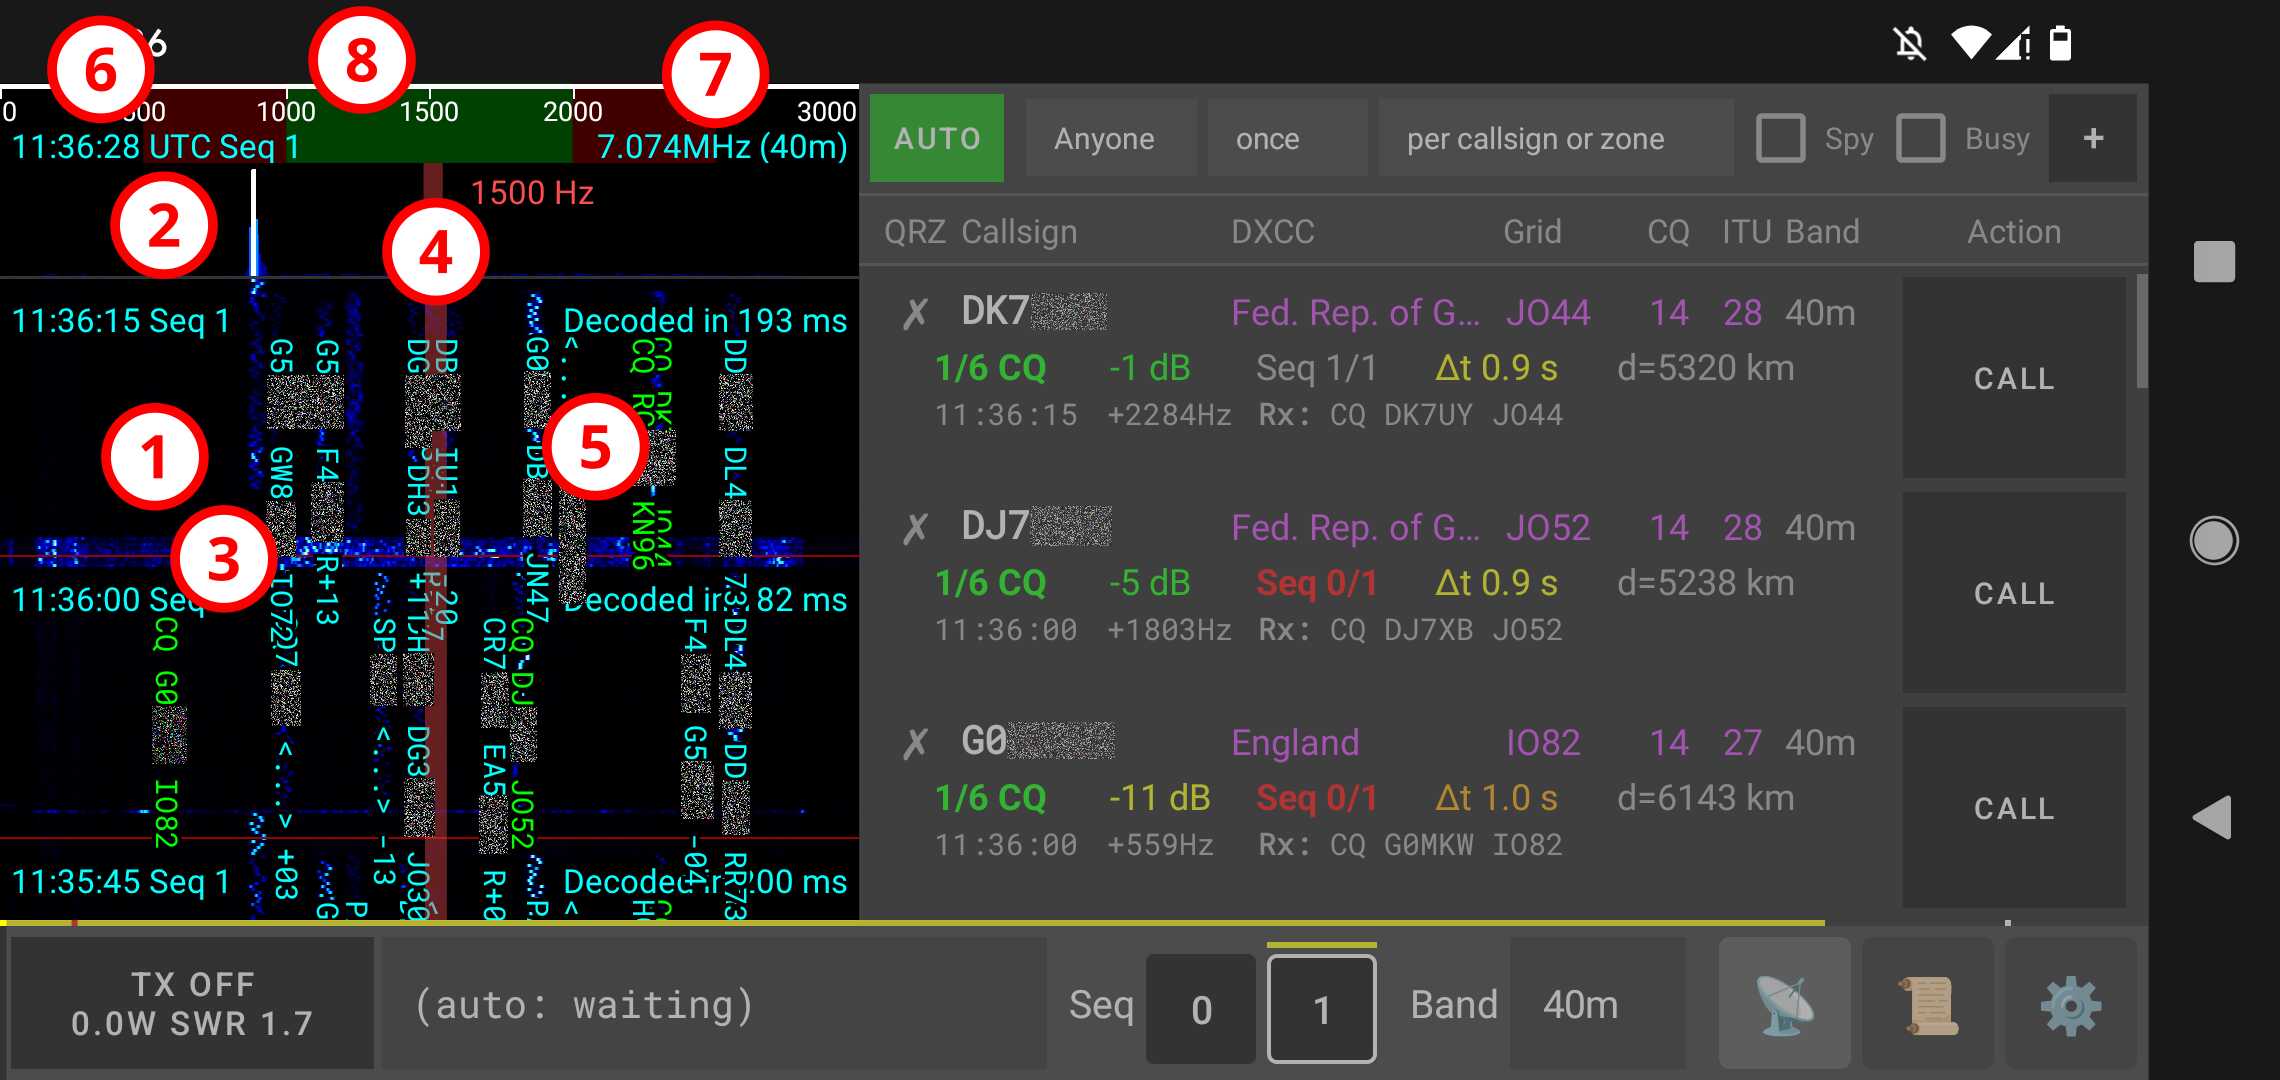
These are the components of the spectrogram in detail:
- Waterfall view: Displays the recent history of received signals over time. Tapping in that view will change the selected frequency offset.
- Real-time peaks: Show the instantaneous strength of signals across the frequency range. Tapping in that view will open a dialog to input the precise selected frequency offset.
- Sequence separators: These red horizontal lines act as visual separators of cycles, and are annotated with UTC time and time spent decoding.
- Selected frequency offset: This vertical yellow overlay on the spectrogram indicates the currently selected frequency offset for transmission.
- Incoming messages, shown color-coded:
- Green: CQ messages.
- Cyan: Messages between other stations.
- Yellow: Your transmitted messages.
- Orange: Incoming messages directed to you.
- Current UTC time and sequence: Displayed at the top of the waterfall.
- Tuned frequency and band: Frequency and band the transceiver is currently tuned to.
- Frequency axis: Shows the frequency scale in Hz within the selected band.
The Stations tab / Stations(ステーション)タブ
The Stations tab is the command center for monitoring activity on the band and operating qFT8. It features filtering and automation controls at the top, followed by a list of active stations.
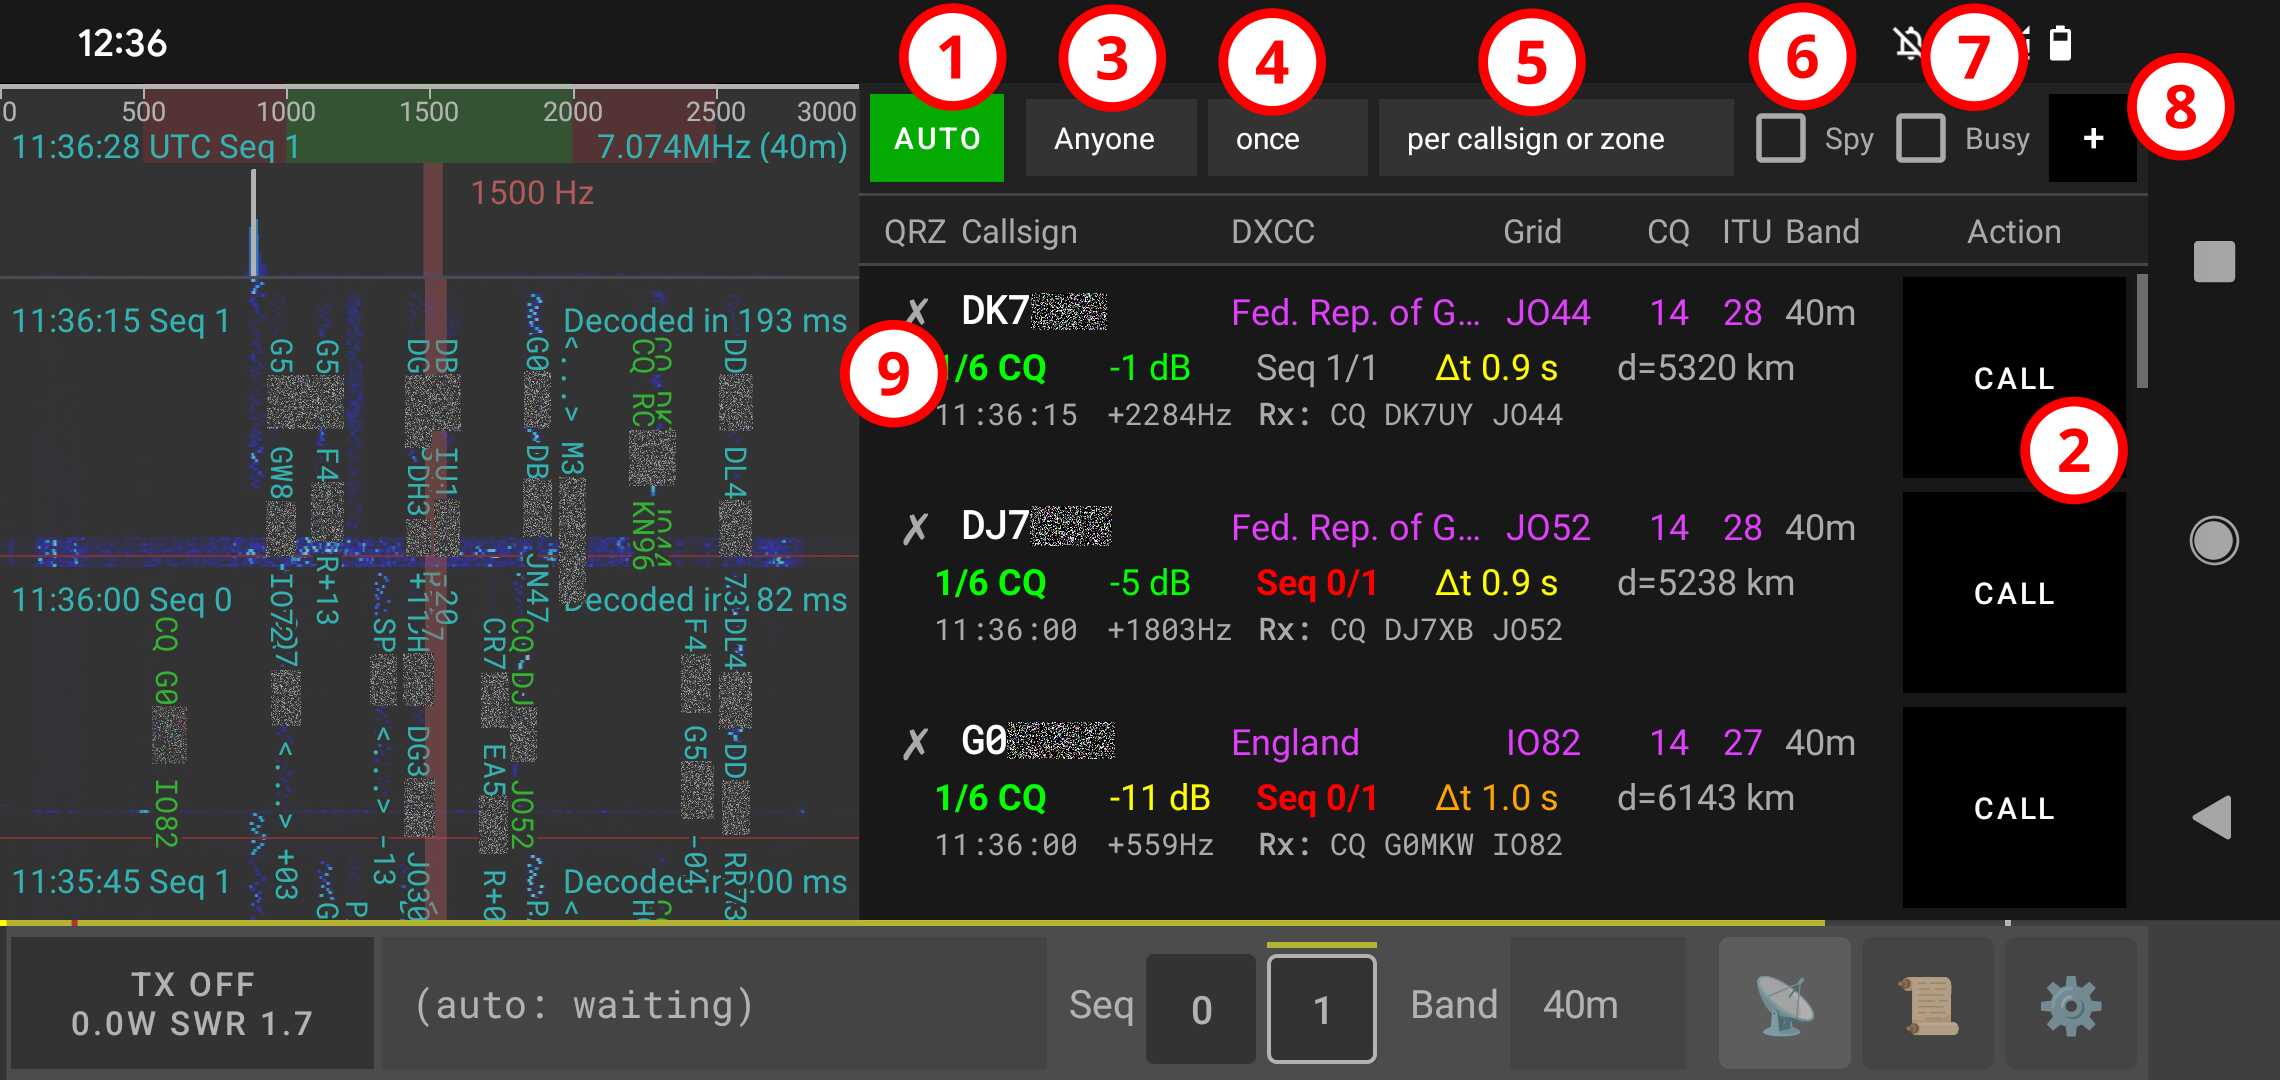
These are the components of the Stations tab in detail:
- AUTO call mode button: Engaging "AUTO" will try to call the best station according to the criteria selected by the user.
- Manual CALL mode button: Engaging "CALL" for a station will insist on calling that station until achieving a QSO, then will fall back to "AUTO".
- Target: Sets the criteria for the AUTO mode:
- Anyone: Any callsign that you don't have a QSO for yet.
- Nearby: Prioritize nearest stations based on Maidenhead grid distance.
- Far: Prioritize farthest stations based on Maidenhead grid distance.
- Signal strength: Prioritize stations with the strongest signal (SNR).
- Call CQ: Just calls CQ and replies to any station that calls your station.
- POTA hunter: Prioritize Parks on the Air stations.
- SOTA hunter: Prioritize Summits on the Air stations.
- POTA + SOTA hunter: Prioritize both Parks on the Air and Summits on the Air stations, then stations that are neither, ordered by SNR.
- DXCC: Prioritize new countries/entities.
- Grid: Prioritize new Maidenhead grid squares.
- ITU zone: Prioritize new ITU zones.
- CQ zone: Prioritize new CQ zones.
- I/C/D/G: Prioritize first ITU zone, then CQ zone, then DXCC, then Grid.
- Periodicity: How often to contact that target:
- once: In a lifetime.
- daily: Once per UTC date.
- weekly: Once every 7 days rolling window.
- monthly: Once every month rolling window.
- yearly: Once every year rolling window.
- Qualifier: How those constraints apply:
- per callsign
- in different bands
- in different modes
- until zone confirmed
- per band+until zone
- per mode+until zone
- in different bands or modes
- per band/mode+until zone
- Spy mode: When enabled, qFT8 will also try to call stations you haven't heard call CQ yet (marked as DIRECT). This is useful to have more stations at reach and join pile-ups.
- Busy mode: When enabled, qFT8 will also try to call stations engaged in a QSO with someone else (marked as BUSY). This is useful to join a pile-up.
- + button: Manually call any arbitrary station by inputting their callsign.
- Station information: Displays detailed status for each decoded station.
Individual station entries consist of four information-rich rows:
The first row shows station details (left to right):
- QSO Status: Indicates your QSO history with this station (✗ = no QSO, ✓ = logged locally, ★ = confirmed via QRZ or LoTW).
- Callsign: The station's callsign.
- DXCC: The country or entity this station's callsign belongs to.
- Grid cell: The Maidenhead grid square this station is reporting.
- CQ zone: The CQ zone this station's callsign belongs to.
- ITU zone: The ITU zone this station's callsign belongs to.
- Band: The band on which the station was last heard.
The second row shows communication status (left to right):
- State: Current phase of communication:
- DIRECT: Heard and seemingly free right now, but never called CQ.
- 1/6 CQ: Heard calling CQ and seemingly free right now.
- 2/6 CALL: Called you.
- 3/6 RPT: Sent you a signal report.
- 4/6 RRPT: Replyed back to your report with their own.
- 5/6 RR73: Confirmed your report with RR73.
- 6/6 DONE: QSO completed (73 exchanged).
- GONE: Not heard in the last couple of cycles.
- TOO LONG: Your callsign and their callsigns are too long together to establish a communication, per FT8 digital mode limits.
- Signal strength: Strength in dB (shows "????" if not heard recently).
- Sequence: The last sequence this station was heard transmitting in (0 or 1).
- Delta time (Δt): Time synchronization offset in seconds between their time and yours.
- Distance: Estimated distance between their and your station Grid cells.
第3行と第4行は、その局とのメッセージ交換を表示し、UTC時刻、周波数オフセット、メッセージ本文(受信メッセージにはRx:、送信メッセージにはTx:が付きます)を含みます。設定 → アプリケーション → ユーザーインターフェースの局の表示モード(デフォルトはコンパクト - 最後のRx、他にコンパクト - 交互表示、コンパクト - 最後のRx/Tx、展開表示)に応じて、局カードには3行表示またはRxとTxの両方を同時に表示する4行表示のいずれかが適用されます。
注意すべき主な視覚的インジケーター:
- コーラル色のRxメッセージ(UTC、オフセット、本文):
この局から受信したRxメッセージが、現在または直前のサイクルにおいて自局/コールサイン(
/Pなどの複合コールサインやハッシュ化されたコールサインの一致を含む)宛てに直接送信されたことを示します。これにより、相手局が自局を呼んだ、または自局の送信に応答したことが即座に視覚的に分かります。一般的なCQ呼び出しや他局宛てのメッセージは強調表示されず、メッセージが直前のサイクルより古くなるとテキストの色は自動的に通常のグレーに戻ります。送信(Tx:)メッセージは常にニュートラルなグレーのままです。 - Red Callsign: AUTO mode has surpassed the retry limit for this station. It will be temporarily ignored unless you click "CALL" to reset it manually.
- Purple Callsign: This callsign is a target given your current criteria.
- Grey Callsign: The callsign matches your comma-separated excluded prefixes setting. AUTO mode will never target this station.
- Purple Highlighted Zone: This zone/entity (DXCC, Grid, CQ zone, ITU zone) is a target given your current criteria.
- Red Sequence number: The station is on the same sequence you have selected, causing a clash. Pressing "CALL" will automatically switch your sequence.
- Red Band: The station was last heard on a different band.
Stations are automatically sorted by relevance. Changing your target criteria or constraints will immediately re-sort the list.
↑ 目次へ戻るThe Log tab / Log(ログ)タブ
The log tab shows achieved QSOs.
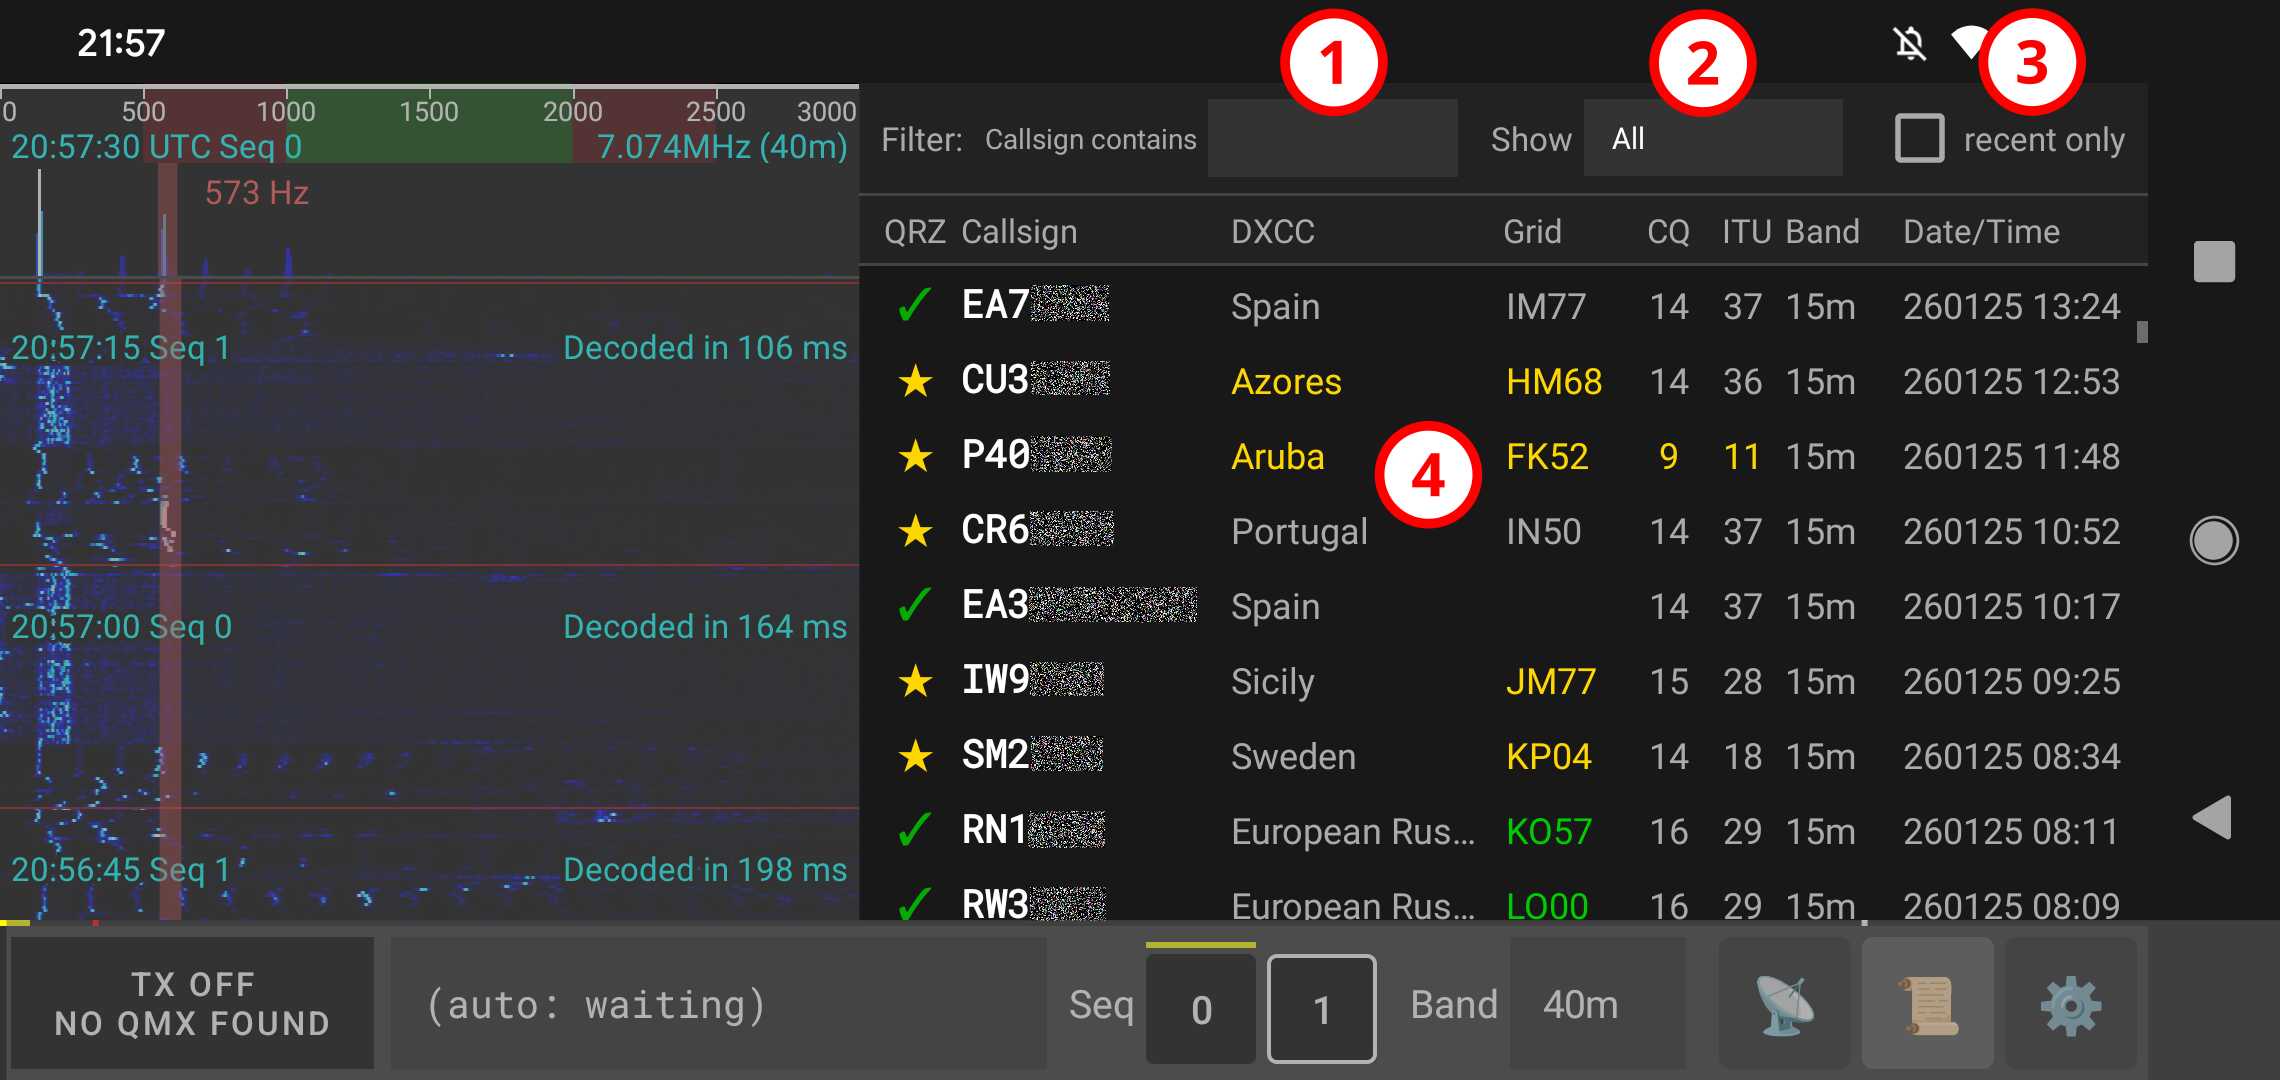
These are the components of the Log tab in detail:
- Callsign text filter: A filter for QSOs based on whether the callsign contains the text inputted.
- Status filter: A filter for QSOs that shows:
- All: Shows all recorded QSOs.
- Confirmed: Shows only QSOs that have been confirmed.
- Not confirmed: Shows QSOs that are not yet confirmed.
- Not uploaded: Shows QSOs that haven't been uploaded to QRZ.
- Duplicated: Shows QSOs that QRZ recognizes as duplicates.
- Rejected: Shows QSOs that were rejected by the other station in QRZ.
- Wrong Callsign: Shows QSOs recorded with a callsign different from the one currently configured.
- Non FT8/FT4: Shows QSOs recorded for a mode other than FT8 or FT4.
- Recent limit filter: A filter that shows only the most recent 100 QSOs with the given criteria.
- The list of QSOs: Displays the log entries with the following columns (from left to
right):
- QRZ: Indicates
your history with this station:
- ✗: No QSO records.
- ✓: Logged locally / Pending upload.
- ✓🕒: Uploaded to LoTW, awaiting confirmation.
- ✓: Uploaded to QRZ.
- ★: Confirmed on QRZ or LoTW (for QRZ-uploaded QSOs) or manually.
- ♻️: Reported as duplicate by QRZ.
- ❕: Station callsign mismatch, already uploaded.
- ⚠️: Station callsign mismatch, not uploaded.
- ⛔: Rejected status.
- Callsign: The station's callsign.
- DXCC: The country or entity this station's callsign belongs to.
- Grid cell: The Maidenhead grid square this station is reporting.
- CQ zone: The CQ zone this station's callsign belongs to.
- ITU zone: The ITU zone this station's callsign belongs to.
- Band: The band on which the station was last heard.
- QRZ: Indicates
your history with this station:
Key visual indicators to watch for:
- Yellow note below callsign: This QSO is for a station different than the one configured.
- Green Highlighted Zone (DXCC, Grid, ITU Zone, CQ Zone): This was the first unconfirmed QSO in your log for this zone.
- Yellow Highlighted Zone (DXCC, Grid, ITU Zone, CQ Zone): This was the first confirmed QSO in your log for this zone.
Editing QSOs: Tapping on any QSO in the list will open a prompt that allows manually marking a QSO as confirmed/unconfirmed locally in qFT8, or deleting a QSO locally in qFT8. Note that these actions are only local and are not synced to QRZ. Deleting a QSO in the app is irreversible, unless you keep an exported copy of the log file or it was uploaded to QRZ.
↑ 目次へ戻るThe World Map tab / World Map(世界地図)タブ
World Map(世界地図)タブは、局の地理的位置、受信トラフィック、交信実績(QSOアチーブメント)、太陽伝搬状態をリアルタイムで表示するインタラクティブな世界地図です。
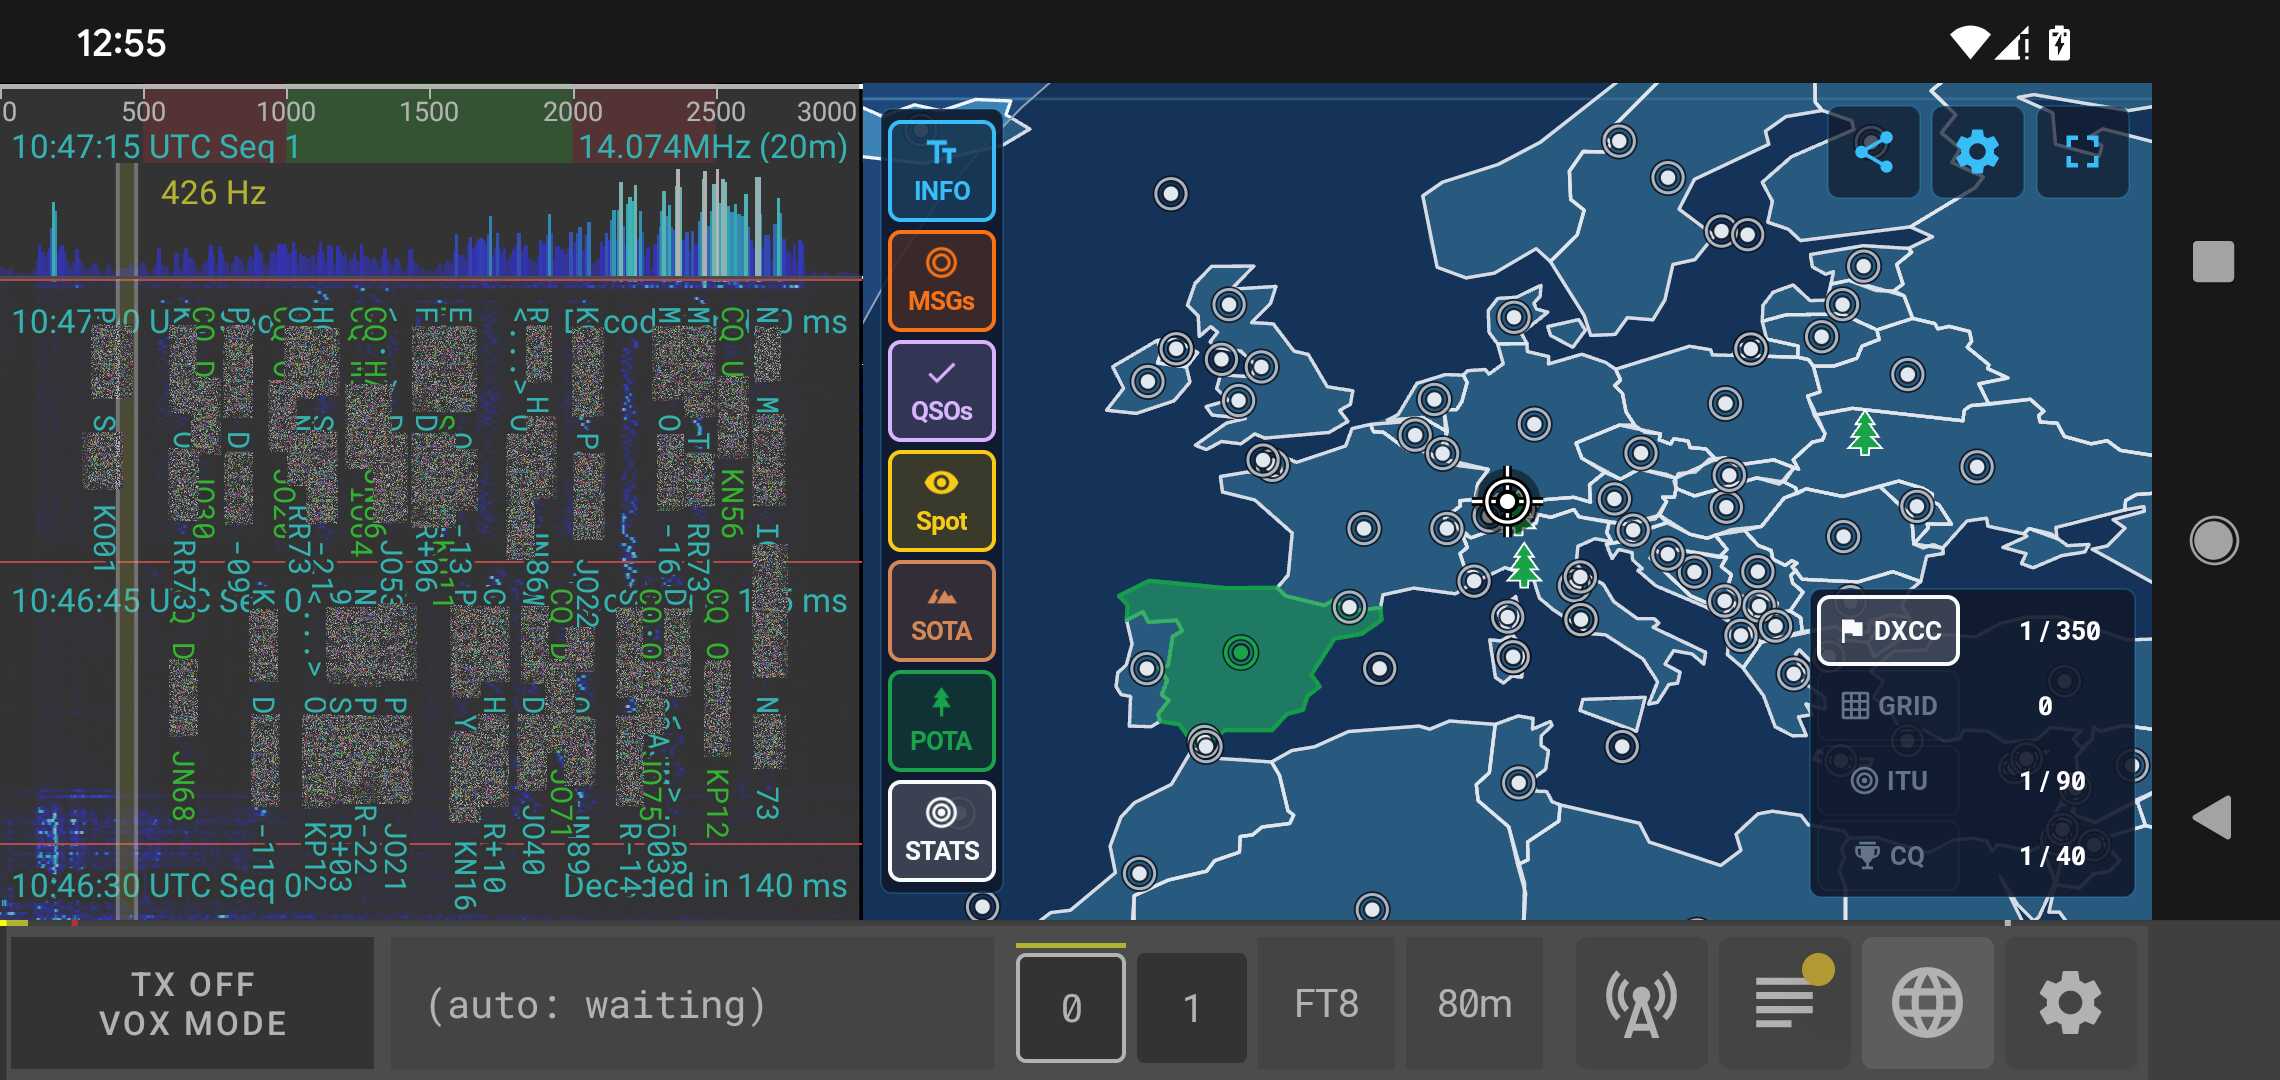
World Mapタブの各コンポーネントと機能の詳細は以下のとおりです:
- インタラクティブ地図と操作:
- ナビゲーション: ドラッグして地球上をスムーズに移動できます(対向子午線を越えた横スクロールにも完全対応)。2本指のピンチ操作で拡大・縮小が可能です。
- 地図テーマ: 上部ツールバーから4つのビジュアルスタイル(Bright Future、Console、Earth、Midnight Navy)を切り替えられます。
- HUD座標: タップした位置の地理座標(緯度・経度)およびMaidenheadグリッドロケーターをリアルタイム表示します。
- 左側ツールバー(情報およびオーバーレイの切替):
- INFO: 画面上の情報オーバーレイカード(時刻、太陽明暗境界線、太陽直下点位置、十字線座標)の表示を切り替えます。
- MSGs: ダイレクトメッセージのルートおよびマーカーの表示を切り替えます。受信メッセージ(自局宛)はオレンジ色、送信メッセージ(自局発)は黄色で表示されます。矢印の中央をタップするとメッセージ本文カードが表示されます。
- QSOs: 現在のセッションの交信マーカー(アンバーはログ記録済、エメラルドはQSL確認済)の表示を切り替えます。
- Spot: 自局が受信したバンド上のリアルタイム通信スポット(RX/CQはシアン)および自局の信号を受信報告したPSKReporter / WSPRnetのリバーススポッター(赤のひし形)の表示を切り替えます。
- SOTA: Summits On The Air(山岳運用)の山頂参照点およびアクティブ運用局(⛰️)の表示を切り替えます。
- POTA: Parks On The Air(公園運用)の公園参照点およびアクティブ運用局(🌲)の表示を切り替えます。
- Band: オンラインレポートに基づくバンド伝搬状況と自局周囲のスキップゾーン(ブラインドスポット)を表示します。インターネット接続がある場合、バンド切り替え時にリアルタイムで更新されます。
SOTA、POTA、STATS、Spot ボタンが点滅している場合は、更新データのダウンロードができなかったことを意味します。
- 右側ツールバー(実績および境界レイヤー):
- STATS: 選択中の境界レイヤーにおける交信・確認数の統計サマリーパネルの表示を切り替えます。
- DXCC: ログ状況に応じて色分けされた国・地域の境界線を表示します(緑はログ記録済/未確認、黄は確認済)。小島や微小地域は視認性の高いドットで表示されます。
- GRID: グローバルなMaidenheadグリッド(フィールドおよび4桁グリッドスクエア)と交信実績の塗りつぶしを表示します。
- ITU: 90のITU無線ゾーンと交信実績を表示します。
- CQ: CQマガジンの40のWAZゾーンと交信実績を表示します。
- 詳細カードと迅速なCALL操作:
局マーカー、スポット、公園、山頂をタップすると、詳細情報カードが表示されます:
- コールサインまたは参照名、DXCCエンティティ、公園/山頂の名称。
- デコードされたメッセージ本文、周波数、バンド、運用モード。
- 信号強度(SNR)またはシグナルレポート(RST)。
- グリッドロケーター、距離(km / mi)、方位角(°)、経過時間。
- CALLボタン: 選択した局への呼び出しを瞬時に開始します(必要に応じてバンドや運用モードを自動的に切り替えます)。
The Settings tab / Settings(設定)タブ
The settings tab allows configuration of qFT8.
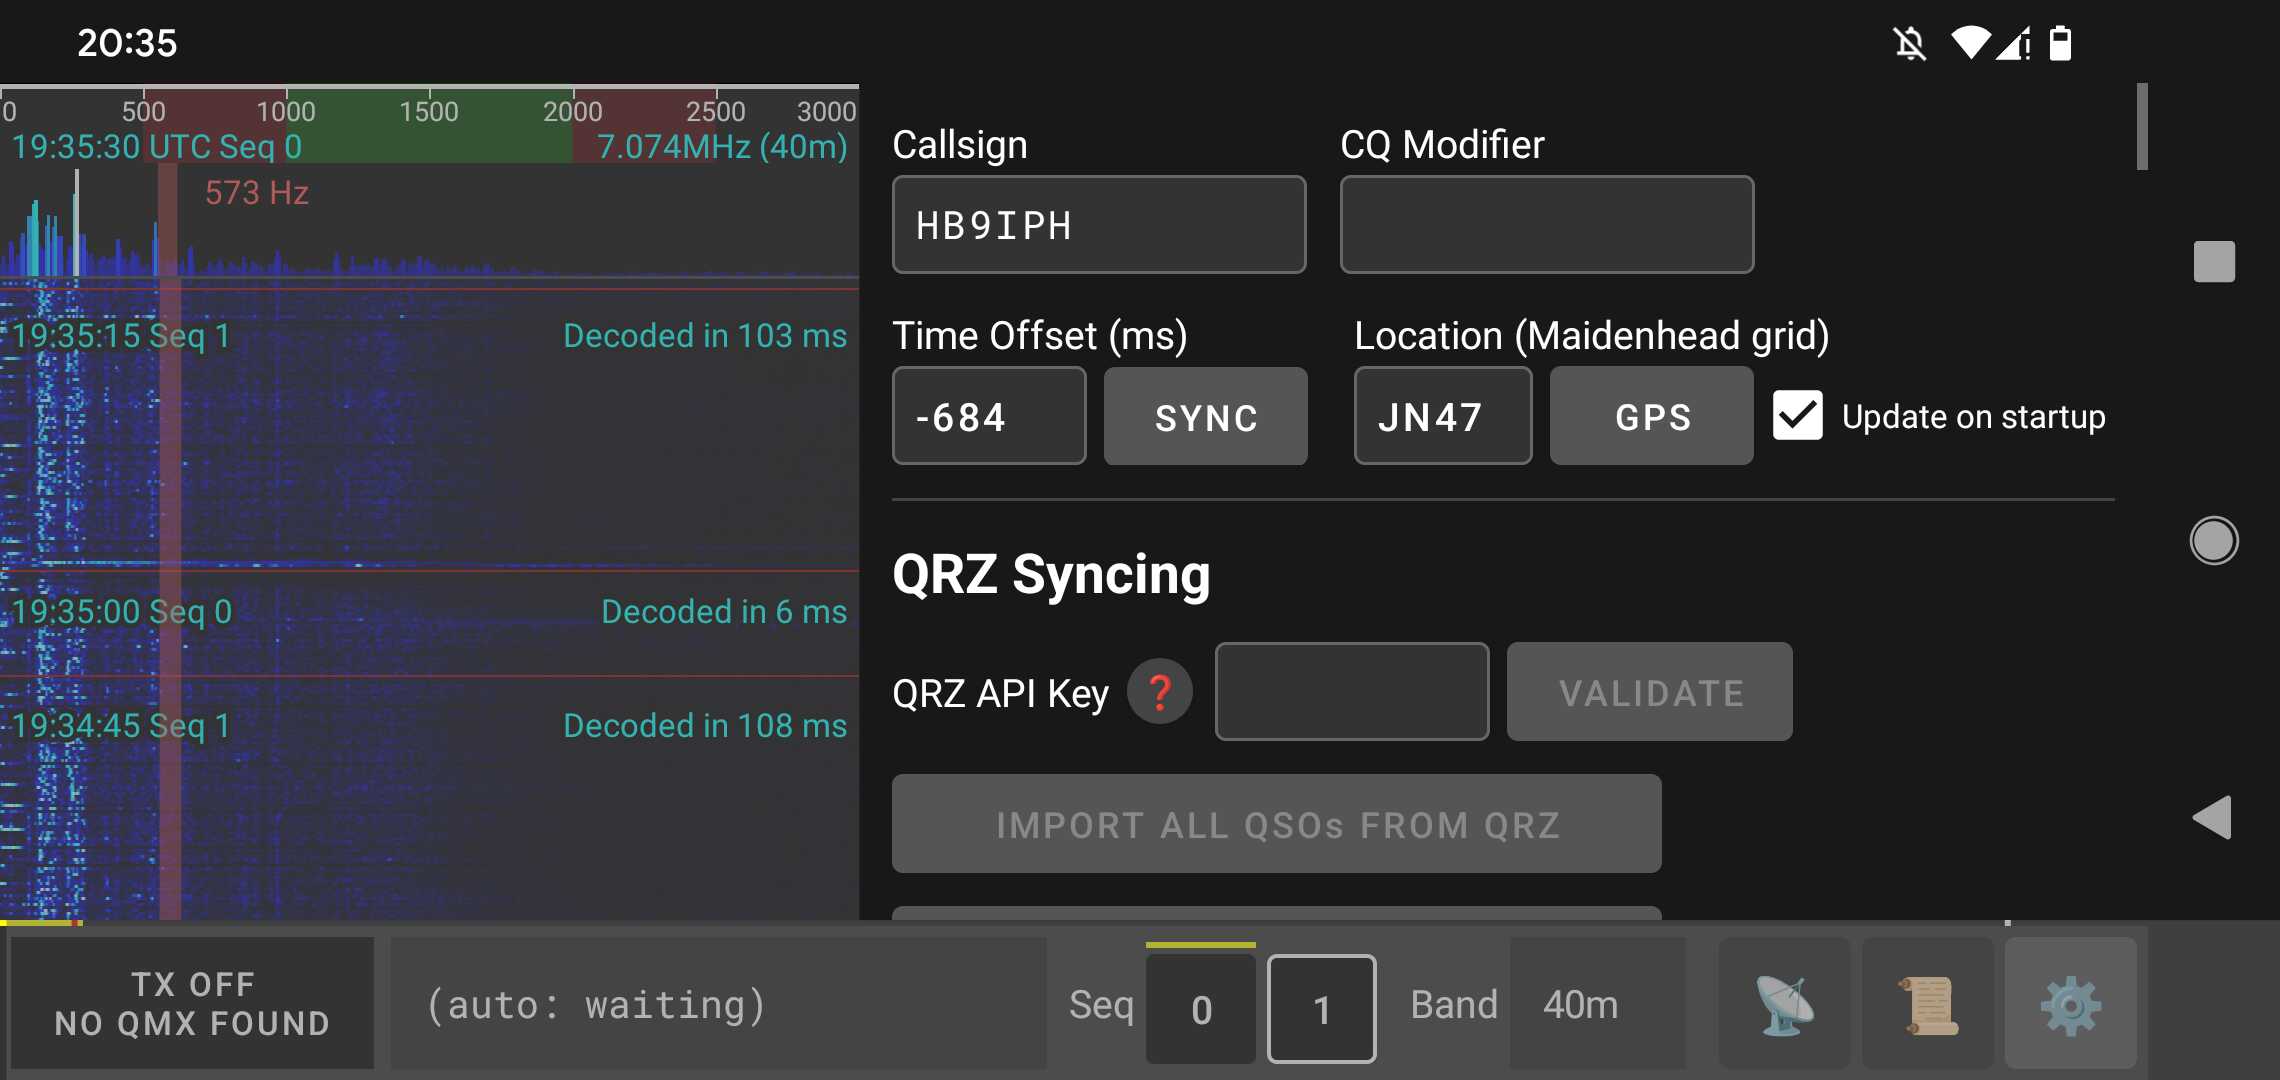
The settings tab is organized as follows:
- Callsign: Your amateur radio callsign (mandatory to transmit). Must comply with your license.
- CQ modifier: Optional text appended to your CQ calls (e.g., "SOTA").
- Device: Used to configure and select your radio transceiver device (e.g., QMX, QDX, Kenwood TS-480 / TS-590 / TS-2000 series, or VOX/Audio-only) and connection parameters.
Submenus and Options
- DEVICE CONFIGURATION: Select the audio device, set transmission volume and VOX thresholds, and configure how the radio is keyed.
- IMPORT/EXPORT LOGS: Import or export your QSO logbook using standard ADIF (.adi) files.
- QSO SYNCING: Set up integration with QRZ and LoTW for log synchronization and verification.
- DELETE QSOs: Clear local QSOs (this action only affects the local app log).
- APPLICATION: General settings including user interface language.
- SPECTROGRAM: Choose which overlays the waterfall draws — decode time, UTC time and sequence, messages, peak lines and the selected station's frequency — and the overlay font scale.
- WORLD MAP: Choose what the map shows and for how long: QSOs achieved, spots, and messages sent and received, each over its own time window.
- TIME AND LOCATION: Configure time offset synchronization (NTP or GPS) and your Maidenhead grid locator.
- AUTO OPERATION: Configure automation preferences, retry counts, and prefix exclusions.
- DIGITAL MODES: Every mode's decoding options in one place — FT8/FT4/FT2, LQ8/LQ4, JS8 and WSPR — including the shared Deep decode setting and how many threads decoding may use.
- BAND SELECTION: Customize active bands and band switching behavior.
- REMOTE CONTROL WEB SERVER: Enable and configure the built-in web server for remote control.
- PSKREPORTER SETTINGS: Upload the stations you receive to PSKReporter, and record the antenna and rig reported alongside them.
- WSPRNET SETTINGS: Upload WSPR spots to WSPRnet and review the recent upload log.
Automated operation (AUTO) / 自動運用(AUTOモード)
AUTO mode is the primary way to use qFT8. In this mode, the application automatically analyzes the decoded messages at the end of every cycle and selects the most relevant station to contact based on your target criteria.
How Target Selection Works / ターゲット選択の仕組み
The Stations tab displays a list of active stations, sorted such that the most relevant candidates (based on your criteria) appear at the top. At the end of each decode cycle, qFT8 looks at this sorted list and attempts to call the first eligible station. If no eligible target is found, it will automatically start calling CQ to attract callers. qFT8 always replies to calls in AUTO mode.
Criteria and Filters / 基準とフィルター
You can fine-tune the automation using the three dropdown menus at the top of the Stations tab:
- Target: Defines what "achievement" you are looking for (Anyone, DXCC, CQ Zone, ITU Zone, Grid).
- Interval: How often you are willing to contact the same entity (Once, Always, Daily, Weekly, Monthly).
- Qualifier: Narrow down the uniqueness requirement (Per callsign, Per band, Until zone/entity confirmed).
Manual Override: You can always manually intervene by tapping the CALL button for a specific station. This enters CALL mode for that specific QSO. Once finished, qFT8 seamlessly drops back into AUTO mode.
Retry Mechanism / 再試行(リトライ)制限と一時除外
To prevent qFT8 from calling a non-responsive station indefinitely, qFT8 offers a built-in retry and ban system, enabled by default. You can configure these in the Settings tab under Retry Logic:
- Retry Limit: The maximum number of times qFT8 will repeat a transmission stage for a station that isn't responding.
- Retry Window: The time period during which these attempts are counted.
- Retry Cooldown: If the limit is reached, the station is "Banned" for this duration. AUTO mode will ignore banned stations until the cooldown expires or the station replies.
Example Optimized Setups / おすすめの設定例
Here are some recommended combinations of criteria for common goals:
| Goal | Target | Interval | Condition |
|---|---|---|---|
| Maximize unique stations | Anyone | Once | Per callsign or zone |
| Maximize unique stations per band | Anyone | Once | In different bands |
| Maximize unique DXCC entities | DXCC | Once | Per callsign or zone |
| Maximize unique DXCC per band | DXCC | Once | In different bands |
| Maximize confirmed DXCC entities | DXCC | Once | Until zone confirmed |
| Maximize confirmed DXCC per band | DXCC | Once | Per band + Until zone |
| Collect unique Grids per band | Grid | Once | Per band + Until zone |
| Work all Zones (CQ/ITU) | I/C/D/G | Once | Until zone confirmed |
| Contest: Unique stations on different bands | Anyone | Once | In different bands |
| Contest: Points for same station on different days | Anyone | Daily | In different bands |
Note that in all these cases, you may enable Spy and Busy to reach out to more stations and enter their pile-ups.
Note: If your callsign is not standard (e.g. with "/"-separated suffixes or prefixes, long callsigns, or other callsigns with numbers in rare positions), you probably want to set Target to Call CQ as your callsign will likely be sent out hashed and only stations who have seen you call CQ will be able to map the hash to your callsign. You may still call stations but they will only map the message to your callsign if they recently heard you call CQ.
↑ 目次へ戻るManual operation (CALL) / 手動運用(CALLモード)
While qFT8 is highly automated, you can take control at any time. Tapping the CALL button next to any station in the Stations tab will immediately enter CALL mode and attempt to establish a QSO with that specific station.
Once the QSO for the manual target is completed (successfully or not), qFT8 will automatically fallback to AUTO mode and resume your previous automated strategy (e.g., calling CQ).
Timing for Manual Operators / 手動オペレーター向けのタイミング
If you find that you'd like more time at the end of the cycle to make manual decisions, you can get yourself more margin by adjusting the FT8 Settings in the Settings tab:
- Decrease "Start decoding time": Starts processing the audio earlier.
- Increase "Start transmission time": Delays the onset of your reply.
Warning: Adjusting these values aggressively into the margins may make your messages much more difficult for other stations to decode, as you are reducing the effective time available for the actual FT8 signal within the sync window.
ADIF Import/Export / ADIFログのインポート・エクスポート
qFT8 supports the standard ADIF (Amateur Data Interchange Format) for interoperability with other logging software, cloud services, and for manual backups.
Importing QSOs / QSOのインポート
The import feature allows you to bring records from other sources (like other logging programs or backups from other devices) into your local qFT8 log.
- Filtering Options: You can choose whether to import only FT8 records or all modes, and whether to restrict the import to your current callsign or include all operators.
- Automatic Deduplication: qFT8 intelligently merges records. It prevents duplicates by matching QRZ Log IDs and QSO timestamps. If an imported record has a confirmed status or a valid Log ID that your local record is missing, entry by updating it with the better data.
Exporting QSOs / QSOのエクスポート
Tapping EXPORT QSOs generates an ADIF 3.1.6 file and opens the system Share sheet, allowing you to save the log to your device or send it via email/messaging.
- Time Range: You can export your entire history or use the UTC date/time pickers to isolate a specific activation or contest period.
- Status Filters: Useful for claiming awards (export "Confirmed Only") or for manual uploads to other services (export "Not Uploaded to QRZ" to avoid duplicates).
- Hunter Criteria / ハンター基準: ログを "All logs"、"Only POTA contacts (parks)"、または "Only SOTA contacts (summits)" でフィルタリングし、相手局の参照コード(
<POTA_REF>/<SOTA_REF>)を含む的確なアワード申請用ファイルを生成できます。 - SOTA reference: As detailed
in the SOTA section,
qFT8 can
automatically inject the summit reference into the
<MY_SOTA_REF>field of every exported record. - POTA reference: As detailed
in the POTA section,
qFT8 can
automatically inject the park reference into the
<MY_SIG>,<MY_SIG_INFO>, and<MY_POTA_REF>fields of every exported record.
Note: For very large logs (over 100KB), qFT8 will display a warning as the deduplication and sorting process may take a few moments to complete on your mobile device.
QRZ Integration / QRZ連携
qFT8 offers deep integration with QRZ.com to keep your logbook automatically synchronized. Note that QRZ integration is a subscription service that requires a QRZ paid subscription (XML Logbook Data or higher). If you prefer a free alternative, consider using LoTW integration, which is provided at no charge by the ARRL.
How it Works / 機能の特徴
To enable QRZ integration, you need to provide your QRZ API Key in the settings tab. You can find your API Key on the official QRZ Logbook API page. Once entered and VALIDATED, you can enable "Upload QSOs to QRZ" for automatic background management.
- Automatic Uploads: Every time a QSO is completed (successfully reaching the 6/6 DONE state), qFT8 immediately attempts to upload it to your QRZ logbook.
- Background Reliability: If an upload fails (e.g., due to no internet connection or server timeouts), qFT8 doesn't give up. A background worker will automatically retry failed uploads every 5 minutes. This process is silent and ensures your log eventually reaches the cloud once connectivity is restored.
- Smart Skipping: qFT8 protects your logbook integrity by only uploading QSOs that match your current configured callsign and the FT8 mode. Non-FT8 entries, QSOs for different callsigns, or QSOs imported from LoTW are skipped automatically to prevent excessive API requests.
Syncing Confirmations / コンファーム(交信確認)の同期
The integration goes beyond just uploading. qFT8 also polls QRZ to see if your QSOs have been confirmed.
- Immediate check: 30 seconds after a QSO is completed and uploaded, qFT8 will check back with QRZ to see if the other station has also uploaded the QSO; if they have, the QSO will be synchronized as confirmed immediately.
- Automatic Sync: By default, qFT8 queries QRZ every 6 hours (configurable) in batches of 250 QSOs at a time, rotating through your entire unconfirmed log to ensure that even older QSOs are eventually checked for new confirmations.
- Confirmation Star (★): When a QSO uploaded to QRZ is confirmed on either QRZ or LoTW, it is highlighted with a gold star. You can also manually confirm any QSO to show this indicator. When QRZ reports a confirmation, the status icon in your Log tab will automatically change to a gold star.
- Manual Sync: Updates to the 250 least recently synchronized QSOs can also be triggered manually in the settings.
Pro Tip: You can see the sync progress in settings under "Oldest QSO synced for confirmation". There's no urgency in keeping this up to date, as qFT8 will take care of it over time.
Log Syncing Strategy / ログ同期戦略
In the synchronization settings, you can choose how qFT8 determines if a QSO is "fully uploaded" via the "Consider a QSO uploaded when uploaded to:" option:
- Any of LoTW and QRZ: A good default if you only have one of the services configured.
- Both: Select this for maximum safety, requiring the QSO to be successfully sent to both services before being considered finalized and ready to be checked for confirmation.
- QRZ (except imported from LoTW): Recommended if QRZ is your primary logbook. Note: QSOs imported from LoTW are marked as synced but not uploaded to QRZ to avoid API limits (which only allow one-by-one uploads); these can be synced within QRZ itself later.
- LoTW: Recommended if you consider LoTW your primary source of truth.
Logbook of the World(LoTW)連携
qFT8 provides a robust integration with the ARRL Logbook of the World (LoTW). Integrating with LoTW is highly recommended for confirming your contacts and earning awards like DXCC and WAS.
Setup Requirements / 必要な設定
To fully enable LoTW features, including automatic uploads and confirmation checks, you need to provide four specific pieces of information in the settings tab:
- 1. LoTW Username: Your official callsign used for the LoTW service.
- 2. LoTW Password: The password you use to log into the LoTW website. This is different from the certificate password.
- 3. .p12 TQSL Certificate: A digital signature file exported from the TQSL application. For instructions on how to request and export this certificate, refer to the official LoTW help page.
- 4. Certificate Password: The password you set when exporting the .p12 file from TQSL (this may be empty if you chose not to set one).
Station Location Automation: Details such as ITU Zone, CQ Zone, and Station Name are automatically determined from your callsign. No manual configuration is required for these fields.
Features / 主な機能
- Automatic Uploads: When Upload QSOs to LoTW when achieved is enabled, qFT8 will automatically sign and upload every new QSO to LoTW in the background as soon as it is logged.
- Auto-Check Confirmation: When enabled, qFT8 will perform a single, immediate confirmation check exactly 30 seconds after a successful upload. This allows you to see if your contact has been confirmed almost instantly.
- Periodic Background Sync: Configure Sync confirmations every __ hours to check for new confirmations in the background at your preferred interval (e.g., every 6 hours). This keeps your entire logbook up to date without manual intervention.
- Importing Logbook: Click IMPORT QSOs FROM LoTW to download your entire LoTW history into qFT8. Note that these imported QSOs are not automatically uploaded to QRZ to avoid API rate limits.
- Pending Indicator: A small yellow dot on the Logs button indicates that there are QSOs waiting to be uploaded to LoTW.
Log Syncing Strategy / ログ同期戦略
In the synchronization settings, you can choose how qFT8 determines if a QSO is "fully uploaded" via the "Consider a QSO uploaded when uploaded to:" option:
- Any of LoTW and QRZ: A good default if you only have one of the services configured.
- Both: Select this for maximum safety, requiring the QSO to be successfully sent to both services before being considered finalized and ready to be checked for confirmation.
- QRZ (except imported from LoTW): Recommended if QRZ is your primary logbook. Note: QSOs imported from LoTW are marked as synced but not uploaded to QRZ to avoid API limits (which only allow one-by-one uploads); these can be synced within QRZ itself later.
- LoTW: Recommended if you consider LoTW your primary source of truth.
Summits On The Air (SOTA) / 山岳移動運用(SOTA)
qFT8は、SOTA(Summits On The Air)のチェイサー(ハンター)およびアクティベーター向けに、リアルタイムの自動スポット取得、参照点トラッキング、アワード達成ハイライト、専用ADIFエクスポートフィルターなど充実したツールを統合提供しています。
リアルタイムSOTAスポットの自動取得
インターネット接続時、qFT8はバックグラウンドで公式SOTA APIに自動アクセス(90秒ごとに更新)し、世界中のアクティブな山岳運用スポットを取得します。
- 世界地図での表示: アクティブなアクティベーターが山岳マーカー(⛰️)、コールサイン、山名、標高、運用周波数とともに世界地図上に表示されます。
- 自動参照点照合: アクティベーターを受信すると、qFT8はライブスポットデータベースとコールサインを照合し、正確な山頂コード(例:
JA/TK-001,HB/BE-001,W6/NC-001)を自動取得します。 - 自動バックフィル(事後補完): 参照点の受信前やスポット取得前に
CQ SOTAを送信する局とQSOを完了した場合でも、qFT8は新たに届いたスポットを参照して、直近(1時間以内)にログされたQSOへ山頂コードを自動補完します。
チェイサー(ハンター)としての運用
山頂から運用中の局をハントする手順:
- Stationsタブで、ターゲット優先度ドロップダウンを SOTA hunter(または POTA + SOTA hunter)に設定します。
- 視覚バッジと参照点カラム: アクティブなSOTA局(オンラインでスポットされた局または
CQ SOTA送信局)は2行目に SOTA バッジが表示されます。また、DXCC列ヘッダーが SOTA Reference に切り替わり、山頂コードが直接表示されます。 - 未交信 vs 交信済み山頂のハイライト:
- 未交信の山頂: 鮮やかな紫色の SOTA バッジと紫色の参照点テキストで強調され、新規ハント対象であることが一目で分かります。
- 交信済みの山頂: 落ち着いたグレーのバッジで表示され、ログ内の交信済み山頂と新規山頂を即座に区別できます。
- AUTOハント: AUTO モード時、qFT8は未交信のSOTAアクティベーターを通常のCQ局より優先し、信号強度(SNR)順に自動呼出します。
ログ内のSOTA参照点の管理と編集
qFT8はSOTA交信履歴の確認・修正機能を備えています:
- QSOsタブのSOTA Hunterビュー: QSOsタブで SOTA Hunter ビューを選択すると、山頂参照点を確認できます。初回コンファーム済みの山頂はゴールド、未コンファーム初回達成はイエローでハイライトされます。
- 山頂参照点の編集: ログ内のQSOをタップして詳細ダイアログを開き、Edit SOTA reference をタップして山頂コード(例:
JA/TK-001)を追加・修正・削除できます。 - QRZ Logbookの自動同期(ACTION=REPLACE): すでにQRZへアップロード済みのQSOの参照点を編集した場合、qFT8は自動的に重複を作成せずその場でQRZの既存レコードを更新します。
- LoTWに関する注意: LoTW(Logbook of The World)はアップロード済みQSOの修正をサポートしていないため、参照点の編集時はLoTWへ自動同期されません。
アクティベーター(山頂側)としての運用
山頂からSOTA運用を行う手順:
- 時刻同期: 現地運用前にデバイスの時計が正確に同期されていることを確認します。
- CQ修飾子の設定: Settingsタブで CQ modifier を
SOTAに設定します。CQ送信時にCQ SOTA [コールサイン]が送信されます。 - AUTOモードの設定: Stationsタブでターゲット優先度を Call CQ に設定し、AUTO モードを有効にします。
- アクティベーション開始: TX を有効にします。qFT8が自動でCQを出し、応答してきたチェイサーと順次交信します。
手動介入: 複数のチェイサーから同時に呼ばれて特定の局を選択したい場合は、その局の CALL をタップしてください。交信完了後、自動的にCQ送信へ復帰します。
SOTAログのエクスポート(チェイサーおよびアクティベーター向け)
アワード申請用ログやアクティベーター用ログとして適切なADIFファイルを生成できます:
- Settingsタブで ADIF File Export をタップします。
- チェイサー(ハンター)の場合:
- Hunter criteria を Only SOTA contacts (summits) に設定すると、山頂参照点と交信したQSOのみ(
<SOTA_REF>含有)が出力されます。
- Hunter criteria を Only SOTA contacts (summits) に設定すると、山頂参照点と交信したQSOのみ(
- アクティベーターの場合:
- Selected time range で運用時間帯(UTC)を指定します。
- Event で SOTA を選択し、運用した山頂コード(例:
JA/TK-001)を入力します。全レコードに<MY_SOTA_REF>が自動付加されます。
- Summit-to-Summit(S2S): 山頂運用中に他の山頂アクティベーターと交信した場合、自局の山頂コード(
<MY_SOTA_REF>)と相手局の山頂コード(<SOTA_REF>)が同時に出力されます。 - EXPORT QSOs を押してADIFファイルを保存または共有します。
Parks On The Air (POTA) / 公園移動運用(POTA)
qFT8は、POTA(Parks On The Air)のハンターおよびアクティベーター向けに、リアルタイムの自動スポット取得、公園コードの追跡、参照点の編集、柔軟なADIFエクスポート機能を完全に統合しています。
リアルタイムPOTAスポットの自動取得
インターネット接続時、qFT8はバックグラウンドで公式POTA APIに自動アクセス(90秒ごとに更新)し、世界中のアクティブな公園運用スポットを取得します。
- 世界地図での表示: アクティブな公園アクティベーターが公園マーカー(🏞️)、コールサイン、公園名、運用周波数とともに世界地図上に表示されます。
- 自動参照点照合: 公園運用局からの電波を受信すると、qFT8はアクティブスポットと照合して公園コード(例:
JA-0001,K-1234,US-0001)を自動認識します。 - 自動バックフィル(事後補完): 参照点の受信前やスポット取得前に
CQ POTAを送信する局とQSOを完了した場合でも、qFT8は新着スポットを監視して直近(1時間以内)のQSOへ公園コードを自動補完します。
ハンターとしての運用
公園から運用中の局をハントする手順:
- Stationsタブで、ターゲット優先度ドロップダウンを POTA hunter(または POTA + SOTA hunter)に設定します。
- 視覚バッジと参照点カラム: アクティブなPOTA局は2行目に POTA バッジが表示され、DXCCヘッダーが POTA Reference に切り替わって公園コードが表示されます。
- 未交信 vs 交信済み公園のハイライト:
- 未交信の公園: 鮮やかな紫色の POTA バッジと紫色の参照点テキストで強調され、未交信の新規公園であることが一目で分かります。
- 交信済みの公園: 落ち着いたグレーのバッジで表示され、混雑時でも未交信公園を容易に優先できます。
- AUTOハント: AUTO モード時、qFT8は未交信のPOTA局を一般局より優先し、信号強度(SNR)順に自動呼出します。
ログ内のPOTA参照点の管理と編集
アプリ内で直接POTAハンターログの確認・修正が可能です:
- QSOsタブのPOTA Hunterビュー: QSOsタブのビューを POTA Hunter に切り替えると、公園参照点が表示されます。初回コンファーム済みの公園はゴールド、未コンファーム初回達成はイエローでハイライトされます。
- 公園参照点の編集: ログ内のQSOをタップして Edit POTA reference を選択し、公園コード(例:
JA-0001,K-1234)を追加・変更・削除できます。 - QRZ Logbookの自動同期(ACTION=REPLACE): QSOの公園参照点を更新すると、qFT8は重複を作らずその場でQRZの既存レコードを自動更新します。
- LoTWに関する注意: LoTW(Logbook of The World)はアップロード済みQSOの修正をサポートしていないため、参照点の編集時はLoTWへ自動同期されません。
アクティベーターとしての運用
公園からPOTAアクティベーションを行う手順:
- 時刻同期: 運用開始前にデバイスの時計が正確であることを確認します。
- CQ修飾子の設定: Settingsタブで CQ modifier を
POTAに設定し、CQ POTA [コールサイン]を送信するようにします。 - AUTOモードの設定: Stationsタブでターゲット優先度を Call CQ に設定し、AUTO モードを有効にします。
- アクティベーション開始: TX を有効にします。qFT8が自動でCQを出し、応答するハンターと順次交信します。
手動介入: 待機中の任意の局の CALL をタップすると、そのQSOを優先処理した後にAUTO CQへ戻ります。
POTAログのエクスポート(ハンターおよびアクティベーター向け)
pota.appへ直接アップロード可能な標準ADIFファイルを生成できます:
- Settingsタブで ADIF File Export をタップします。
- ハンターの場合:
- Hunter criteria を Only POTA contacts (parks) に設定すると、公園と交信したQSOのみ(
<POTA_REF>含有)が出力されます。
- Hunter criteria を Only POTA contacts (parks) に設定すると、公園と交信したQSOのみ(
- アクティベーターの場合:
- Selected time range で運用時間帯を指定します。
- Event で POTA を選択し、運用した公園コード(例:
JA-0001,K-1234)を入力します。全レコードに<MY_SIG>POTA,<MY_SIG_INFO>,<MY_POTA_REF>が自動付加されます。
- Park-to-Park(P2P)および Park-to-Summit(P2S): 運用中に他の公園や山頂と交信した場合、自局の公園コード(
<MY_POTA_REF>)と相手局の参照点(<POTA_REF>/<SOTA_REF>)が同時に出力されます。 - EXPORT QSOs を押してログファイルを保存または共有します。
JS8Chat / JS8チャット
When operating in JS8 mode, qFT8 provides a conversational free-text chat interface alongside traditional FT8/FT4 QSO operations. JS8 enables robust, weak-signal keyboard-to-keyboard messaging at multiple configurable speeds (Slow 30s, Normal 15s, Fast 10s, and Turbo 6s slots).
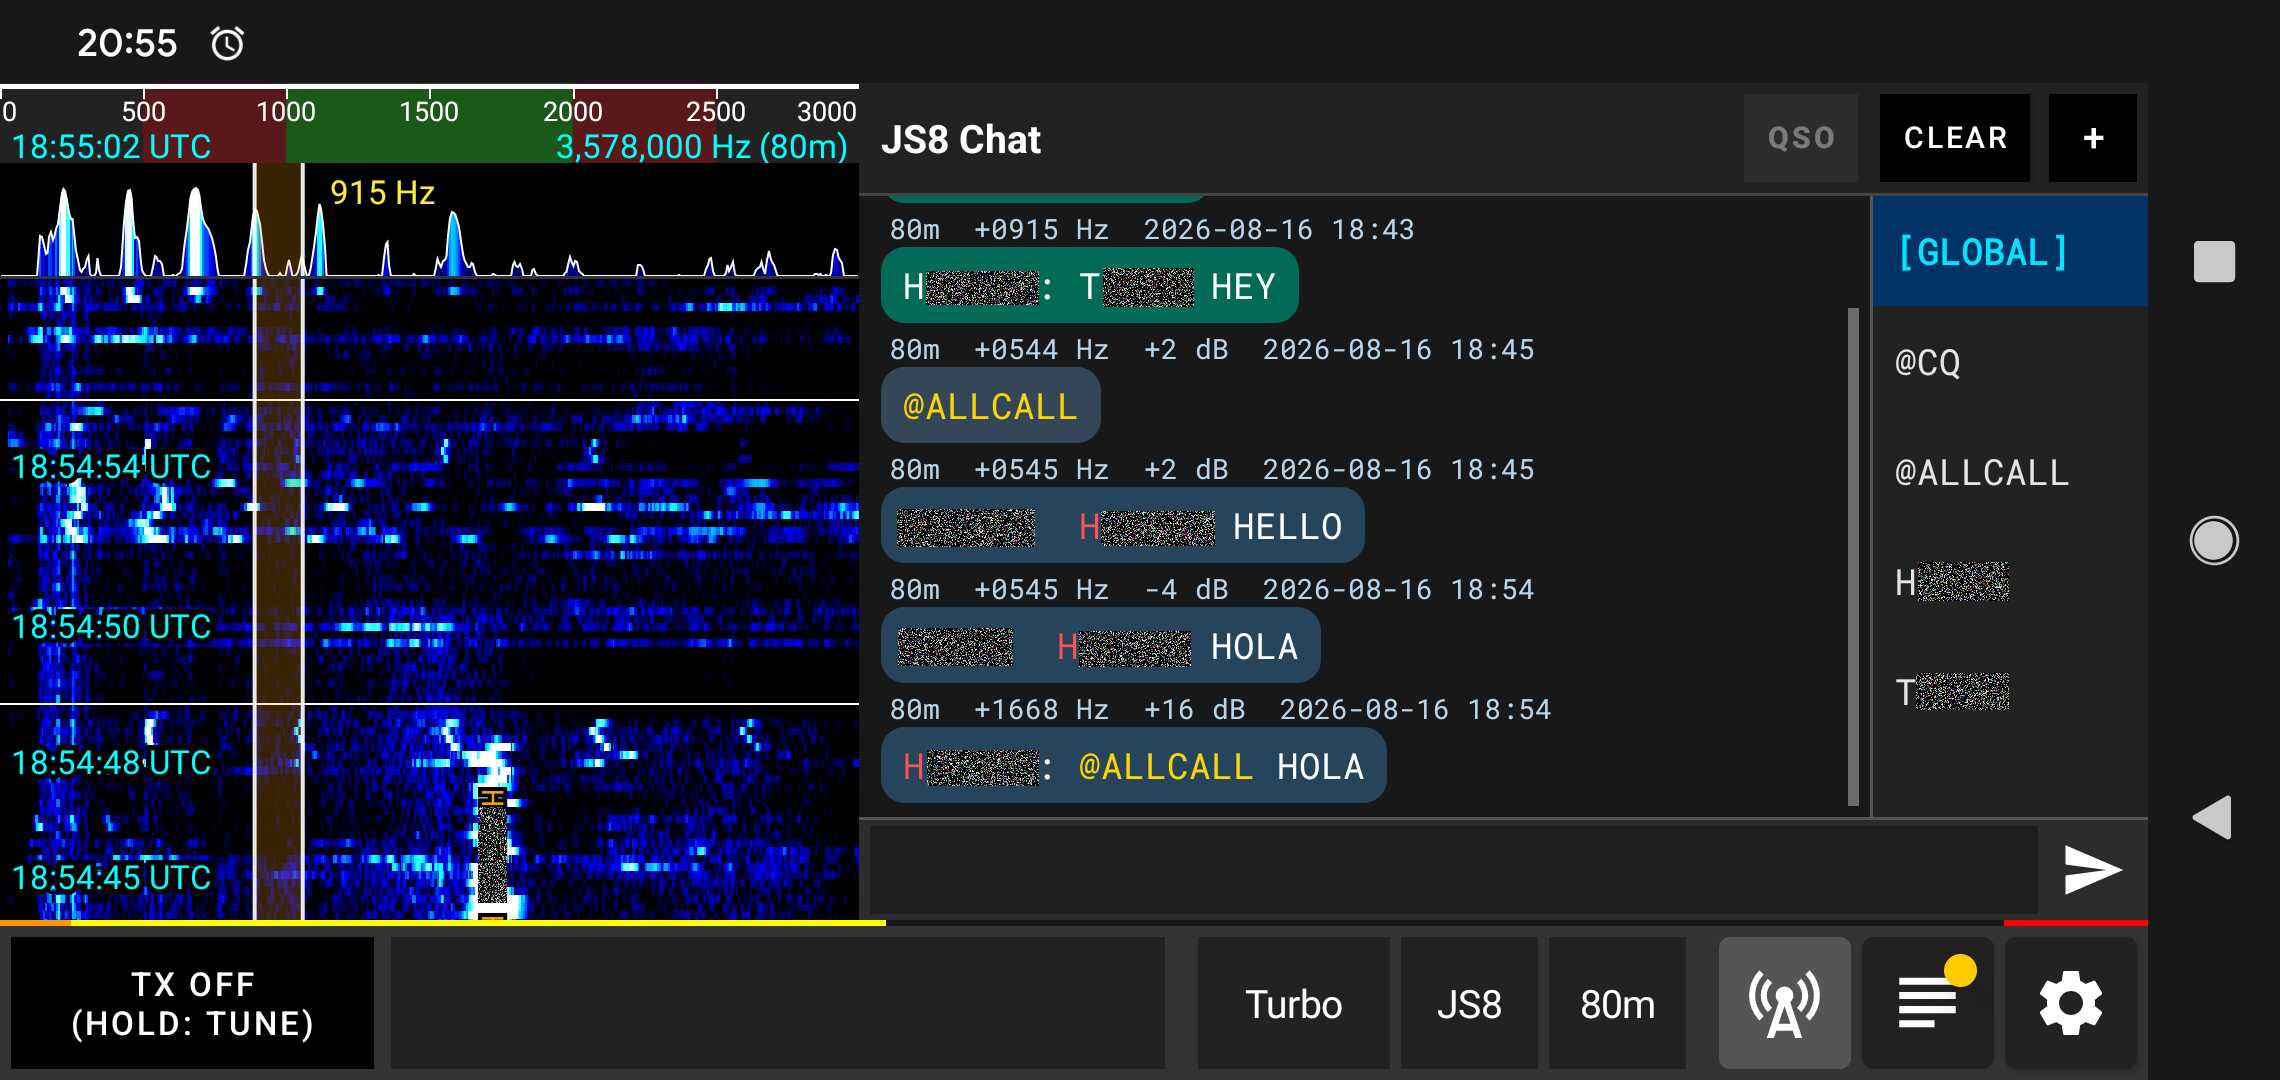
Channel Types & Routing / チャンネルタイプとルーティング
The chat panel on the right-hand side organizes incoming and outgoing traffic into separate channel tabs:
[GLOBAL]Master Channel: Displays every decoded JS8 transmission across the entire audio passband, as well as all of your own transmissions. This gives you a complete live overview of all band activity in one place.- Broadcast Group Channels (
@CQ,@ALLCALL): Used for general calls and announcements to all listening stations. Messages sent to@CQor@ALLCALLwill be seen by anyone tuned to the frequency. - Custom Group Channels (
@GROUPNAME): qFT8 supports custom directed groups (e.g.@EMERGENCY,@SOTA,@NET). When a message is sent or received with a@GROUPtag, it is automatically organized into its dedicated channel tab. - Direct Station Channels (Callsign Tabs): Selecting a specific station from the channel list or the stations table opens a dedicated conversation thread with that callsign.
Over-the-Air Transmission (Not Private): All JS8 messages are transmitted in the clear as standard amateur radio digital signals. Direct station chats route conversation history into a dedicated tab for convenience, but they are not encrypted or private and can be received by any station monitoring the frequency.
Composing & Sending Messages / メッセージの作成と送信
- Select a Target: In the right-hand panel, tap a channel tab (
[GLOBAL],@CQ,@ALLCALL, a group, or a specific station callsign). - Enter Message: Type your text in the input box at the bottom (supports full standard ASCII text up to 100 characters).
- Send: Tap the Send button.
Tapping on Messages (Quick Chat & Details) / メッセージのタップ操作(個別チャット・詳細)
Tapping on any message in the chat log opens a detail dialog showing the full UTC timestamp, audio frequency, SNR, Maidenhead grid, and message content:
- Received Messages (RX): Tap CHAT to immediately open a direct chat tab with the transmitting station, or GROUP CHAT if the message was addressed to a group.
- Transmitted Messages (TX): Tap RESEND to automatically re-populate the text input box and target channel to easily resend the message.
Multi-Chunk Message Streaming / 長文メッセージのマルチチャンク分割送信
If your message is longer than what can fit inside a single JS8 transmission frame:
- qFT8 automatically splits the message into consecutive multi-chunk frames.
- The app automatically transmits each chunk in sequential time slots until the entire message has been delivered.
- A visual progress indicator displays the ongoing multi-slot transmission status (e.g.
TX (1/3)). - If you need to stop sending before all chunks finish, tapping the Send/Stop button opens a prompt allowing you to cancel the remaining queued transmission.
Managing Channels (Long-Press Actions) / チャンネル管理(長押し操作)
右側パネルのコールサインタブまたはグループチャンネルタブを長押し(ホールド)すると、管理メニューが開きます:
- Clear Chat / チャットをクリア: 選択したチャンネルタブのメッセージ履歴を消去します。
- Close Chat / チャットを閉じる: タブを閉じ、アクティブチャンネルバーから削除します。
- Export Chat / チャットをエクスポート: 選択したチャンネルのメッセージ履歴全体をテキストファイルに書き出します。
Automated Query Replies (AUTO Mode) / クエリへの自動応答(AUTOモード)
AUTOボタンが有効な場合、qFT8は他局から受信したダイレクトクエリ(SNR?、HW CPY?、GRID?、INFO?、STATUS?、HEARING?など)およびハートビートメッセージ(@HB HEARTBEAT)に自動的に応答します。
例えば、他局から自局コールサイン SNR?や自局コールサイン HW CPY?を受信すると、qFT8は手動操作を必要とせず、シグナルレポート応答(例: SNR -08)を自動的にキューに入れて送信します。同様に、ハートビート送信(@HB HEARTBEAT)を受信した際も、qFT8はハートビート確認応答(HEARTBEAT SNR -08)を自動的にキューに入れて送信局へ受信状態を返答します。
Directed Queries & The Request Button / ダイレクトクエリとRequestボタン
Requestボタンを使用すると、コマンドの構文を手動で入力することなく、選択中の相手局やグループに対して標準クエリを素早く送信できます:
SNR?/HW CPY?: 相手局にシグナルレポートを要求します。GRID?: 相手局のグリッドロケーターを要求します。INFO?: 相手局の設定された情報メッセージを要求します。STATUS?: 相手局の運用ステータステキストを要求します。HEARING?: その局が過去10分間に受信した局のリストを問い合わせます。
WSPR モード
WSPR(Weak Signal Propagation Reporter)は、極めて低い送信電力で電波伝搬経路を調査・測定するために設計された専用デジタルプロトコルです。WSPR 信号は狭帯域 4-FSK 変調、強力な畳み込み符号、および逐次ファノ(Fano)復号を使用し、雑音レベルを大幅に下回る −28 dB SNR の極微弱信号まで高感度にデコードできます。
2分間サイクルとタイミング
WSPR の送受信は同期された UTC 2分間スロット(162トーンシンボル、110.6秒間のアクティブ送信)で行われます。送信は常に偶数 UTC 分の1秒後(:00, :02, :04, :06...)に正確に開始されます。スペクトログラムの垂直スクロールは、120秒のサイクル長に合わせて滑らかで緩やかなスクロール速度に自動調整されます。
シングルペインアクティビティ表示
WSPR は会話型 QSO ではなくビーコン送信および伝搬観測プロトコルであるため、qFT8 では QSO 左右分割のないフル幅のシングルペインアクティビティログを提供します:
- コールサイン: 相手局のコールサイン。
- DXCCエンティティ: 自動解決された国・DXCCエンティティ名(可変幅)。
- グリッドロケーター: 4文字のMaidenheadグリッド(例:
JN45)。 - SNR: 受信シグナル・ノイズ比(dB)。
- 送信出力: 相手局から報告された送信電力(dBm、例:
37 dBm)。 - 日付 & UTC時刻: UTCでの送信タイムスタンプ(
yyMMdd HH:mm形式)。
自動ビーコン送信と送信比率(Tx %)
WSPR アクティビティ画面の上部ヘッダーコントロール:
- BEACON 切替: 自動ビーコン送信の有効/無効を切り替えます。有効時(明るい緑色で強調表示)、qFT8は設定されたTx %に基づき確定的な時間間隔でビーコン送信を自動スケジュールします。
- Tx % セレクター: 前回の送信からの経過時間に基づき確定的な送信デューティサイクルを設定します(
0% [受信のみ]、10%、20%、25%、33%、50%、または100% 連続)。例えば、20%の設定では前回の送信から10分ごとに確定して送信します(50%= 4分ごと、33%= 6分ごと、25%= 8分ごと、10%= 20分ごと、100%= 2分周期ごとに連続送信)。 - Send ボタン: 直後の2分周期で即時手動送信を予約します。送信完了後は、その周期を基準として確定的な自動ビーコンスケジュールが継続されます。
WSPRnet & PSKReporter スポット自動送信
qFT8 は受信したスポットを世界規模の WSPRnet データベースおよび PSKReporter に自動アップロードできます:
- WSPRnet からスポットをダウンロード: デフォルトで有効になっており、自局のコールサインとバンドのリアルタイムスポットを取得して世界地図上に表示します。
- WSPRnet にレポートをアップロード: 設定 → WSPRnet で有効にすると、受信したスポットが15分間の重複排除とレート制限を経てバッチ送信されます。
- ブラウザで WSPRnet を開く: 自局のコールサインでフィルタリングされた WSPRnet データベースをブラウザで即座に開きます。
独立した ADIF エクスポート
WSPR アクティビティパネルの右上にある EXPORT ボタンをタップすると、現在のセッションで記録されたすべてのスポットを標準の ADIF 形式(.adi)で直接エクスポートして共有・保存できます。
Remote Control Web Server / リモートコントロール Webサーバー
qFT8 includes an embedded HTTP server that allows you to monitor and control the application from any web browser on your network. This is particularly useful for remote operation or as a secondary display.
This is how the Spectrogram/Stations view looks like in the remote control web server:
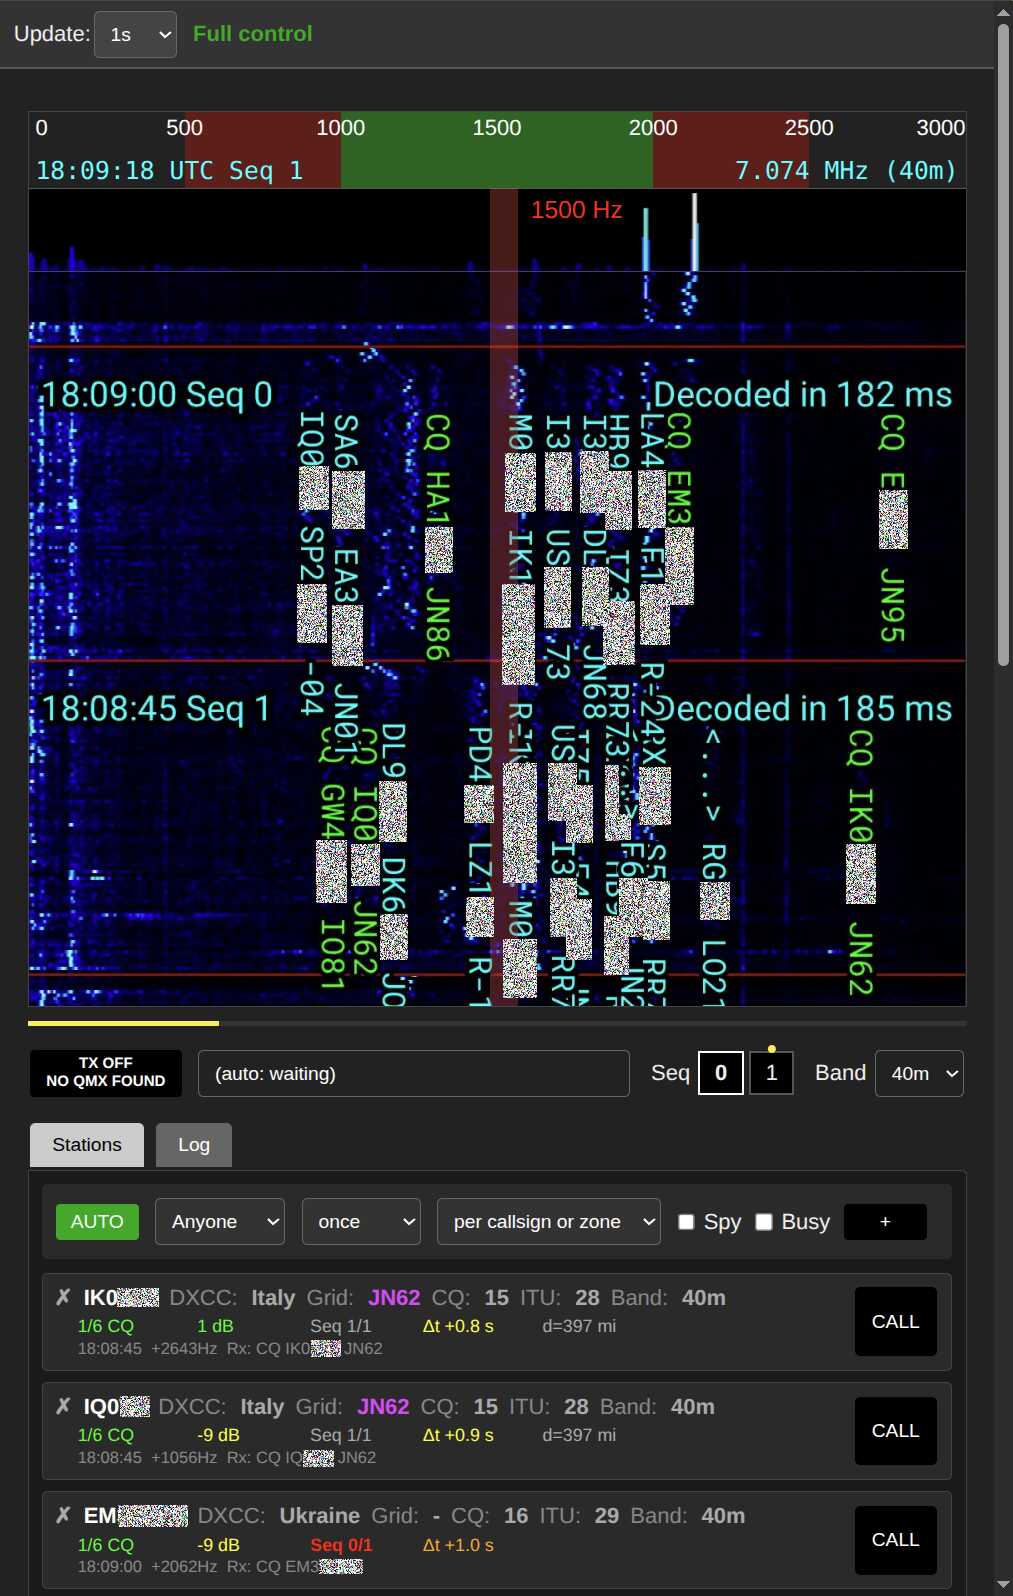
It allows operating with the AUTO button, criteria dropdown, + button to directly add callsigns, and the list of stations with CALL buttons to manually call them.
And this is how the Spectrogram/Log view looks like:
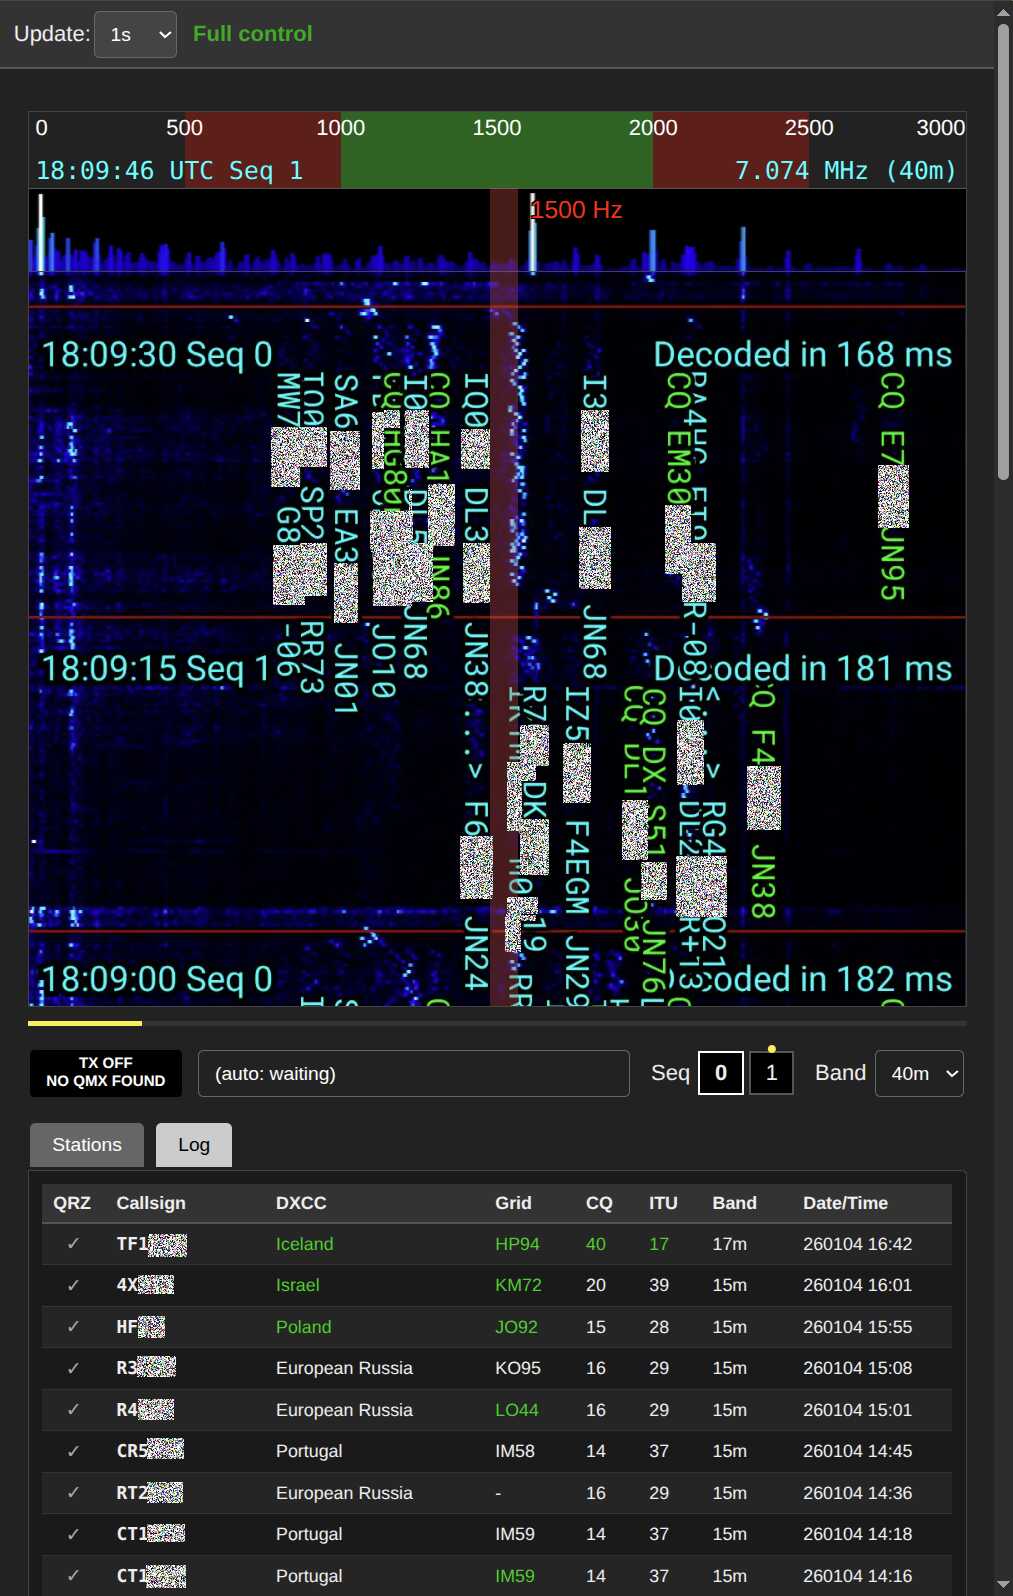
This view shows the most recent log entries.
Network & Connectivity / ネットワーク接続について
The server opens a specific TCP port (default 13497) on your phone. To access it, your devices must be able to "see" each other on the network:
- Local Network: Both the qFT8 phone and your control device (computer, tablet, or another phone) must be on the same Wi-Fi network.
- Router Settings: Some routers have a feature called AP Isolation (or Client Isolation) enabled by default. This must be disabled for devices to communicate with each other.
- Mobile Hotspot Scenario: If you are in the field, you can open a Wi-Fi hotspot on one phone (with internet) and connect the qFT8 phone to that Wi-Fi network. After connecting, close and reopen the web server in qFT8 settings; the IP address shown will then be accessible from the hotspot-providing phone.
- Internet Access: Accessing the server from outside your home (over the internet) requires Port Forwarding in your router settings (mapping the internal IP and port to an external one). Note that this generally will not work over 5G/LTE connections due to carrier NAT restrictions.
Access Levels / アクセスレベル(セキュリティ権限)
You can configure the remote security level in the settings pane:
- Read only: Allows viewing the live spectrogram, active stations, and the QSO log. No actions can be performed.
- Read + Stop TX: Primarily a safety mode. Allows viewing all data and permits disarming the transmitter (stopping TX) in case of an emergency, but does not allow starting TX or changing settings.
- Full control: Grants complete authority over the application, enabling all interactive features.
Security Note: Anyone with access to your network, IP address, and port will have the level of control you have configured. If set to Full control, they could potentially start transmitting using your station.
Capabilities / 機能と操作性
In Full control mode, the web interface offers nearly everything the app UI does:
- Operation Modes: Toggle between AUTO and manual CALL modes.
- Strategy: Change the AUTO criteria (Anyone, DXCC, Grid, etc.) and search constraints.
- Transmission: Manually start/stop TX, choose specific TX messages, and change the FT8 sequence (0/1).
- Frequency & Band: Tap the web spectrogram to move your frequency offset or change the active radio band.
Note: The web UI is designed to remain responsive even if the physical phone's screen becomes sluggish due to RF interference, providing a reliable fallback for control.
Note: The web server will function when the screen is off if the settings to run in background are enabled (the default is to keep running in the background when qFT8 is connected to a transceiver).
Troubleshooting / トラブルシューティング
Android device doesn't recognize the transceiver or it gets disconnected / Android端末がトランシーバーを認識しない、または切断される
This is almost always a hardware connectivity or radio interference issue. USB connections are sensitive to vibration, cable quality, and fluff phone raccoons dwelling in the USB port. Another common cause is that USB OTG may be disabled by default in your Android device (in particular if you are able to receive signal from qFT8 but not transmit and CAT commands don't work even when the device is fully supported, shown in the device dropdown, autorecognized in AUTO mode, etc., this is very likely the cause). また、Android端末側でUSB OTGがデフォルトで無効になっていることもよくある原因です(特に、qFT8で信号を受信できるのに送信できず、対応機種として認識されているにもかかわらずCATコマンドが機能しない場合は、これが原因である可能性が非常に高いです)。
Try:
- Enabling USB OTG / USB OTGの有効化: Check your Android device's settings to ensure USB OTG is enabled (on some devices, OTG is disabled by default and may be located under advanced, system, or additional settings / 一部の端末ではデフォルトで無効化されており、詳細設定やシステム設定内に項目がある場合があります).
- Using a high-quality, short USB cable (using a shorter cable can significantly help), and ensure the port on your phone is clean and the connection is tight.
- If the issues occur specifically while transmitting, it could be caused by radio interference. Adding chokes or ferrites to the USB cable could help. You can also try transmitting in a different band, as some devices are only sensitive to interference in certain bands.
Instead of receiving signal from the transceiver, qFT8 is getting audio from the microphone / 無線機の信号ではなく端末内蔵マイクの音声を拾ってしまう
This indicates that the phone is using its internal microphone because it doesn't recognize the transceiver as an external audio source. The most common causes are:
- The USB cable is not rated for data (charge-only cable).
- The USB adapter (OTG) is faulty or incompatible.
- The cable is plugged in the wrong direction (some cables are directional).
Try: Using a different USB cable, a different adapter, or flipping the cable connections.
Not receiving any signal at all; the waterfall is pitch black / 信号が全く受信できずウォーターフォールが真っ黒
If the waterfall remains entirely black both when the transceiver is connected or disconnected, qFT8 likely lacks the necessary permissions to access audio.
Try: Go to your phone's Settings > Apps > qFT8 > Permissions and ensure that Microphone (or Audio recording) is allowed while using qFT8. Alternatively, fully uninstall and reinstall qFT8 and accept all permission prompts on the first launch.
Signals are visible, but no messages are decoded / 信号の線は見えているのにメッセージがデコードされない
If you see vertical "wiggly lines" in the waterfall (FT8 signals) but no text appears in the Stations tab, perhaps your clock is not synchronized.
Try:
- Ensure you have internet access and reopen the app to trigger an NTP sync.
- If no internet is available, try a GPS sync.
- If that also doesn't work but message tones are visible in the spectrogram, trigger an emergency time sync from the messages, from the time and location settings menu.
- Ensure your radio is actually receiving signals from the air.
If no wiggly stripes appear at all in the waterfall, perhaps the band is closed or your antenna is disconnected/untuned.
Messages are decoded too late / メッセージのデコードが遅すぎる(タイミングのずれ)
The phone processor may be too slow to decode messages on time.
Try: Make sure you switch to Fast decode in the settings, and feel free to move decoding time earlier (e.g. to 13000ms) to create more margin for decoding, at the expense of potentially missing some late messages every cycle.
Error "SWR exceeded threshold — transmission stopped" in the QMX transceiver / QMXで「SWR exceeded threshold — transmission stopped」エラーが出る
If qFT8 shows 0W while transmitting, there are several likely causes:
1. SWR Protection
If the QMX LCD display shows an "S" after the frequency, it means SWR protection kicked in. This means your antenna is not properly tuned for the current band, and the QMX has stopped transmitting to protect its circuitry.
Additionally, qFT8 has its own configurable SWR threshold setting in the app settings. When measured SWR exceeds this threshold, qFT8 will automatically stop transmission to protect your equipment.
- Firmware 1_04_004+: qFT8 automatically resets SWR protection at the end of the cycle.
- Firmware 1_03_000+: You can set "SWR Protection reset options" to Timer or TX->RX in the QMX menu. This allows qFT8 to continue operating without you having to touch the transceiver physically.
- Legacy Firmware: On QMX firmware older than 1_03_000, you must manually reset the transceiver (off/on) or enter and leave the TUNE menu on the QMX to clear the error.
Note: qFT8 waits 1 second after the start of transmission before checking for 0W to avoid false positives while the QMX ramps up. If the QMX recovers and power rises above 1W, the problem indicator clears automatically.
2. Firmware doesn't support power measurement
If the QMX does not show that SWR protection is engaged, and it shows that transmission is happening properly, it may be that the firmware is old and does not support power measurement. Devices like the QDX also do not support power measurement. qFT8 does not know how to interpret 0W and it gets confused.
Try: If your QMX firmware is old, update it. If you are using a QDX, there is no way around this.
3. Audio signal not reaching the QMX
If the QMX does not show the "S" icon after the frequency, then it is likely that the transceiver is simply not receiving a suitable audio signal from the phone. The volume may be too low (not enough signal) or too high (clipping/distortion causes the QMX to reject the signal).
Try: Check the signal indicator on your QMX. A single dot means no audio, two dots mean there's audio but it's not loud enough. Go to the FT8 Settings section and adjust the "Set system volume to [X] when transmitting" setting to different values (e.g. 70%, 80%, 90%) to find the right level for your device.
4. SWR is low during tuner but SWR protection kicks in
This seems like SWR is spiking or peaking at high power for some instants during actual transmission, which triggers SWR protection. This is an indicator of a finnicky antenna (e.g. magloops), a bad cable, a bad connection, or an issue in the setup.
Try: adding common-mode current chokes (such as ferrite beads) should decrease common-mode current.
What is the qFT8 Android notification? / qFT8のAndroid通知とは何ですか?
This notification allows qFT8 to continue processing audio and managing QSOs when you minimize the app or turn off the screen.
- By default, it triggers automatically when a transceiver is plugged in.
- You can disable this in qFT8 settings, but qFT8 will stop working in the background.
- You can press STOP in the notification to fully close qFT8.
qFT8 stops working when the screen is off / 画面消灯時に動作が停止する
Some Android manufacturers implement very aggressive battery optimizations that may kill background apps even if you granted the initial permissions.
Double check that you granted the permissions: Go to your phone's Settings > Apps > qFT8 > Battery and select "Unrestricted" (or "Don't optimize").
Buttons act weird or the screen is unresponsive during TX / 送信(TX)中にボタンの反応がおかしくなる、または画面がフリーズする
This is caused by RF Interference (RFI). If your antenna is close to the phone or the cable is poorly shielded, the radio energy can interfere with the touch digitizer.
- Tip: Use a shielded USB cable or clip a ferrite bead onto the cable.
qFT8 looks different than the screenshots in this manual / qFT8の画面がこのマニュアルのスクリーンショットと異なって見える
The app's user interface is occasionally updated, so some minor visual elements may have changed since the screenshots were taken. However, if significant parts of the UI are completely missing or the colors look heavily altered (e.g. the yellow progress bar, the sequence selectors, etc.), your phone's system dark mode may be incorrectly overriding and messing up the application's color palette.
Try: If your system's dark mode is causing issues, you can try temporarily disabling it or adding qFT8 to its exclusion list to restore the correct design.
qFT8 says "NO RADIO" even though transceiver is connected
The issue is likely that you didn't grant the permissions to connect qFT8 to the transceiver. Sometimes this happens because you tap somewhere out of the permission dialog and the dialog closes.
Try: Disconnect and reconnect the transceiver, this should trigger the prompt again. For comfort, mark the option "Always open qFT8 when transceiver is connected" so you never hit this issue again.
qFT8 shows distance in miles and I want it in kilometers (or vice versa) / 距離の表示をマイルからキロメートル(またはその逆)に変更したい
This comes from the operating system locale (i.e. language selection).
Try: Switching that configuration to the right country (e.g. English (United States) for miles, English (United Kingdom) for kilometers) will fix it.
qFT8 shows low transmission power (e.g. 0.1W) when transmitting at >10W in QMX
This is a known bug in the QMX firmware (up to at least 1.03.000). If you are using the 2x4 mods (e.g. in a QMX+) and your transmission power exceeds 9.9W, the radio's formatting wraps around. For example, 10.1W is reported by the transceiver to the app as 0.1W over the secondary CAT protocol.
Try: There is no workaround inside qFT8, as the app is directly displaying the value it receives. You can safely ignore this display error or reduce your power below 10W to keep the readings accurate until this bug is patched in the transceiver firmware.
Cannot export ADIF logs to the local storage using Share / 「共有」機能でADIFログを端末のローカルストレージにエクスポートできない
The default Share method relies on the native Android share mechanism to export logs. Sometimes, your device's built-in file sharing menu does not offer a direct option to save to your local filesystem.
Try: Change the export Method to Local save in the settings. This uses the Android file picker to directly save the file to your local storage without relying on the sharing menu.
qFT8 fails to decode some messages / 一部のメッセージがデコードされない
Try: Enable deep decode in the settings. Deep decode does recursive decoding and is able to decode more messages when the band is busy, at the expense of extra processing power. Keep an eye on the spectrogram: if deep decode time is too high in your device (e.g. greater than 1 second) and the app is not able to make decisions on time, disable deep decode.
qFT8 hangs or behaves strangely / qFT8がフリーズする、または予期せぬ動作をする
If this happens only during transmission, it is likely extreme RFI as mentioned above. If it happens at other times, please scroll to the bottom of the Settings tab and use the "Email me to report issues and bugs" link.
↑ 目次へ戻る